User Code Setup
If you haven't already done so, please read the System and Security Administrator Program Overview.
Summary
The options available for setting up users will vary based on how you use the software and the specific features you license. While this topic discusses all user code options, it may be that some are not available for you. There are, for instance, differences between provider based clinics and employer based clinics. In addition, your system setup might not include certain features such as Provider Charting, and as a result, options related to those features will not be available.
The program provides a safe, secure tracking of confidential patient information by requiring that every user have an individual user access code (a.k.a. user code, user ID) with password protection and with access rights specific to that user's job. Before a user can log into the system, that user ID and a password must be established by your Security Administrator
Only users designated as Security Administrator can create user codes and restrict or allow access to various parts of the software. The rights you will provide a user will depend on the user's job, the number of staff employed by the organization, and the organizations procedures. These rights are controlled in the individual User Code record.
This topic describes all of the User Access Rights, and how to set them up in the software.
How to Add a User Code
On the Home Nav Bar, click Setup/Admin.
On the Setup /Admin menu, click Admin/Security.
On the Setup and Administration sub-menu, click User Codes.
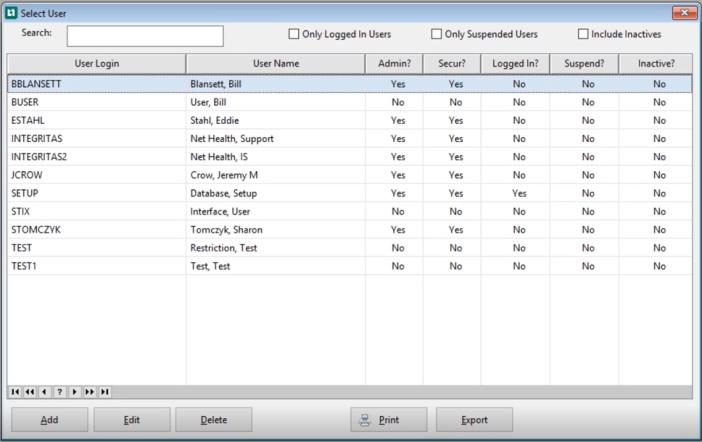
The Select User window displays.
Add a User Code
Click the Add button.
Click the Add button.
The Add NEW User Account window displays:
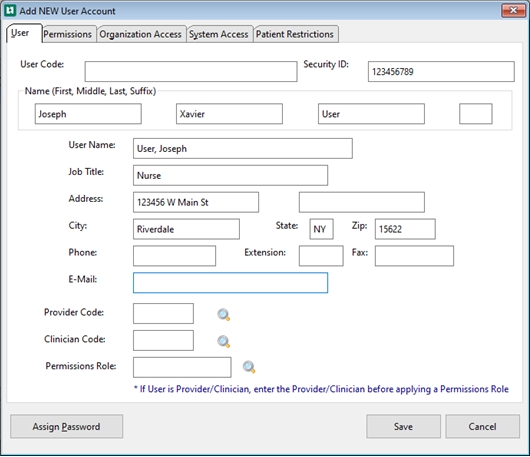
User Tab
- Enter a User Code. This is required.
-
Enter the names fields.
- Enter the Security ID: A client defined ID code that will further Identify users for a Privacy and Security Audit export file.
-
When you move to the User Name field, the program will automatically copy in what you entered in the names fields above. A User Name is required.
-
Optionally, enter title, address, and contact information.
-
If this user is a Provider or a Clinician who will use the application's Provider Charting, click the magnifying glass beside the appropriate field. Then, search for and select the correct Provider or Clinician. (The Provider or Clinician record must already be created.)
-
When you select a Provider or Clinician, a Credentials button will be displayed to the right for your information. Clicking it will show all of this user's credentials and medical identifiers, such as NPI, DEA number, etc.
-
If this user has been granted access to charting notes, a Signature button will be displayed. You can capture her electronic signature using a Topaz signature capture device. Once captured, her signature can be attached to charting notes and other forms at a later time, by entering her Signature Authorization password.
-
Permissions Role: When adding or editing a User, select a predefined Permission Role to have the system automatic set permissions. Click the Magnifying glass to display the following window containing the active Permission Roles:
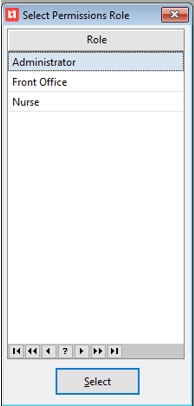
Choose a Permissions Role and click Select. The predefined permissions associated with that role will now apply to your new (or changed) User ID.
If you need to add, edit, or delete a Permissions Role, see the topic called Permissions Role.
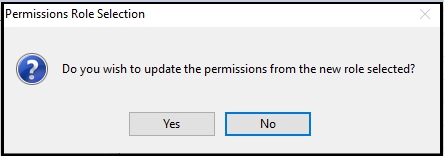
When editing a user and a Permission Role is selected, the application will prompt the user and ask if the permissions for that user should be updated.
-
Click Save to complete the process or Cancel to exit without your changes.
Managing User Access Roles
There are two methods by which a Security Administrator controls the level of access a user can have in the application. The first is to select the functions that the user will be allowed to access, and the second is to grant the degree of data access within each functional area. By "functions", we mean the areas of the application , such as scheduling, visit entry, charting notes, etc. By "data access" we mean whether the user has full or complete access, read only access, or no access to certain types of data.
-
Full Access grants the right to view, add, change or delete information.
-
Read Only Access grants the right to view any of the related information, but not to add, change or delete anything.
-
No Access grants the ability to select a record (such as a patient or company record) for use, but the user can not see the details of that record. For example, a user with No Access to patient medical records could still select a patient to log her in for a visit, but would not be able to see any of the patient's medical data. To manage these two types of access control, the software employs a pre-defined set of access "roles" that are carried in each User Code record. (Note: another type of role exists in Net Health Employee Health and Occupational Medicine whose purpose is to facilitate inter-user communication and messaging. This login or messaging "role" is a separate topic, addressed in the next section.)
The access permission roles available to a particular client depend upon the type of Net Health Employee Health and Occupational Medicine licensing the client has. For example, Net Health Employee Health and Occupational Medicine clients will always have Clinical and EMR Charting roles, whereas other clients will have Clinical roles but may not have EMR Charting roles. Clients who have licensed the Billing and Receivables module will have Billing roles to choose from. This topic will describe all of the roles available in Net Health Employee Health and Occupational Medicine .
To set the functional and data level access of a User Code record, click the PERMISSIONS tab. When you do this, you will see several "sub-tabs": Administrative, Tables, Clinic, EMR Charting, Billing and HIPAA Privacy.
To set up or maintain user codes, you must be a Security Administrator. This requirement aligned with best practices for HIPAA Security Standard compliance. See How to Assign Security Administrator Rights to a user.
Setting Organizational Access
In addition to specifying the level of functional and data access for a user, the Security Administrator can establish defaults for and restrictions to the clinic locations and company (employer) entities to which a user can have access.
For example, in a multiple location organization, a user can be restricted to or excluded from entering or viewing data for services performed at a particular clinic location. Similarly, the default login clinic can be set up to make sure the user enters clinical data tied to his or her usual clinic location.
For providers in an Occupational Health or hospital Employee Health Department setting, company (employer) access becomes an important issue. Users can be restricted to or excluded from access to certain employer data, either at the level of individual company code or by inside company versus outside company. Your own organization is known in the software as an "inside" company, and your organization's employees are "internal" employees. All other organizations (i.e. your client employers) are known as "outside" companies, and their employees (your patients) are considered "external". You can set up restrictions to prevent a user who works in your occupational health clinic from viewing or entering data for your own employees, for example. The ORGANIZATION ACCESS tab includes three sub-tabs, all discussed below: Clinic Access, Company Access and Other Location Access. For enterprises which license multiple business entities, there is a fourth tab, Business Entity Access.
Planning User Access
There are innumerable possible combinations of access parameters that can be applied to a user account. While there is a logic to how the various settings function, it can sometimes take a bit of thinking to determine exactly what access to provide a particular type of user. It is probable that most of your users will fall into one of several categories which have standard settings, such as front desk users, clinic users, billing staff, etc. You might want to keep a record of the settings for these standard types to make it easier to set up new users over time.
Here is an example. One of the most restrictive, and therefore important, types of access is that used for front desk staff. There are certain functions they need to perform, but it is often the case that they should not have access to any medical information. To provide this relatively restricted access, a user account can be set up with these entries on the CLINIC sub-tab of the PERMISSIONS tab in User Code Setup:
-
No Access to Clinical or Workers Comp data.
-
Full access to Scheduling.
-
Visit Logging/Check-in box selected.
-
No other boxes marked on the CLINIC tab.
When a user has just these rights, the program will hide all access to the problem, medical (diagnosis), results, charges, orders and patient chart areas from within the visit, and it will also hide medical or setup access from the launch pad. It will be possible to schedule appointments, and to check patients in and out. Patient demographics will be accessible.
Managing User Account System Access
From time to time the Security Administrator may be called upon to monitor or manage the status of a User Code (Account). This can include resetting the user's password in the event that the user has forgotten it, deactivating a User Code so that the user can no longer log into the system (discussed above), setting up a special schedule for permitting this user to log in only at certain times of the day, checking to see if the user is currently logged on, and viewing the user's access history log.
With the exception of the first activity, each of these is accomplished from the System Access tab.
What Do You Want To Do?
-
Access the User Code Setup window
-
On the Home Nav Bar, click Setup/Admin.
-
Click Admin/Security.
-
Click the User Codes button.
-
At the [Select User] window, click Add to add a new user, or Change to update an existing user account. The Add New User Account window opens when you add a new user.
-
-
The USER tab includes basic demographic information about the user.
-
Access to various modules and functional areas of the software is provided by assigning specific PERMISSIONS to each user.
-
Access related to locations and groups of employees is granted or restricted by specifying each user's ORGANIZATION ACCESS.
-
Special requirements of the HIPAA Security Standard allow the Security Administrator further control over SYSTEM ACCESS.
-
A user's access to the records of specific patients can be restricted on the PATIENT RESTRICTIONS tab.
-
Change or assign a user password
The Security Administrator can reset the user's password at any time, in the event that the password is forgotten or compromised, by clicking the Assign Password button. Whenever you encounter this situation, you will need to assign the user a new temporary password to use. Depending upon the password strength and history rules established in the Administer Security function, you will need to assign a completely new password that does not violate any of your password rules.
For users who use electronic signatures, you will need to enter a separate password for that purpose. The fields for entering this will only appear for users who have been given access rights that allow it.
Type and re-type each password to confirm, and then click OK to save the new passwords in the User Code record. Note that passwords are never viewable on the screen, and all passwords are saved in a hashed format that adheres to the 3DES standard.
Resetting a password will automatically require that this user change his or her password the next time the user logs into the program.
This status is shown on the SYSTEM ACCESS tab:
As you can see above in the Password group on the left side of the screen, the date that the password was last changed displays, as is the Expiration Date for this password, (calculated from the last change date based upon the password change frequency established in the Administer Security function), and the Require Change at next log in check box is marked.
While neither advised nor consistent with HIPAA standards, the program will allow the Security Administrator to flag a User Code so that the password never expires.
The Permissions Tab
The PERMISSIONS tab has six or seven sub-tabs, as noted below. Click each item for detailed explanation of the options available on that tab.
-
ADMINISTRATIVE sub-tab
This tab provides General Administrative Rights for the User. Access to various program functions is granted by yes/no check boxes. Four options are available on this screen:
-
System Administrator: System Administrators typically establish settings and groups that are not frequently changed. Check this box to grant access to the Admin.exe program, for handling special administrative functions required to operate the software. System Administrator access is required to set up fundamental System Parameters (the main company and clinic, the primary patient identification method, fax and email settings, data file locations, etc.). In addition, only a System Administrator can set up higher organizational levels (regions, districts, campuses) for those larger organizations that need these reporting groups. Although not a right that is exclusive to the System Administrator, this user can also set up employer organizational subgroups (divisions, departments, job classes and work locations). Grant System Administrator status to very few individuals.
-
Security Administrator: The Security Administrator is a required role of the HIPAA Security Standard. Check this box to grant access to the Admin.exe program for setting up User Account Codes and Security Parameters, such as the level of detail that HIPAA security compliance requires: audit history of who added/changed/deleted records; how long audit logs will be kept, etc. In addition, the Security Administrator maintains control over HIPAA Audits and is responsible for resolving log-on conflicts, should they arise. Limit this role to only a very few individuals! This user could also be a System Administrator, although not necessarily. If these are separate roles in your organization, each user will only be able to access the relevant functions in the Admin program, even though they each can open it.
-
Information Systems: Check this box to enable the user to import, export or archive data. This role is also required for executing and managing the Hospital Interface modules. Limit this function to a very few individuals.
-
Patient Portal Profile Access: Allows this user to set up access to the patient portal for specific patients.
-
Messaging Role: The Messaging system allows you to send messages to other users within the software. This is like an internal email system, especially for business. In addition to sending to an individual, you can be sent to a group. We call these groups Roles. For example, there might be a Role called "Front Desk". In the user codes for all Front Desk employees, you would set the Usual Login Role to Front Desk. When someone selects the Front Desk Role to receive a message, it would be copied to everyone assigned this role.
-
SureScripts Electronic Prescription Message Administrator: This role is available for Net Health Employee Health and Occupational Medicine clients only. It should be granted to one person only. The person granted this access is allowed to work with prescribing providers to manage the messaging and interface queue for electronic prescribing through the SureScripts Network.
-
-
TABLES sub-tab
This tab provides maintenance rights for the master tables. Access levels are specified to allow Full Access, Read Only Access or No Access for each of the tables noted below.
-
Demographics:Employee/Patient demographics includes all demographic data such as name, SSN, MRN, address, etc. Without access to Demographic data, a user may select an employee or patient, but may not set up or maintain employee demographic records.
-
Clinics: This table includes your Clinic master table data, including the clinic name, address, schedule, etc. From the Setup/Admin on the Home Nav Bar, it is located on the CLINICAL SETUP sub-tab. For larger clients who track Business Entities (groups of clinics), this checkbox also grants access to maintaining Entities.
-
Employers: This table includes the Employer (company) files for client employers, including demographics and company contacts. Checking this option does not include the ability to set up or maintain employer protocols or the ability to establish or maintain pricing. Like the System Administrator, this user can also set up and maintain divisions, departments, job classes and work locations. From the Setup/Admin on the Home Nav Bar, it is located on the ENTITY TABLES sub-tab.
-
Visit Protocols: This function grants or restricts the rights to set up Generic Visit Protocols, Company-Specific Visit Protocols and Payer Protocols. This access level may be granted without giving the user the rights to set up the Companies or Payers, and without granting access to setting up other master code tables. In that case, company protocols can be viewed and modified from the Appointment Calendar. They may be viewed, modified, and added from the Encounter button on the visit record.
-
Payers: This table includes third party payer demographic information, (insurance carriers, Workers' Comp TPAs, MCOs, labs, and contract [drug screen] TPAs) including contacts. Like Employer access, it does not include the ability to maintain protocols or pricing. From the Setup/Admin on the Home Nav Bar, it is located on the ENTITY TABLES sub-tab.
-
Providers:Providers, Referral Providers and Billing Physicians. This option includes the ability to set up Provider Networks and Medical Groups. From the SETUP tab on the Home Nav Bar, it is located on the ENTITY TABLES sub-tab.
-
Master Codes: Enables the user to create, modify or delete all master Medical Codes, Medical Activity Templates and Incident / Safety Codes. From the Setup/Admin on the Home Nav Bar, it is located on the CODE TABLES sub-tab. For Billing users, checking this option also allows maintenance of the special Billing Adjustment and Denial/Reason codes, located on the BILLING SETUP sub-tab, from the Setup/Admin of the Home Nav Bar.
-
Fee Schedules: All fee schedules and pricing, including override pricing for individual billing accounts, provider network fee schedules and services contract fee schedules are governed by granting full access to these tables. From the Setup/Admin on the Home Nav Bar, all master fee schedules are located on the BILLING SETUP sub-tab.
-
-
Clinic sub tab
The CLINIC sub-tab governs Scheduling and Clinical rights for this user, through the use of Yes/No check boxes. Some access levels are specified for Full, Read Only or No Access.
-
Clinic Manager Access: If checked, this box grants access to all clinic functions and all types of clinical information, including the entire patient medical chart (aka Employee Chart). A clinic manager automatically has full access to those portions of the program affecting medical data entry, Workers' Comp and case management, scheduling, visits, incidents, charges and sensitive information (i.e. activities requiring HIV and Drug Screen level security rights). The clinic manager also has certain rights that are not available to most users. This includes:
-
-
Access to the UTILITIES tab which includes the Patient Merge, Company Merge, and Recalc Next Due Dates functions.
-
The ability to change notices (letters).
-
If the flag requiring this is set in Billing Parameters has the ability to reduce or delete a co-payment from a visit after the end of visit report has been printed.
-
Access to making changes to Clinic System Parameters and Billing System Parameters.
-
Access on the CLINIC Setup/Admin of the Home Launch Pad to the Clinic Management and the Profiles & Protocols sections
-
-
Clinical/Medical Access: This option governs whether the user has any access to medical sections of the program, including medical history, visits, charges and the entire patient medical chart (aka Patient Chart). Automatic Full Access is granted to users designated as Clinic Managers (see above).
-
Work Comp/Cases: This access determines whether the user has access to Workers Comp Case Management and other case-related information. In employer-based Net Health Employee Health and Occupational Medicine user organizations, people with access to Workers' Compensation information will be able to see salary information, if the information is included in the employee demographic records. This access also includes access to statistical reporting. Automatic Full Access is granted to users designated as Clinic Managers (see above).
-
Scheduling Access: This option grants access to schedule records and reporting. If the Block Appointment Scheduler module has been licensed, it allows access to the appointment scheduling function. Automatic Full Access is granted to users designated as Clinic Managers (see above).
-
Visit Logging/Check-In: This option allows the user to log new visits (i.e. perform check-in and check-out functions). A user may be granted this access without access to other clinical functions. For example, this option could be granted to a reception desk user in conjunction with Scheduling access, to allow the user to schedule patients, check them in and check them out. Automatic Full Access is granted to users designated as Clinic Managers (see above).
-
Charge Entry/Check-Out: The Charge Entry/Check Out check box, only has an effect if the user has No Access for Clinical Data Access. In that case, checking this box allows the user to enter charges on the visit, although the RESULTS tab on the charge record will be unavailable since that involves clinical data.
Automatic Full Access is granted to users designated as Clinic Managers (see above). -
Safety/OSHA Log: This option grants access to Incidents data and Statistical Reporting, but restricts access to case management and/or salary information. This option is designed to allow safety officers to record and review injuries, illnesses and exposures, as well as OSHA related information, without having access to other clinical module information, unless such access is granted under another option above. Automatic Full Access is granted to users designated as Clinic Managers (see above).
-
Charting Notes: This option gives access specifically to charting notes. The level of access granted by this option (i.e. Full, Read Only or No Access) depends on what was selected for Clinical/Medical access (as above). This designation is established to protect extremely sensitive patient information. Access to Charting Notes is required for obtaining any level of access to Provider Charting. Automatic Full Access is granted to users designated as Clinic Managers (see above).
-
HIV Security: This options grants access to any medical activity (i.e. procedure) or scanned image that has been designated by the clinic manager as requiring HIV Access level security. The level of access granted by this option (i.e. Full, Read Only or No Access) depends on what was selected for Clinical/Medical access (as above). This designation is established to protect extremely sensitive information, typically in employer-based clients. It is independent of the Drug Screen level access, so a user may be given one access level, but not the other, or may be granted access to both HIV level and Drug screen level medical activities. Automatic Full Access is granted to users designated as Clinic Managers (see above).
-
Drug Screen Security: This option allows access to the results of any medical activity or scanned image that has been designated by the clinic manager as requiring Drug Screen level security. The level of access granted by this option (i.e. Full, Read Only or No Access) depends on what was selected for Clinical/Medical access (as above). This designation is established to protect sensitive information, typically in employer-based organizations. It is independent of the HIV level access, so a user may be given one access level, but not the other, or may be granted access to both HIV level and Drug screen level medical activities. Automatic Full Access is granted to users designated as Clinic Managers (see above).
-
Personal Health & Wellness: If the box is checked, the clinical data for all visits can be seen. If it is not checked, this type of data is restricted from view. If the user has Clinical Data Access, this box is checked by default. Additionally, if a user has Check-in and Check-out capabilities, the Personal Health and Wellness checkbox has no effect the user can still see all of the visit information. This is a clinical health data access function only, and does not apply to billing or the EMR charting areas.
- Approve OSHA Logs for Submission: Check this box to allow the logged-in user to approve OSHA 300A logs for submission.
-
Confidential Info Security: CONFIDENTIAL NOTES section has been added to the patient record which is viewed on a separate tab from both the Patient Chart and the Patient Demographics windows. This tab is only available to users with this option checked.
- Billing Notes: If this box, users will have access to Billing Notes. The system has a central repository of Patient Billing and Collection Notes that can be accessed and updated from both the Billing and Clinical programs. For more information, please see Centralized Billing and Collection Notes.
- EAP Access Security: Check this box to grant users access to Employee Assistance Program (EAP) functions and fields.
- Inactive / Re-Activate Document Images: Check this box to grant users the authority to either inactivate or re-activate a document image. For more information, please see Using the Scanning and Image Capture Function.
- View Inactive Documents: Check this box to grant users access to view documents that have been inactivated from the system.
- Release Results to Portal: Check this box to allow a non-provider user to release results for labs and/or radiology results. If the user has a provider linked to them this will be checked and grayed out.
-
Once a Charting Note has been locked, no one, regardless of the access level indicated here, will be able to make changes.
-
Reporting sub tab
-
Net Health Employee Health and Occupational Medicine has a set of reporting access rights in the clinical reporting area that can be turned on or off for each user. Clinic managers will have full access rights to all reports. However, other users can be granted individual access rights to the following reporting groups:
-
Visit Reconciliation
-
Cash Reconciliation
-
Letters (Reminders)
-
Account Management (Revenues and Collections)
-
Clinic Management (Scheduling, Visits and Referrals)
-
Surveillance
-
Injuries and Illnesses
-
Case Management
-
Exposures
-
Employer Reporting (Employer Reporting tab in the Provider Practice launch pad)
-
Department Reporting (Departmental Reporting tab in the Employee Health launch pad)
-
Special and Ad Hoc (Wizards)
-
Clinical Management (Query, Quality, Meaningful Use and Quality Measures)
-
To preview this feature:
-
From the Setup and Administration sub-menu, select a user to configure their user code security.
-
Select the PERMISSIONS tab.
-
REPORTING tab creates security rules for reporting.
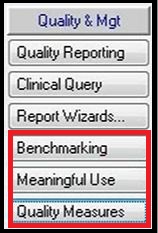
If all of the selections are unavailable, that indicates the Clinic Manager Access within the CLINIC sub-tab has been checked. This will allow the user in question to have access to all of the reports. Specifically, 3 additional reports (highlighted in red below) are only available with this option selected:
-
If Clinic Manager Access is not selected, than each report becomes an option from the NAV bar, the Provider Reporting Launch Pad, and the Employee Health Reporting Launch Pad.
-
As an example of how this feature works, several reporting options are selected.
-
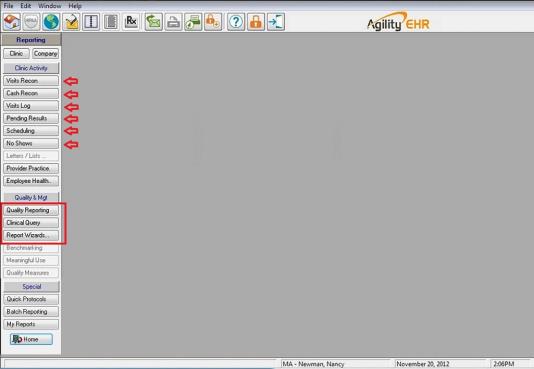
Once the selection is made and the user is logged into the software, select REPORTING and notice that the NAV bar now has a number of reports available as a result of the selections made from the user security roles selected for reporting above.
-
The three reports under Quality and Mgt. are a result of selecting Clinical Management, Queries, and Quality.
-
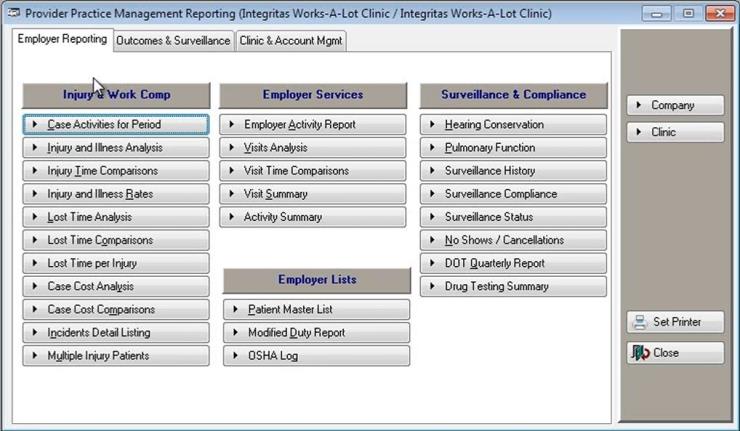
If Provider Practice is selected, the Reporting Launch Pad will reflect the choices made in the user security roles for reporting.
-
If Employee Health is selected, the Reporting Launch Pad will reflect the choices made in the user security roles for reporting.
-
-
BILLING sub-tab
The Billing Tab governs Billing module rights for the User through the use of Yes/No check boxes. Some access levels are specified for Full, Read Only or No Access.)
-
Accounting Manager: This option grants access to all the billing and receivables functions, including setting up fee schedules, billing accounts, pricing, adjustment codes, user limits for adjustments, etc. This option does not of itself grant access to setting up other codes within the software, such as medical codes.
-
Billing Module Access: This option grants No Access, Full Access, or Read Only Access to the Billing and Accounts Receivables module. Any use of the Billing and Accounts Receivable module requires that this box be set to Full Access. Automatic Full Access is granted to users designated as Accounting Managers (see above).
-
Invoicing: This option grants access to the charge processing and invoice generation functions. It DOES NOT include posting invoice batches to the open Accounts Receivable. Automatic access is granted to users designated as Accounting Managers (see above).
-
Invoice Posting: This option grants the ability to post invoice batches to the Accounts Receivable. Automatic rights are granted to users designated as Accounting Managers (see above).
-
Cash Application: This option enables the user to enter payments and apply cash to open invoices in the Accounts Receivable. It DOES NOT include posting the cash to the Cash (Credit) file in the Accounts Receivable. Automatic access to all cash and collections functions is granted to users designated as Accounting Managers (see above).
-
Cash Posting: This option grants the rights to post cash batches to the Accounts Receivable. Automatic rights are granted to users designated as Accounting Managers (see above).
-
Collections: For clients who have licensed the Collections Manager, this option grants access to use that module. Automatic access is granted to users designated as Accounting Managers (see above).
-
Adjustments: This option enables the user to make adjustments to an invoice during the cash application process (to write off an open balance, for example), up to a specified amount, if such amount has been specified as a Billing system parameter. Also allows entry of Debit and Credit Memos. Automatic access to adjustments functions is granted to users designated as Accounting Managers (see above). This does not give the user the ability to use the Adjust Invoices button in the Billing Program.
-
Adjustments Posting: This option allows adjustments and write-offs to invoices using the Adjust Invoices button in the Billing program. Automatic access to adjustments functions is granted to users designated as Accounting Managers (see above).
If you want a user to be able to apply adjustments during the cash application process AND by using the Adjust Invoices button in the Billing program, check both the Adjustments and the Adjustments Posting boxes.
-
-
SALES sub-tab
-
Sales Manager: This option grants access to all information in the Sales & Profiling Program, for all sales reps. Without this access, an individual user (sales rep) can see only those accounts assigned to him or her. A Sales Manager can also set up other Sales Rep records.
-
Sales Module Access: This option grants the user No Access, Full Access, Read Only Access to the Sales and Profiling Manager.
-
-
HIPAA PRIVACY sub-tab
For Net Health Employee Health and Occupational Medicine, or clients who have licensed HIPAA Guard, this tab specifies the level of access allowed this user for documenting HIPAA privacy related actions. Users can be granted Full, Read Only or No Access to privacy notices and consents, authorizations, disclosures, disclosure accounting, restrictions, patient access requests, patient amendments and complaints. If granted HIPAA Security Administrator or Privacy Officer access, the user has full control of all HIPAA privacy documentation functions. The default Covered Entity and POS (place of service) logins specify the name covered entity and clinic location that will be default for this user when entering HIPAA privacy documentation in the software.
-
EMR sub-tab (only available to clinics using the Net Health Employee Health and Occupational Medicine EMR)
Designate providers and clinicians
If you license Net Health Employee Health and Occupational Medicine Provider Charting, your [Change User Account] window will be slightly different. At the bottom of the USER tab there will be buttons for entering a Provider Code or a Clinician Code. One of these must be entered for the user to have access to the Provider Charting Templates module. Clicking the Credentials button will display the IDs and license numbers for the selected user.
SureScripts administrator
If using SureScripts electronic prescribing, a user must be designated as the SureScripts administrator. All messages from the SureScripts network will be directed or copied to this user. The SureScripts administrator is designated by checking the following box, found at the bottom of the ADMINISTRATIVE sub-tab of the PERMISSIONS tab:

Provider Charting access
The PERMISSIONS tab will have an EMR sub-tab (only if the account is linked to a provider or clinician.)
-
Patient History & Vitals Entry: This option grants access to recording the chief complaint, HPI, Patient History (PMH), and Review of Systems (ROS) in the Provider Charting area. This includes the ability to record vital signs, and, if the Medical Director so allows, other clinical results and procedures. Typically, this level of access is granted to RN's and medical assistants. The EMR Parameters include options to allow clinicians with this access to also enter on the PROCEDURES and/or RESULTS tabs.
-
Patient Exam & MDM Entry: This option, only available for providers, grants access to charting the results of examination, clinical assessment, and other medical decision making, such as orders, referrals, etc. This access will always be granted to physicians, and is typically granted to mid-level providers such as NP's, PA's and physical therapists.
-
Prescribing Provider Access: This option, only available for providers, grants access to the administration and ordering of medications, as well as setting up the Medication Code table. This access will always be granted to physicians, and is typically granted to mid-level providers such as NP's and PA's, when licensed to prescribe medications.
The Provider Charting module is licensed for a certain number of concurrent users. A user who has only the first two boxes checked does not count as a licensed user. Granting Prescribing Provider Access makes this a licensed user who does count towards the limit. Be clear that the licensing limit does not apply to the number of providers given this level of access, but rather, the number using the Provider Charting at one time. That is, if your license allows 3 prescribing physicians, you could give 10 providers that access, but only three could be using Provider Charting concurrently.
-
EMR Template Setup Access: This option, available for providers and clinicians, grants access to setting up Charting Templates, Wizards and Rapid Charts. In order to maintain quality standards and consistency in EMR charting this access should be restricted to a relatively few users. Typically, this will be a small number of senior level physicians and, since most physicians are relying on other users to make the changes to the Templates and Wizards, one or two clinician's working under the providers' supervision. While access should not be spread too widely, neither should it be restricted to a single individual. Make sure more than one person is trained and practiced in Provider Charting setup.
-
If this user has been granted access to charting notes, a Signature button will be displayed. You can capture her electronic signature using a Topaz signature capture device. Once captured, her signature can be attached to charting notes and other forms at a later time, by entering her Signature Authorization password. A second password is required for attaching electronic signatures.
-
The ORGANIZATION ACCESS Tab
-
CLINIC ACCESS sub-tab
When a user first logs into the system, he or she will be "pointed to" or located at the system default Clinic location. This tab allows the Security Administrator to override this default, as well as restrict or exclude access to a specific Clinic location.
-
Restrict User to Clinic: Restricts user to only the selected clinic.
-
Exclude User from Clinic: Grants access to all clinics except the selected clinic.
-
Default Login Clinic: Ensures the user is automatically logged in to the selected clinic when s/he logs onto the system. If the Restrict User clinic is selected, the program will automatically set this clinic to be the default login clinic. (Note: The benefit of having a default log in clinic is that the program will automatically track all visits entered by the user as having been seen at that treatment location.)
If the user goes to another clinic, he or she will need to select that clinic prior to entering any data! If the user forgets to do this, a correction to the entity may be made, but it would be tedious, to say the least, to do this for an entire day's visits!
-
-
Company Access sub-tab
When a user first logs into the system, he or she will be "pointed to" or located at the system default Company location. For clients who track Occupational Health information for multiple companies or organizations, this tab allows the Security Administrator to override this default, as well as restrict or exclude access to a specific set of Company employee records.
-
Restrict User to Company: Restricts user to only the selected company.
-
Exclude User From Company: Grants access to all companies except the selected company. (Useful in a provider-based clinic that provides services to the employees of a related health system, and/or to the clinic's own employees.)
-
Default Login Company: Ensures the user is automatically logged in to the selected company when s/he logs onto the system. If the Restrict User company is selected, the program will automatically set this company to be the default login company.
-
Allow User Access To: All Employees, Inside Employees (your own employees), Outside Employees (other companies employees). This is only relevant for clients who are tracking both internal and external employees (both Hospital Employee Health and Provider Occupational Health, for example).
-
-
OTHER LOCATION ACCESS sub-tab
For larger organizations with many Clinic sites, or large health systems tracking Employee Health for many campuses, this tab allows the Security Administrator to restrict a user to or exclude a user from a particular Region, District, Campus and/or State.
-
Restrict User To: Restricts user to only the selected organizational entity: Region, District, Complex/Campus, State. When this option is used, the user can only see clinics and companies in the designated Region, District, or Complex.
-
Exclude User From: Grants access to all entities except the selected organizational entity: Region, District, Complex/Campus, State. When this option is used, the user can not see clinics and companies in the indicated Region, District, or Complex.
-
-
BUSINESS ENTITY ACCESS tab
Clients who license Net Health Employee Health and Occupational Medicine or Net Health Employee Health and Occupational Medicine to manage clinics for multiple tax entities (i.e. "Business Entities") will see one additional sub-tab that manages user access on a tax ID basis. A Business Entity is comprised of one or more Clinic locations. When a user first logs into the system, he or she will be "pointed to" or located at the system default Business Entity. This tab allows the Security Administrator to override this default, as well as restrict or exclude access to a specific Business Entity.
This tab is only visible for enterprises with multiple .
-
Restrict User to Business Entity: Restricts user to only the selected business entity.
-
Exclude User from Business Entity: Grants access to all clinics except the selected Business Entity.
-
Default Login Business Entity: Ensures the user is automatically logged in to the selected business entity when s/he logs onto the system. If the Restrict User entity is selected, the program will automatically set this clinic to be the default login entity. (Note: The benefit of having a default log-in entity is that the program will automatically track all visits entered by the user as having been seen at that treatment location.)
If the user goes to another business entity, he or she will need to select that entity prior to entering any data! If the user forgets to do this, a correction to the entity may be made, but it would be tedious, to say the least, to do this for an entire day's visits!
-
Complete the SYSTEM ACCESS tab
The following security options may be set (or displayed) for each user on the SYSTEM ACCESS tab. Please note that some of the data displayed on this window refers to the user's current system status (e.g. logged in).
-
Logingroupbox: This box of information displays the current and most recent login status for this user. It shows the workstation and log in/out times of the most recent session.
If the user is currently logged into the system, the last log in time is more recent than the last log out.
-
Clinical? This check box indicates whether the user is currently logged into a clinical program area (including Net Health Employee Health and Occupational Medicine PIX). It is important for HIPAA Security purposes to know who is working in the clinical database. This checkbox also prevents this user from logging into the clinical program in more than one place at the same time. In the event that this user has inadvertently been knocked out of the system (for instance, during a power failure), the Security Administrator can un-check this box in order to allow re-entry into a clinical module.
-
Passwordgroupbox: This group, in conjunction with the Assign Password button, controls the management of passwords, in accordance with HIPAA Security guidelines.
-
-
PASSWORD NEVER EXPIRES. Check this to enable the users password to be permanent (NOT RECOMMENDED).
-
EXPIRATION DATE: Set the next expiration date for this password. This date will be set automatically according to the rules established in the Security Parameters function. For example, if passwords are set to expire every 90 days, the next date will be calculated from the last date the password was assigned or changed.
-
Require Change at next log in: Check this box to force the user to enter a new password the next time s/he logs into the system.
-
-
Inactive Account As Of: This option, below the Password group box, allows the System Administrator to de-activate this User Account. This will suspend the user from further log in capabilities. This date is also set automatically if the user exceeds the maximum number of unsuccessful log in attempts that the Security Administrator has established in the Security Parameters function. Clearing this date will re-active the user.
-
Assign Passwordbutton: This button located at the bottom of the window, enables a Security Administrator to assign a password to a new user, or a user who has forgotten his or her password.
-
Signaturebutton: This button allows you to capture an electronic signature, which can be used in many parts of the program to sign notes and documents, and print signatures on forms. Capturing the signature will make it available for use elsewhere. This function requires the use of a Topaz signature tablet, available from Net Health. (This button is displayed only for those users who are either designated as Clinic Managers or who have access to Charting Notes.)
-
Access Schedule: This function enables the Security Administrator to establish a specific weekly schedule of days and times during which this user is allowed entry into the program. For example, a user might be allowed entry only Monday-Friday, from 8:00am to 6:00pm. This can be used to afford extra protection from users gaining access outside of their normal work schedule. To activate this feature, click the Use Scheduled Access for this Account check box on the right hand side of the window. Then, check each day of the week that the user is allowed access, and type in the time period for each day.
-
Access Audit Log: This table displays the history of login and logout attempts made by this user, including the date, time, action (in or out) and program module (Net Health Employee Health and Occupational Medicine = clinical, BILL = billing, ADM = admin, etc). It is a view only function for security monitoring purposes only. A more detailed audit event log is described in the topic on Audit_History_Overview.
Complete the PATIENT RESTRICTIONS tab
In certain sensitive situations, it might be of benefit to restrict a user's ability to view the medical record of specific patients. This can be done. In cases where a critical situation might arise when it is necessary to break that restriction, it is also possible to allow emergency access.
-
Click the PATIENT RESTRICTIONS tab. This shows a list of all patients who this user is restricted from accessing.
-
Click Add to display the [Enter User Patient Restriction] window.
-
Click on the table icon beside Restricted Patient.
-
Search for and select the patient.
-
If the user attempts to access the patient's records, a message is displayed: "Warning: You are restricted from accessing or updating records for the patient listed below. If this is an error, contact your Security Administrator."
-
-
Optionally, click Access is Allowed under Appropriate or Emergency Situations.
-
If the user attempts to access the patient's records, beneath the message above will be a Request Emergency Access button, and a field for entering a reason will be displayed. The reason is required before the button can be clicked and access granted.
-
-
Click OK when done.
-
If the restriction needs to be lifted later, the System Administrator can return to this window and check the Restriction Removed box. The name of the user removing the restriction, along with the date and time, will be recorded.
-
Repeat steps 2 - 6 for all patients that this use should not be able to access.
Other Tasks
-
Reset a user account
-
Change a user password
-
Electronic signature setup
The program includes a powerful capability for capturing and printing electronic digital signatures for providers, physicians, and case managers. Once captured, a user's signature is available in the software for attaching to and locking charting notes, as well as printing forms requiring a signature. All signatures are password protected and require proper password authorization for use. With this software you can sign and e-mail or fax hour charting notes, drug screen reports, audiometry screening reports, and other forms that used to require printing and manual signature.
To enable the use of electronic signatures, certain parameters must be set on the [Clinic Systems Parameters] window.
A user's electronic signature is captured as part of the user code setup. You must have a digital signature pad already connected to the work station being used for the setup.
-
On the [Change User Code Account] window, click
 .
. -
This displays the [Capture User Signature] window.

-
Click the Capture button.
-
Have the user sign the digital signature pad.
-
Click Accept when done.
-
-
Deactivate an account
Once created, a User Code (Account) record can only be deleted if that user has never logged into this software to enter data. This can happen, for example, if a duplicate user record was set up by accident. Once a user has entered data, his User Code cannot be deleted. However, a User Code record can be deactivated to prevent future access.
To delete a User Coded entered in error:
-
From the System Administration Home Nav Bar, click the User Code button to access the list of user accounts.
-
Highlight the user record and click Delete. A message will pop up to confirm the deletion.
-
Click OK to delete the record.
To deactivate a User Code:
-
Highlight the record from the Select User browse list, and either double-click or click Change.
-
Click the SYSTEM ACCESS tab at the top of the window.
-
At the bottom of this window, check the Inactive Account check box, and enter today's date.
-
Click OK to save the deactivated record.
-
Once deactivated, a User Code can later be re-activated by un-checking the Inactive Account check box.
-
An audit record will be created whenever you delete, deactivate or re-activate a User Code record.