Reminder Letters Setup & Use
Letters and Lists is one of the most useful functions in your Net Health Employee Health and Occupational Medicine software. You can, for instance, send reminders for immunizations or tests, such as TB skin tests, or generate department lists, birthday or hire date anniversary lists, for any one of a number of purposes for which you use them.
The letters are originally composed by you or another user, then saved in a Letters Library, where they can be used repeatedly. You can create an unlimited number of reminder letters, to cover everything that employees need to be reminded of.
If your clinic licenses the Net Health Employee Health and Occupational Medicine, you can also send letters based on Clinical Practices Guidelines.
By definition and design, reminder letters are generated for groups of employees. You instruct the software regarding which medical activity and which reminder letter to use, as well as the period through which you want the software to search for Next Due dates. When you press OK, the software goes searching for anyone whose Next Due date for the activity you selected (such as TB skin test or HBV), falls within the date range you specified. It then prints a letter, a list or both, whichever you selected when you specified the search dates. Some Employee Health nurses generate the lists by department, and send the list with the letters to the department supervisor to distribute. Of course, you can send them individually, if you prefer, which is probably a good HIPAA idea, depending on what the reminder is for.
When reminders are printed, you can have the software include the employee's name in your calendar so you'll always know who's due to come in each day. (The reminder letter process does not create an appointment for the employee with a provider and a time, but your letter can request they call the department to schedule an appointment, if needed.)
Several types of letters can be sent:
-
Occ Med Incident Follow-up: Select patients due for activity exposure follow-up protocol rules. The date due is based on the time periods in the follow-up protocol.
-
Occ Med Surveillance: Select patients due for a specific service . The software knows when patients are due based on the Date Due in the medical activity which is determined by medical activity rules. for repeating activities (ex. TB Skin Test) and activities with multiple steps (ex. Hep B Vaccination). Medical activities can also be set to be required of everyone, in which case an individual who has never received that activity will be selected.
-
Other Occ Med: Select based on the patient's DOB or anniversary of the Hire Date (in patient demographics.)
-
Clinical Guidelines: Select patients due for services as specified in Clinical Guidelines.
-
Other Private: Select patients due for a medical activity on any Clinical Guideline, who also meet other user specified rules based on demographic and clinical information.
Within Occ Med Incident Follow-up and Surveillance reminders, there are three possible reminders to send: first reminder, past due reminder and final notice. The main difference between the first reminder and the past due or final reminders, is that the program includes a first line that differs for the first letter, as shown below. After these standard text lines, you add the rest of the text for each letter that you compose:
-
First Reminder: Our records indicate that you are due for your (medical activity) on next due date.
-
Past Due and Final Reminder: Our records indicate that you are now past due for your (medical activity).
When generating (not composing) letters, the first reminder screen requires a range of dates to find employees whose Next Due date falls From __ Thru __dates(e.g. From March 1 thru March 15).
When composing letters for the Letters Library, (not generating them), the past due reminder letters require a range of days to find employees whose Next Due date is anywhere From ___ Thru ___ days past due (e.g. From 10 Thru 30 days past due).
This is a subtle, but important difference to understand, both when setting up or generating letters!
Anniversary and Birthday reminders work the same way as the others, except that the Next Due date for the activity is based on the employee's hire date anniversary or birthday, instead of being based on some other rule.
The program provides an option for saving copies of patient notices sent. This requires setting a flag in Clinic System parameters. If, on the MISC tab, the checkbox labeled Store History of Reminded Letters is checked, a NOTICES tab will be included on the patient chart and every notice sent to that patient will be listed there.
It is also possible to send a letter to one employee instead of selecting a group.
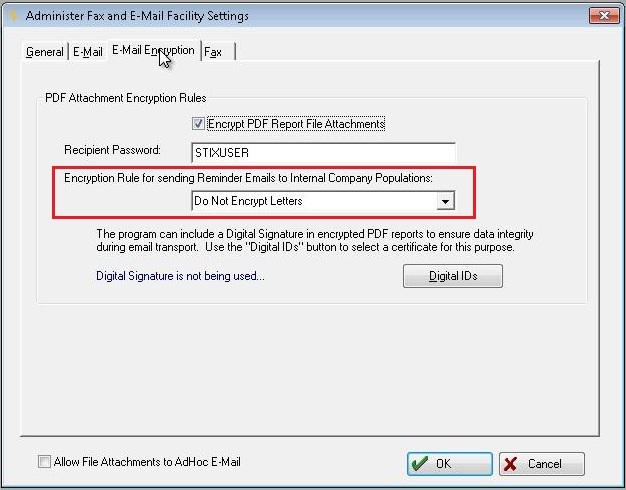
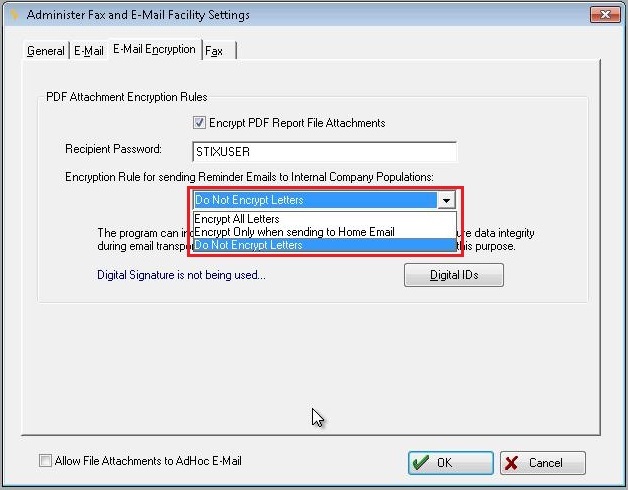
Net Health Employee Health and Occupational Medicine has the option to encrypt emails on the Fax/Email Parameter, E-MAIL ENCRYPTION tab. This field is titled Encryption Rule for sending Reminder Emails to Internal Employee Health Populations. The choices for this field are: Encrypt All Letters, Encrypt Only when sending to Home Email, and Do Not Encrypt Letters.
Administer_Fax_and_E-Mail_Facility_Settings
From Net Health Employee Health and Occupational Medicine EHR Home, select Setup / Admin.
Under Administration, select Admin / Security.
From the Setup and Administration sub-menu, select System Admin Parameters.
The Administrator System Global Settings window displays.
Click the Fax / E-Mail button at the bottom left of the window.
The Administer Fax and E-Mail Parameters window displays.
Click the Change button.
Select the E-Mail Encryption tab.
Notice the new field titled, Encryption Rule for sending Reminder Emails to Internal Company Populations.
Administer_Fax_and_E-Mail_Facility_Settings
The field includes a drop down menu with two encryption choices that require the Recipient Password. The third choice omits encryption and therefore does not utilize a password.
When emailing reminder letters (incidents, exposures, surveillance, etc.), to internal company/populations this new rule will be used to determine how the letters are encrypted before sending them through your email system.
If you run a notice for a group of patients as described below, and choose to preview, it is possible to print a single page and abandon the rest. If you do this, the notice will NOT be saved.
What would you like to do?
Send reminder letters
All reminder letters include the Company and Organization buttons on the right side of the window. These buttons enable you to run the reminders for a specific group, or to run them for all employees (whose Next Due or Past Due dates fall within the dates you specify).
-
From the Home Nav Bar, click Reporting, then click Letters and Lists.
-
Click Reminder Letters. This will display the [Print Reminder Notices] window.
-
Click the button in the Type of Notice or Reminder section to indicate the type of letter you want to create.
-
Select the specific notice on the window that pops up. This can be changed later by clicking the table icon
 beside Notice ID.
 -
The window changes to show additional tabs.
-
Click the down arrow on the Report Type field to generate a Notice (letter), List (for the department supervisor), or Both.
-
In the Notice Date field, enter the date the reminder is being sent (or click the to select the date).
-
From the Notice ID field, click the table icon to change the reminder notice to be generated.
-
Optionally, if producing a report, change the Report Title and/or enter a Subtitle.
-
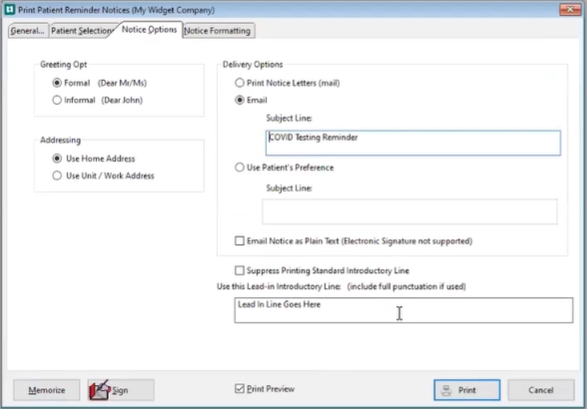
Click the NOTICE OPTIONS tab.
-
For Greeting Opt select Formal if you want the notice to say Dear Ms. ___. Select the Informal radio button if you want the notice to read Dear (first name).
-
Click the Addressing radio button to indicate whether the letter should be directed to the home or unit address.
-
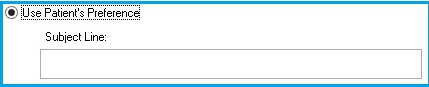
Letters can be printed for delivery, or sent by e-mail in an encrypted .PDF file. If you don't have a preference, you can select Use Patient Preference. This will look at a field named Send Notices or Reminders By on the ALERTS & NOTES tab of the each patient's Demographics record. When using the patient preference, if producing both a letter and a list, the list will note how the letter was sent: printed, email, or not sent.
When either the EMail option or the "Use Patient's Preference " option is selected, users will have the ability to enter a customized subject line sentence to describe the type of notice that the employee/patient is receiving. This will eliminate confusion on the part of the person receiving the email.

-
Email Notice as Plain Text: Check this box to have the content of your Letters sent within an the body of an Email notice. When choosing this option the signature on the letter/notice will not be supported. Net Health also advises that you evaluate the contents of the message to ensure that PHI is properly protected. If the letter/notice contains PHI it is strongly suggested that the messages are encrypted by the email service that is used by your organization.
-
All letters have a standard lead-in line, such as "Our records show you are due for a TB skin test on November 8, 2010." If you do not want this line to print, check Suppress Printing Standard Introductory Line. To use a different lead-in line, type that line in Use This Lead-in Introductory Line.
Users may opt to send Notices via our Automation Service. For more information, please refer to the document on Automated Batch Reporting located in the Resource Center.
Defaults for the items in the General Notice Options area, described in steps 10-14, are set when the notice is created.
-
Click on PATIENT SELECTIONS. The options on this tab vary based on the type of letter:
-
Surveillance reminder letter
-
Complete the Due From Date and Thru Date fields. Patients with the selected medical activity, with a Next Date in this date range, will be selected.
-
Typically, surveillance letters are sent to patients due for a single medical activity. You can optionally indicate two or more activities by checking Use Multiple Activities Selection Option.
-
If the multiple activities box is not checked, click the table icon beside Select Medical Activity. Then search for and select that medical activity related to this reminder letter.
-
If the multiple activities box is checked, click the table icon beside Select Medical Activities to display the [Select Activities for Reporting] window. In the pane on the left, search for and select each activity to be used with this reminder letter form the complete list of medical activities on the left. As you select activities, they will appear on the list on the right. To remove an activity from the list on the right, highlight it, then click Remove.
-
If you have selected multiple activities and an employee is selected for more than one of them, if Create single notice for selected employee is not checked, a separate notice will be printed for each appropriate activity. If it is checked, the employee will receive a single notice for both activities.
-
Check Include Employees with no Records if you want to send a reminder to employees whose record does not include any history of the selected activity, such as TB skin test.
-
If you check Create Tickler Schedule Records, the program will create a schedule record. This record will have the date when the activity is due for this patient, and the status will be set to "Reminded". You will be able to see the record when you look at [Scheduling by Patient] for that patient. It will also show on [Scheduling by Date] window for that date and on the Scheduling by Date report. While it will not show on the calendar (it does not have a time or a provider), it will show in [Today's Scheduling], seen from the calendar.
-
If you have selected to print a List or Both a List and Reminders, you have the options to Include the Last Vac/Test on List and to Include Medical Activity on List on List. Otherwise, these options are grayed out refers to part of a screen that cannot be used because it is inactive or otherwise not accessible. This part of the screen appears slightly gray. .
-
-
Incident follow-up reminder letter
-
Complete the Due From Date and Thru Date fields. Patients on the indicated exposure follow-up protocol(s) who have activity due in this date range will be selected.
-
Select the Incident Type (All, Injuries, Illnesses or Exposures).
-
Click the table icon beside Select From Protocol and select the follow-up protocol of interest. Optionally, select a range of protocols by also entering a Thru Protocol.
-
Optionally, send letters only to patients involved in a multiple employ exposure by clicking the table icon
beside Select Mult Exposure to display the [Multiple Exposures by Date] window. Search for and select the exposure of interest. -
Optionally check Exclude Incidents from Multiple Exposures to do just that.
-
-
Other Occ Med
-
Complete the Due From Date and Thru Date fields to indicate the range of dates to select.
-
Click the drop-down arrow beside Date Type and select either Anniversary Date or Birth Date. Individuals with a date entered for this field (in patient demographics), in the indicated date range, will be selected.
-
-
Guideline Reminder
-
Complete the Due From Date and Thru Date fields. Only Private Practice patients with a clinical guideline due in this time period will be selected to receive the letter.
-
Check Only Include Patients with Appointments in this Time Frame to do just that.
-
Select the Guideline Type.
-
Immunizations: All patients due for an immunization type guideline will be selected.
-
Preventive and Wellness Services: Patients will be selected who are due for any services on any guidelines of this type.
-
Disease Management: All patients with a due disease Management guideline will be selected.
-
Medical Activity : Click the table icon
, then search for and select the medical activity of interest. When you run the letters, patients will be included who are due for this medical activity on any guideline which has this activity as an item to be completed. -
Specific Guideline: For the first three options above, limit the selection to patients due for a specific guideline. Click the table icon to select the guideline of interest.
The Guideline Reminders cannot be faxed or e-mailed. You can produce a summary or detail report for all the Guideline Reminders except when selecting by medical activity. In that case, only the summary report is available.
-
-
Other Private
-
Complete the Due From Date and Thru Date fields. Only Private Practice patients with a clinical guideline due in this time period will be selected to receive the letter.
-
Check Only Include Patients with Appointments in this Time Frame to do just that.
-
Click Build Patient Reminder Selection Criteria to display the [Build Guideline Rule] window. Build the selection rules for this notice based on demographic and clinical factors.
-
-
To alter your standard letter for this run only, click the NOTICE FORMATTING tab. (You might do this to include a holiday greeting, for example. Changes to the letter are not saved in your Letters Library.)
-
Optionally, add an electronic signature by clicking Sign.
-
Make sure the Preview Report? box is checked! Otherwise, you may print a lot of the wrong letter!
-
Click OK to print the letters or list, or both. If you have selected Both, the program will generate the letters first, and then the lists.
Automation Service to Email Reports and Notices
Net Health Employee Health and Occupational Medicine will allow email notices and reminders to be sent on an automated schedule based upon next due dates for medical activities, birthday, or anniversary date. This function also offers the ability to send patients/employees automated emails based on various demographic information and medical criteria that is set to a schedule. Once email notices are sent from Reminder Notices, the record of the sent emails will appear in the View Chart.
Reminder Notices report criteria will need memorized and then selected to be scheduled as an automated report by setting up a task through the Automation Service.
There are two scenarios that can be used through the Automation Service:
- Net Health Employee Health and Occupational Medicine will send email notifications or reminders to patients WHEN the Reminder Notices, located in Letters and List, is run as an automated Batch Report and the radio button for "Delivery Option" is set to Email.
- Net Health Employee Health and Occupational Medicine will send email notifications or reminders to patients WHEN the Reminder Notices, located in Letters and List, is run as an automated Batch Report and the radio button for "Delivery Option" is set to Use Patient’s Preference and the preference in the patient's Demographics is set to Email.
Add reminder letters to the letters library
Before entering your reminder letters, have each letter typed on paper first! Also, if you have the letter in electronic form, such as in a Microsoft Word document, you can copy and paste the letter into the software.
-
From the Home Nav Bar, click Reporting, then click Letters and Lists. This will display the [Adding a Notices Record] window.
-
Click the radio button in the Type of Notice section which reflects the type of letter you want to create.
-
Click Add on the [Select Reminder Notice] window.
On the GENERAL tab:
-
In the Title field, enter the name you want to call this reminder notice/letter, such as TB skin test Reminder Letter or Hep B Reminder Notice then press the TAB key.
-
Click one of the Greeting radio buttons.
-
Click Formal if you want the notice to say Dear Ms. ___.
-
Click the Informal radio button if you want the notice to read Dear (first name).
-
-
Click the Destination radio button to indicate whether the software should use the home or unit address in the letter.
-
All letters have a standard lead-in line, such as "Our records show you are due for a TB skin test on November 8, 2006." If you do not want this line to print, check Suppress Printing Standard Introductory Line.
-
To use a different lead-in line, type that line in Use This Lead-in Introductory Line.
All of the items in the General Notice Options section, described in steps 5-8, can be overwritten at the time when the notice is sent for that one mailing.
-
If this is a PAST DUE reminder, beside Selection Rule, enter the From and Through days past due for this reminder (e.g. From 10 through 30 days past due).

-
If this is a Surveillance Reminder:
-
Typically, letters are sent patients due for a single medical activity. You can optionally indicate two or more activities by checking Use Multiple Activities Selection Option.
-
If the multiple activities box is not checked, click the table icon beside Select Medical Activity. Then search for and select that medical activity related to this reminder letter.
-
If the multiple activities box is checked, click the table icon beside Select Medical Activities to display the [Select Activities for Reporting] window. In the pane on the left, search for and select each activity to be used with this reminder letter form the complete list of medical activities on the left. As you select activities, they will appear on the list on the right. To remove an activity from the list on the right, highlight it, then click Remove.
-
If you have selected multiple activities and an employee should receive a notice for more than one of them, if Create single notice for selected employeeis not checked, a separate notice will be printed for each appropriate activity. If it is checked, the employee will receive a single notice for both.
-
Check Include Employees with no Records if you want to send a reminder to employees whose record does not include any history of the selected activity, such as TB skin test
-
-
On incident reminder letters only:
-
Click the appropriate radio button beside Incident Type if you only want one type of incident included on this letter.
-
Select the range of protocols you want included.
-
-
Check the box Generate Labels if you want the software to create an ASCII file of the names and addresses so that you can create mailing labels with the mail merge function within your word processing software.
-
Enter the body of the letter on the NOTICE tab.
-
Click OK to close the notice set-up window.
-
Click Close to return to the [Select Reminder Notice] window.
-
Repeat from Step 2 until you have added all your reminder notices to the software.
-
When you are finished click OK, Close, then Cancel.