Provider Patient Chart Overview
The purpose of the Patient Chart is to provide a fast, simple way to look up information about a patient/ employee sometimes used to refer to patients in the context of occupational medicine. . Everything that you have ever entered into the program about an employee is visible from the Patient Chart. Of course, what you can see depends on your user access rights, as set up in your user code.
How to Access the Patient Chart
There are several ways to reach the Patient Chart:
-
From the Home Launch Pad: You can access the Patient Chart from the Home Nav Bar by clicking View Chart. You will access the Select Employee Dialog Box where you may locate the desired patient.
-
From the Visit Record or the Incident Record: Click
 at the bottom of the window. You will go straight to the chart without having to look up the employee, since you are already in the desired employee's records.
|
|
Before you can access the chart from the visit record, you must first create and save the visit! The original design was enhanced to include this constraint after numerous users accessed the Chart before saving the visit record, which created problems for everybody! |
-
From the Net Health Employee Health and Occupational Medicine Charting Workspace: If your clinic uses Net Health Employee Health and Occupational Medicine Provider Charting, then the patient chart can also be accessed from the [Generate Patient EMR Charting Note] window by clicking the View Chart button in the upper right of the window.
|
|
There will be minor differences in the appearance of and options on the patient chart based on the route to the chart. |
The following sections (tabs) are included in the Patient Chart:
Demographics
The Patient Chart opens to the DEMOGRAPHICS tab, which displays basic demographic information about the employee. There are several ways to reach the patient chart. Depending on the route you take, certain of the features below might not be available.

-
Demographicsbutton: Accesses the complete patient/employee demographic file for the selected individual. For more information, see the Employee Demographics Overview.
-
Employeebutton: Allows you to select the chart for a different patient without exiting from the chart. This is especially useful if you are entering lab results for a number of employees.
-
Companybutton: If an employee works for more than one company, you can see the occupational health medical records related to a single company, or, the patient's private practice records, at a time. This button lets you select the specific company or private practice.
-
All Orgs (Or, View for All Companies/Orgs): Check this to see the medical records for all of an employee's companies as well as private practice records at the same time.
-
Print a Letterbutton: Lets you send a single letter to a patient.
-
Formal Health Recordbutton: The need to pass medical information electronically is increasing every year. The Formal Health Record either prints a report or exports data from a specified date range to one of two standard file formats for data interchange among providers the Continuity of Care Record (CCR) format and the HITSP/C32 CCD Document Electronic File.
-
ALERTS AND NOTES tab: This tab contains a large text entry field which displays non-confidential information which is entered from Patient Demographics. From the patient chart, it is read only and cannot be altered.
-
The CONFIDENTIAL NOTES tab: This tab contains a large text entry field where anything can be entered, with visibility being limited to just certain users. It is only available to users with the proper security rights. The same field can be viewed, but not altered, from Patient Demographics where it is also only available with the proper security rights.
Problems Lists
The Clinical Problems List displays in one place the patient's Active or Chronic Illnesses, Work Restrictions, Medications, Allergies and Other Medical History. the program is smart enough to update this list automatically, but it is important to understand how and when information gets added to the list. You can also enter data manually directly onto the Problems List. For more information, see the Clinical Problems Lists Overview.
Surveillance
The SURVEILLANCE tab includes the Surveillance Profile. This screen displays all the surveillance and immunization activities that you are tracking for occupational health employees on an on-going basis, such as TB Skin tests, Tetanus shots, Hepatitis B immunizations, etc. It also displays a summary of medical conditions, wellness measures, labs and employee exposures. The Surveillance Profile can be tailored to your specific needs. For more information, see the Surveillance Profile Overview.
Clinical Results
The CLINICAL RESULTS tab displays a chronological listing of all activities ever documented for a patient, starting with the most recent activity at the top of the screen. When on the CLINICAL RESULTS tab, you can print the list of activities, with several options for tailoring the list to your current needs. See Clinical Results for details on this topic.
Visits
The VISITS tab displays a chronological listing of all visits ever documented for an patient, starting with the most recent visit at the top of the screen. A visit can be selected and opened to see the full details and access the full ranges of options available on the visit record for both checking-in a patient and checking-out. When on the VISITS tab, you can print the list of Patient Visits by clicking the Print button at the bottom. See Patient Chart: Visits Tab for more information.
Incidents
The INCIDENTS tab displays a chronological listing of all incidents ever documented for an employee, starting with the most recent incidents at the top of the screen. When an incident is selected and opened, you can see the full details and access the full range of options provided on the Incident record. When on the INCIDENTS tab, you can print the list of incidents by clicking the Print button at the bottom. See Incident Record Overview for more information on this topic.
Charting
The CHARTING NOTES tab displays a chronological listing of all notes ever documented for an patient, starting with the most recent at the top of the screen. When on the CHARTING NOTES tab, you can print all the notes by clicking the Print button at the bottom. See Charting Notes for more information.
To help you find the charting notes for a visit, you can filter the list in three ways:
-
To filter by provider, click the table icon beside Filter by Provider. Search for and select to provider you want, then click OK.

-
To filter by ICD-9 code, click the table icon beside Filter by ICD-9 Code. Search for and select to ICD-9 code you want, then click OK.
-
To filter by date, enter a From date and a Thru date. Entering just a From date will show all notes on or after that date. Entering just a Thru date will show all notes on or before that date.
You can filter by more than one field at a time.
To remove a filter, highlight the entry in the relevant field, then hit the Delete key on your keyboard.
Scheduling
This tab displays a list of all appointments scheduled for the patient. It is often used as a reference when an patient calls to change or cancel an appointment, or to verify that the person has been scheduled for an exposure follow-up protocol. See the Employee Chart Scheduling Tab for more details.
Document Images
The scanning feature allows you to capture reports, forms, and other images. From this tab, you can see all images associated with the patient and add additional ones. See Scanning and Document Capture Images to learn more about scanning. All documents captured for this patient are displayed on this tab.
Documents can be flagged in setup as advanced directives. When one is highlighted, a red message with the user, date and time that the document was last reviewed is displayed at the bottom of the window.
To limit the display to a single document type, click the drop-down arrow beside Filter by Document Type. This displays a look-up list of all your document types. Search for and select the one you want. When you return to the DOCUMENT IMAGES tab, only that type of document will be displayed.
Similarly, documents displayed can be limited to a date range by entering From and Thru dates.
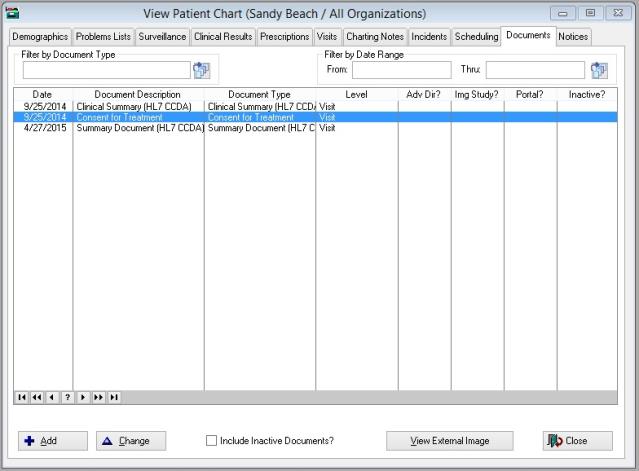
Selecting the View External Images will display the following:

Include Document Images for All Visits: This check box will display for visits attached to an incident for Workers' Comp Visit types. Checking the box will additionally display the document images for all Visits for the same incident. Net Health Employee Health and Occupational Medicine defaults this check box as unchecked.
Include Inactive Documents: Inactive documents are noted in a column, marked "inactive"; this column can be sorted. Images can not be deleted. Within the Documents tab, a user can view inactive images by selecting the check box marked "Include Inactive Document Images" only if they have the correct permissions. Net Health Employee Health and Occupational Medicine defaults the inactive check box as unchecked. Inactive documents cannot be included with an E-mail.
Notice History
This tab shows a list of all reminder letters sent to this patient. Double click a notice to see the details on the [Review Historic Employee Notice] window. For users with Clinic Manager access to the software, a Delete button is available for removing notices from the list.
The GENERAL tab shows details of the sending of the letter. The NOTICE tab shows the actual text of the letter.
|
|
For it to work, this feature must be enabled on the MISC tab of Clinic System Parameters. |
The Patient Chart also includes the following items on the right side or bottom of each screen:
Employee button
This button enables you to change the patient/ employee sometimes used to refer to patients in the context of occupational medicine. whose data you are viewing. Click the button to select a different patient.
Company button
When clicked, the Company button displays the list of occupational health companies associated with the employee whose chart you are viewing. When the companies are displayed, select a different company to view the employee's data for services administered in that company. Or, you can choose to view the patient's Private Practice records.
All Orgs? checkbox
If checked, the Patient Chart displays the employee's visit information across all companies to which the employee is assigned.
If unchecked, the data displayed applies only to the company name displayed in the Title Bar The top of a window that includes the window name [Title] next to the employee name.
To see information for the same employee, but a different organization, click the Companybutton on the right side of the window.
Letter button
In addition to sending letters to groups of employees (See Reminder Letters and Lists), the program can send a single letter to an employee by clicking this button. This will save you the time of going to a word processor to send the letter. In addition, you can design and maintain a library of different letters. Each time you select a letter from your library to send to the employee, the program will fill in the appropriate demographic information, saving you the trouble of doing so.
Some organizations use this function for patient instructions: you can set up a "letter" for common instructions, then print it at the end of an employee visit. The Patient Chart can be accessed from within the visit record by clicking the View Patient Chartbutton, making this a relatively easy and useful function.