Using the Scanning and Image Capture Function
The scanning and image capture function is an add-on feature that requires individual licensing. Contact sales@integritas.com for more info. Scanning requires setting up the hardware and setting up the software for scanning. Read How to Set Up Hardware for Scanning and How to Set Up _for Scanning to learn more.
Summary
There are numerous types of documents used in the typical clinic such as Medical Insurance Cards, X-Ray or test results, past charting notes, patient photographs, and others. Furthermore, the billing office may want to scan EOBs. The program offers the ability to capture and store images obtained from a scanner, camera, or electronic file.
Scanning has these features:
-
The ability to capture an image from an image capture device such as a scanner or camera.
-
The ability in the software to import an image that was previously captured and is stored in a file such as a BMP, GIF, JPG, or PDF.
-
The ability to associate images with a patient, case (incident) and date of service (visit). Each image is classified by a client defined Document Type, maintained in the system setup area. Initially there are three locations in the Clinic Program from which this interface can be executed: during the visit, from an incident record and directly from the chart.
-
The ability to view preview, print, fax, email, and even export captured images, from the associated patient chart, patient case record or visit record. Document types that specify images that pertain to billing for a visit may be designated to accompany charting notes during the billing process.
-
The ability to capture and view a patient photograph from the [Patient Demographics] window.
Managing scanning operations
The scanning and image capture provides a great deal of power and flexibility for scanning, but without carefully planning how you will implement it, you will have a mess on your hands in no time! There are two aspects of planning: setting up document types and establishing procedures for how different categories of documents will be scanned.
-
Of particular importance in setting up document types is the Document Level which determines where each type will be stored in your database.
-
In establishing procedures, it is vital that you have a system that is as streamlined as possible.
We have developed a spreadsheet to assist you in planning, which you can get by contacting Net Health Technical Support. Be sure to read How to Set Up Stix_for Scanning, which explains the "step-by-step" process for setting up document types.
Let's talk here about your broader strategies. The program enables you to link particular document types (e.g. Xray Report, Lab Test Result, Driver's License, EOBs) to particular logical places in the software so that proper security rules can be applied. For example, a Driver's License would be linked to a patient's demographic record because it doesn't change from visit to visit (although it may expire from one visit to the next). A lab test could be related to a visit, but if that visit is part of a blood and body fluid exposure, you would want to link it to the incident, not the visit, since it really relates more to the Incident than the particular visit record.
Because a single document type might, under different circumstances, be related to different parts of the software, you may need to set up more than one document type for the same thing/different context. For example, an Xray related to an injury would be linked to an incident record, whereas an Xray for a physical would be linked to a visit record (there is no incident record for a physical). Therefore, you would have two document types, perhaps XRay Report - Physical and Xray Report - Injury, and you would link them (during setup) to two different places in the software: The first one would be linked to a visit and the second to an incident. You will want all the possible XRay Reports to be grouped together, to make selection easier, so you must name them so they all start with the same word.
Basic rules for setting up the document level:
-
If you have what is clearly a demographic document, such as an insurance card or driver's license or patient identification photo, choose DEMOGRAPHICS.
-
If you have a document that COULD be related to an incident or a visit under different circumstances, make two document types that have different names, as in the example above. Then, link one to INCIDENT in the Document Level field and link the other to VISIT in the Document Level field.
-
If you have a document that COULD be related to an incident or a visit, but you aren't sure, select INCIDENT.
-
If you have a document that would only be related to the Patient Chart (such as Patient History - Labs), select PATIENT CHART.
If your billing department wants to scan EOBs
For billing purposes, you will want to scan EOBs, and maybe even some other documents that relate to more than one patient. This is a special case that requires a special approach to make EOBs for each date readily accessible:
-
Set up a patient named Patient (First Name) EOBs (Last Name).
-
When you set up EOB as a document type, set the Document Level to Patient Chart.
-
To scan today's EOBs, go to the Patient Chart for the patient whose last name is EOB. Click the IMAGES tab and scan away.
-
To retrieve today's EOBs, you go to the Patient Chart for the patient whose last name is EOB.
-
Click the IMAGES tab, to see the scanned EOBS in chronological order.
-
Find the date you want and double click to open the scanned document.
-
Advanced Directive Documents
Scanned images can be designated as advanced directive documents (ex: Living Wills, Power of Attorney, etc.). If one or more advanced directive documents have been scanned for a patient, users and physicians will be notified of that fact with a red message displayed above the Alert Notes on the [Enter Visit] window.

A new field has been added to the Patient Demographics ALERTS tab that can be manually flagged by the user or automatically be set when advanced directive documents have been captured (scanned) for the patient. The DOCUMENT IMAGES tab in the Patient Chart displays the documents that are advanced directives and at the bottom of the window displays a red message of the user, date and time that the document was last reviewed.
Some setup is required to enable this feature. Read How to Set Up Net Health Employee Health and Occupational Medicine Scanning to learn more.
Annotation Notes
Annotation notes can be associated with a scanned document at the time when it is scanned, or at a later date. When viewing a document, click the ANNOTATION NOTES to enter, view or change notes.
Using the Net Health Employee Health and Occupational Medicine Scanning & Image Capture Function
Images can be captured on windows where you see this button: ![]() . Locations include:
. Locations include:
-
Patient Demographics
-
Patient Chart
-
Visit Record
-
Incident Record
-
Case Management
Steps to Capture an Image
-
On one of the above windows, click the Images button. This will display the Add New Document Image(s) window.
 wdw_356x348.png)
-
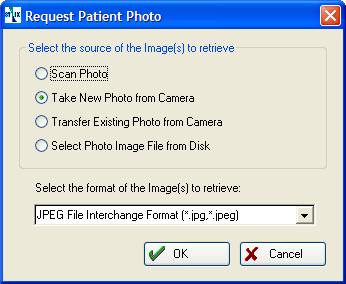
If you are on the Patient Demographics window, there will be a button labeled Get Photo which will display the similar [Request Patient Photo] dialog. Since the context of the patient photo is outside the scope of typical document scanning and image capture we have a simpler dialog box for this function which provides few quality options.
-
-
Select a Document Type that best matches the document or photograph you are about to acquire. This list will vary, displaying only options which are appropriate based on location from which you are working. There is no limit to the number of document types you use. A few typical types are:
-
Driver's License
-
Authorization Form
-
Health Assessment Form
-
Patient Photograph
-
Radiology Report
-
-
If available, select the Default Intent & Default Bias. These are options that govern image quality and size. It is recommended you leave these set to their defaults, which will assume the best quality available. However you may want to tweak certain document types for either minimizing file size and related storage capacity, or for display-quality purposes.
-
Select a source for the image you want to capture. Each one of these options provides a different dialog box or set of dialog boxes to step through the image acquisition process.
-
Select the Image Format. This selection may greatly change the quality and/or size of the image you are scanning. JPEG is the recommended default here, since it requires less storage while still providing a high quality image. If perfect image quality is more important than storage capacity (rare!), then BITMAP is the best selection.
Physicians sometimes find themselves in need of viewing complex imaging data, such as X-Ray and MRI radiology images. The standard electronic format for such images today is known as "DICOM". This is a very complex data format that requires sophisticated viewing capabilities.
The program includes the ability to view DICOM images from the Net Health Employee Health and Occupational Medicine . While the program will allow you to store such images in the database, it is NOT advisable to do so. DICOM images are extremely large and take up huge amounts of disk space. After reviewing DICOM images, the client should establish and follow a procedure for removing them from the local server, if images are being placed there just for viewing. This is both for security and disk efficiency purposes.
-
Follow the instructions for the source you selected:
-
Retrieve Image from Scanner
When this option is selected, you will see a dialog box similar to one of these two:
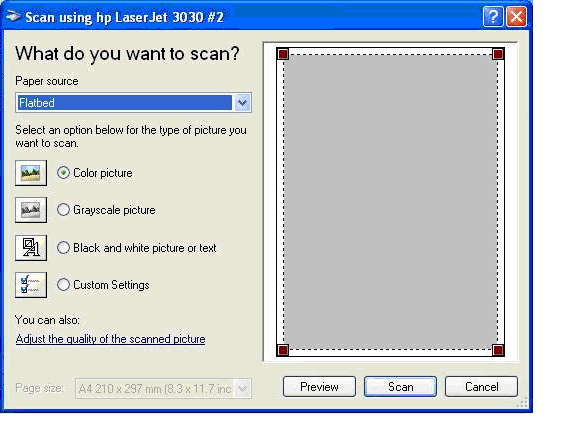
This first example shows the Windows Image Acquisition Common Dialog box with Flatbed Selected as Source.
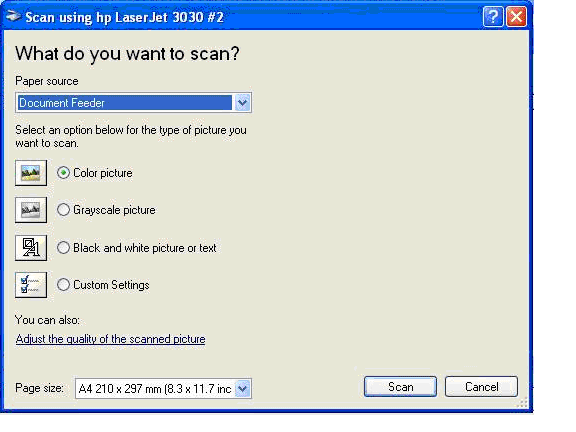
The second example is Windows Image Acquisition Common Dialog box with Document Feeder Selected as Source
If you have a multi-input scanner the Paper Source drop-down list will contain more than one option. If you have a flatbed scanner, or the flatbed is the selected source, you will see the first example. If you have a document feeder only or document feeder is the selected source, you will see the dialog box immediately above.
The only major difference between these dialog boxes is for the flatbed scanner source, you have the ability to preview the scanned image and resize its scannable area.
On both of these dialog boxes, you will see some other common controls.
-
Page Size drop down list: Enables you to change the size of the paper on which the scanned image is displayed.
-
Adjust the Quality of the Scanned Picture hyperlink: Opens a pop-up to change some advanced properties of the scanned image:
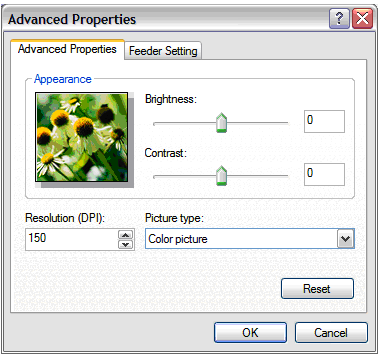
Also note the FEEDER SETTINGS tab in the screens above and below. This tab is included in the [Advanced Properties] window. If your scanner is capable of scanning both sides of the document at the same time, you can enable it to do so on this tab, by checking the Enable Duplex box:

-
-
Take New Picture from Camera
If you choose this option, your computer will instruct the camera to take a picture real-time when you click the OK button, and transfer it automatically to the computer. You will not get a dialog box for this, because the settings for picture quality, format, and size are determined in the camera.
Please note:
-
Some cameras cannot be controlled from the computer: you will need to take the picture from the camera first, then transfer it using the Transfer Existing Pictures from Camera option instead. This can be determined only through your camera's instruction manual OR through trial and error. Net Health cannot tell you whether your camera can do this or not!
-
On some cameras, we have observed that a copy of the picture remains on the camera's memory card, so you will need to manually remove it from the camera for security and privacy purposes.
-
-
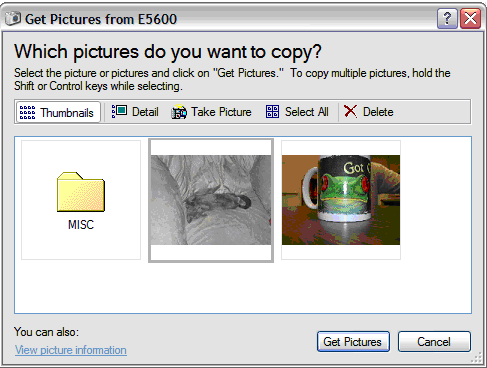
Transfer Existing Picture(s) from Camera
If you choose this option you will be presented with the [Get Pictures from (device name)] dialog box shown below. To select more than one image to transfer to the relevant patient record, hold down the CTRL key and click each picture you want to transfer.
Holding the SHIFT key down while clicking pictures allows you to select a range of images.
Of course, you can also simply select one or all. If you select more than one image, each image will be imported to Net Health Employee Health and Occupational Medicine as a separate page.
Note the Take Picture or Get Picture button here: clicking this button will cause the camera to exhibit the same behavior as the Take New Picture from Camera function, but it will add the image to the selection dialog box for you to select, preview, or delete prior to transfer.
-
Select Image File(s) from Disk
When this option is selected you will be presented with the [Select Files for Import] dialog box. Use the standard Windows controls to locate and select the file you want from your hard drive or network. Be sure to notice the Files of Type drop down selection box which controls the files displayed. Make sure it is set to the image format you want. Types available include standard image formats as well as PDF documents. You can change the file type here by simply clicking the down arrow and selecting the desired file type.
From this dialog box, you may select more than one image file for import at the same time, as long as all the files are the same type (e.g. all JPEG or all PDF files, etc.) If you select more than one image, each image will be imported to the software as a separate page.
-
View Scanned Documents
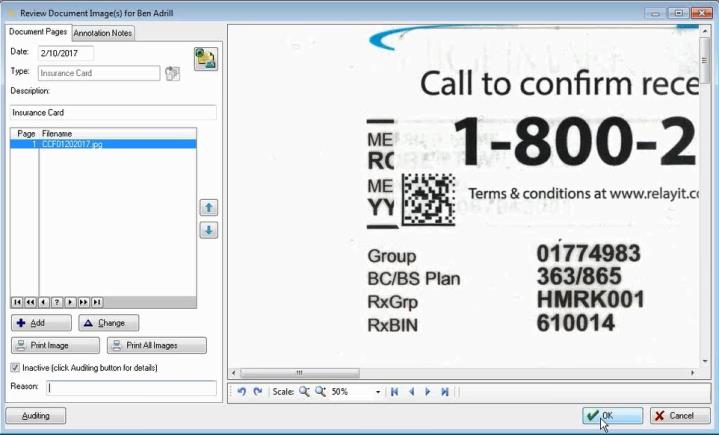
The [Review Document Images] window enables you to view a patient's images that have been scanned or imported, exactly as they will be stored.
Clicking the Images button will display the following window:

Include Document Images for All Visits: This check box will display for visits attached to an incident for Workers' Comp Visit types. Checking the box will additionally display the document images for all Visits for the same incident. Net Health Employee Health and Occupational Medicine defaults this check box as unchecked.
Include Inactive Documents: Inactive documents are noted in a column, marked "inactive"; this column can be sorted. Images can not be deleted. Within the Documents tab, a user can view inactive images by selecting the check box marked "Include Inactive Document Images" only if they have the correct permissions. Net Health Employee Health and Occupational Medicine defaults the inactive check box as unchecked. Inactive documents cannot be included with an E-mail.
It can be accessed by clicking the Images button![]() on any of the many screens on which it appears or from the DOCUMENT IMAGES tab on the patient chart. It displays automatically every time after the image acquisition process is completed, regardless of the image source you used.
on any of the many screens on which it appears or from the DOCUMENT IMAGES tab on the patient chart. It displays automatically every time after the image acquisition process is completed, regardless of the image source you used.
-
Document Type: To change the Document Type click the Table Icon
 beside that field to display a list of types from which you can select the correct one.
 -
Annotation Notes tab: Add, change or view annotation notes associated with the document.
-
Add button: Allows you to acquire another image for this document, following the procedures described above.
-
Change button: Change the file name.
Delete Button: This button is only available to undo an Add.
- Inactive check box: This check box is only available if the user has the correct permissions to inactivated a document. For more information, please see User Code Setup. The check box is defaulted to unchecked. Users may inactivate a document by checking this box; This function can only be completed if the user includes a Reason for the inactivation. Inactive documents can viewed (but not altered and not E-mailed) if the user has the correct security roles. For more information, please see User Code Setup. An audit event will be generated.
If this box is first checked making the document inactive, unchecking it will then reactivate the document. This function can only be completed if the user includes a Reason for the reactivation and the user has the correct security roles. This action will clear the inactive flag, and the date and time it was originally marked as inactive will be also cleared. An audit event will be generated. This function is also available for Pre-filled Interactive forms which have been "Flattened and Saved".
-
 : Move the highlighted image up or down on the list.
 -
Print Image button:
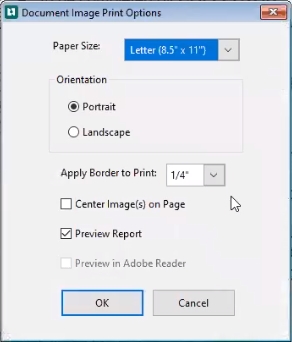
Print the highlighted image. As with most print functions, it can be faxed or e-mailed or exported to a PDF file instead of being sent to the printer if you are set up for that. The image as it will be printed will open in the standard print preview window for you review before printing.If the user selects to print an image, or a page of an image that has been inactivated, the system will print a watermark on the document that shows the document was inactivated, the user that inactivated and the date/time inactivated. This is not possible on XML, PDF or DCOM document types.
Apply Boarder to Print: The border size is defaulted to what was selected on the Set Up Document Type window. Users may change that size for the printed image. There are five different default border sizes listed in a dropdown menu:-
None
-
1/4 inch
-
1/2 inch
-
3/4 inch
-
1 inch
-
-
Print All Images button: Prints all images with the same options for faxing, e-mailing, or exporting to a PDF file.
-
Hover cursor over image: A pop-up box will display technical information about the image, such as the size and resolution.
-
Double-click the image preview: Exports the image to your PC's hard drive and displays in your Windows default image viewer for that type of file (e.g. Windows Picture & Fax Viewer).
Auditing Button:When this button is selected, the following window will display with relevant historical information regarding this document. This would include if the document was inactivated or reactivated, date, time, and reason.
-
Publish to Company Portal: Allows the image or document to be seen through the various company portals.
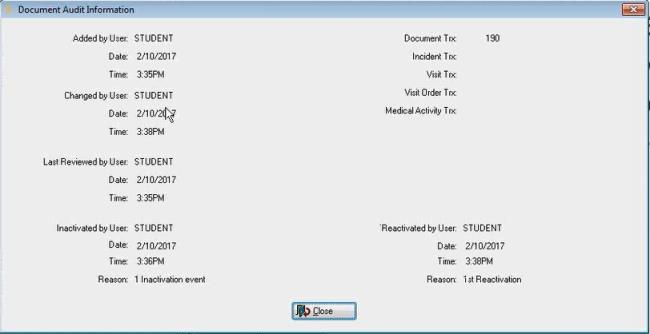
An Audit Event will be generated to show when a document was inactivated or reactivated.