Patient Demographics Overview
Summary
The Patient Demographics file includes a wide array of data fields used both to identify employees and to produce reports. Different information may be entered for different categories of patient. It is extremely unlikely that you will need to enter all the information that can be entered for any patients. An Urgent Care patient will, for instance, need basic identification, name, contact information, and an insurance policy. An Occupational Health patient will not need to have an insurance policy entered, but may need some job related information. Hospital employees may need a great deal of job related information. Every clinic should develop a clear procedure as to which fields will always be filled in for each type of patient.
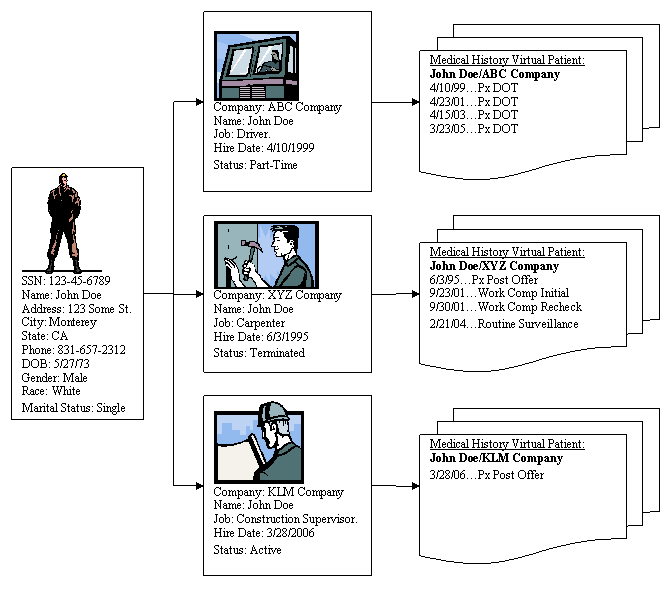
Occupational Health is different from typical health care in that the client is the employer, not the patient. Because of that, the company has a right to certain information about visits for which it has paid, directly through employer contract services and indirectly for Workers' Comp. The employer does NOT have a right to see information that was paid for by a different employer or by the patient. Since the software allows you to keep a history of activity for a patient from a succession of employers, or even from multiple current employers, a "wall" must be in place to prevent one employer from seeing activity which should only be available to a different company. In the software, it could be said that for each visit you are dealing with a "virtual patient", a combination of a particular patient with a particular company, who is distinct from that same patient visiting from a different company.
Patient Identification
A critical issue around patient entry is how to best uniquely identify each patient. The answer to that question varies greatly among facilities. the software provides a very flexible system that has been designed to accommodate the many different systems used for patient identification. If your clinic is new to the application, the identifiers used have been thoroughly thought out after a careful review of the options. If your facility has used the software for a while, you may not be aware of all the options. Read Business Rules for Patient_Identification for more information.
Changing your system of patient identification is a complicated process. Before attempting any changes be sure to contact Net Health Support at 1-844-464-9348, Option #3.
Merging Patient Records
It is almost inevitable that occasionally a single patient will be entered in the system twice. This might happen because the patient works for two companies, or because the identifier for the patient was mistyped the first time. Regardless of the reason, you are in a bind-you have visits for one patient entered on two patient records, thus splitting the medical record. Furthermore, if all visits have been billed, you can't even delete the activity on one patient record and re-enter it on the second.
Fortunately, there is a solution. The Merge Duplicate Patient Records function allows you to identify two patient records, then tell the software to consolidate the activity on both records on to the single record of your choice.
History of Changed Patient Information
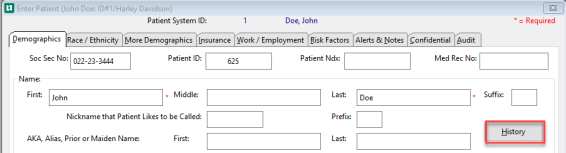
Whenever a patients name, address, phone number, fax number, cell phone number or email is changed, a history record will be created with the previous data before the change. This information can be viewed from the History button in the name area on the [Enter Patient] window.
Each history record can be viewed by double-clicking it. Information presented includes the user, date, and time when the change was made.
Import Employees
The program provides the ability to import employees from other systems. This is most typically used be hospital employee health departments to pull information from the hospital human resources system or other sources. The data in the demographics file is categorized onto various tabs, to facilitate finding what you need.
the program provides the ability to import employees from other systems. Here are some uses:
-
Virtually 100% of the organizations which use the software to manage employee health for their own enterprises load the demographic data from their HR system, to eliminate the need to duplicate data entry that is done in the HR department.
-
Some Occupational Health clinics use the import function to pull in employees from new major employers.
-
The import function can be used to pull employees from a program which is being superseded by DrugPix for randomly selecting individuals for drug testing.
To import employee records they must be in a file with a very specific structure called the Employee Demographics Bridge File Extracted from the HR Payroll System, this is a data file that includes the employee demographics. Your IT department formats this file according to the Employee Demographics file layout, so that the data can be read into the application by a utility program supplied with the software . To get a copy of the latest file layout, please contact Net Health Support at 1-844-464-9348, Option #3, or send an email to ehoccmed-support@nethealth.com.
For employee health applications, this data import (sometimes called a "download" by the users) is done initially to populate the database, then the data is refreshed periodically, typically every pay period or every month. For occupational heath, it is usually used on a PRN basis.
View the tabs on the Patient Demographics Window
The Demographics tab
The Demographics tab includes the basic identifying information, such as SSN or other identifying numbers, Name, Address, Contact information, English-speaking, etc. The fields on this tab are self-explanatory, except for the Fields Former First or Middle Name and Former Last Name. These two fields are completed at the time you learn of a name change. Move the old name into one of these two fields, as appropriate, then enter the new name into the standard name fields. When looking for an employee at a later date, you can then look by their former name (the "AKA name"), as well as their current name, if desired.
Complete all information given for this employee/patient.
If the "Mask SSN on Displays, reports and unsecured User Viewing option" is on in the System Admin Parameters, the Patient's Social Security Number will be masked. Only the last four digits of the Social Security Number will be displayed, except in the case where the user has update authority. In that instance, the entire number will be temporarily visible until the Social Security Number edit is complete. At that point the field will go back to a masked format to protect patient privacy.
When adding a patient, the Sex, Race/Ethnic, and Marital status fields will default to a blank selection. "Blank" is a valid entry for Sex, Race/Ethnic, and Marital status.
The Race / Ethnicity tab
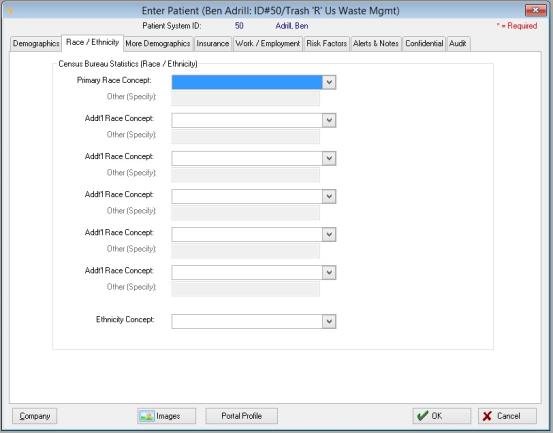
When the Enable Meaningful Use Demographic Data? checkbox is selected on the Setup Clinic System Parameters window is selected, the Race/Ethnic field on the main Demographics tab will be dithered. Additionally, when this parameter is enabled, selections of the Primary Race Concept and Ethnicity Concept on the Demographics Race / Ethnicity tab will populate the Race/Ethnic field on the Demographics General tab.
The options and how those map to the Race/Ethnic field available in Primary Race Concept and Ethnicity Concept fields, are defined below:
- Selecting Black or African American as the Primary Race concept from the Race / Ethnicity tab will populate the Race/Ethnic field with Black.
- Selecting White as the Primary Race concept from the Race / Ethnicity tab will populate the Race/Ethnic field with Caucasian.
- Selecting Asian as the Primary Race concept from the Race / Ethnicity tab will populate the Race/Ethnic field with Asian.
- Selecting Native Hawaiian or Pacific Islander as the Primary Race concept from the Race / Ethnicity tab will populate the Race/Ethnic field with Pacific Islander.
- Selecting American Indian or Alaska Native as the Primary Race concept from the Race / Ethnicity tab will populate the Race / Ethnicity field with Native American.
- Selecting Other as the Primary Race concept from the Race / Ethnicity tab will populate the Race/Ethnic field with Other.
- Selecting Unknown as the Primary Race concept from the Race / Ethnicity tab will populate the Race/Ethnic field with Unknown.
- Selecting Declined to Specify as the Primary Race concept from the Race / Ethnicity tab will populate the Race/Ethnic field with Declined to Specify.
If a selection of Hispanic or Latino is made for the Ethnicity Concept field within the Race / Ethnicity tabs, the software will update the Race / Ethnicity field with Hispanic. If a different selection for Ethnicity is made (Non-Hispanic, Declined to Specify or Unknown), the Race / Ethnicity field will not be changed.
The software will update the Race / Ethnicity field based on the most recent selection. For example, if African American is selected as the Primary Race Concept within the Race / Ethnicity tab, this would be reflected in the Race/Ethnic field on the Demographics General tab. However if the user then selects Hispanic from the Ethnicity drop down within the Race / Ethnicity tab, this will update the Race/Ethnic field on the Demographics General tab to Hispanic. If users would like to update the Race / Ethnicity field again to reflect African American, they will need to make this selection again as the Primary Race Concept on the Race / Ethnicity Tab.
The More Demographics tab
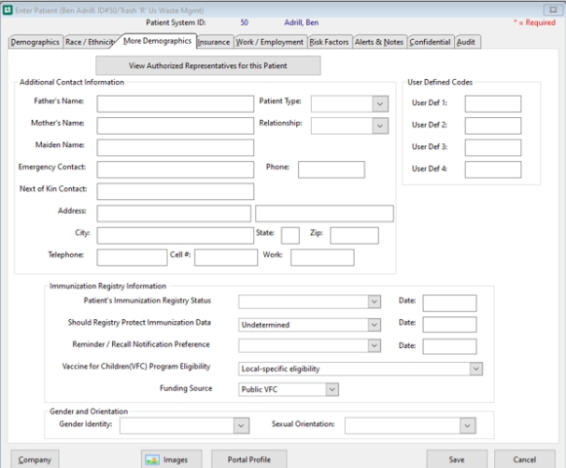
Complete all fields as appropriate.
Funding Source: The Funding Source may be used to record where the funds came from to cover the cost of the immunizations.
Enter the Funding Source from the following dropdown selections:
-
Federal funds
-
State funds
-
Tribal funds
-
Public
-
Public VFC
-
Public non-VFC
-
Military funds
-
Private funds
-
other
-
unknown
-
Pandemic
User Defined Codes- To submit the New York State Immunization Registry a Priority Code must be entered on the Patient's More Demographics tab on the [Enter Patient] screen. Below is the list of approved codes. The code must be entered in the User Defined Field (User Defined 4) set up in the System Admin Parameters.
The MORE DEMOGRAPHICS tab includes four user-defined fields for the purpose of capturing and displaying additional demographics data in a systematic way. They should not be used for clinical information of any sort since they are not confidential. User fields are set up in System Admin Parameters.
The State Immunization Registry export for New York state includes additional Priority Group Code. The "3HEALTH" code is specific for the third dose of COVID-19 vaccine. The codes include:
| Value Code | Short Name | Description |
|---|---|---|
| HCPHOSP | HCP Hospital | Health Care Providers Hospital |
| HCPEMS | HCP EMS | Health Care providers - EMS |
| HCPOTHERS | HCP other staff | Health care provider - other facilities |
| LTCFHCP | LongtermCare HCP | longterm care staff |
| LTCFRES | ltcf resident | lonf term care resident |
| HCPME | HCP MED Examiner | HCP - Medical Examiners, Coroners, morticians, etc. |
| RESCONG | resident congregant setting | resident in congregant setting other than residents of LTCF |
| PUBSAFE | frontline public safety | frontline workers in public safety - fire fighters, police, corrections |
| HCPAMB | HCP Ambulatory | HCP Ambulatory staff |
| 75+HEALTH | 75 years or older | persons 75 years or older who are not residents of LTCF |
| 65-74 | 65 to 74 years old | 65 to 74 years old who are not residents of LTCF |
| U65HEALTH | under 65 health | under 65 years with underlying health conditions at high risk of hospitalization |
| FRONTLINE | frontline staff | frontline workers in food / agriculture, USPS, manufacturing, grocery, public transit, educational (teacher, support staff, daycare) |
| OTHESSENTIAL | Other essential | Other essential staff - transportation and logistics, food service, housing construction, finance, IT, communications, energy, law, public safety and public health |
| PREGNANT | Pregnant | Persons who are currently pregnant |
| AGE | Eligible Age | Eligible age at time of visit per current NYS guidelines |
| 3HEALTH | 3rd dose - health reason | 3rd dose administered due to existing health condition (immunocompromised) |
Enter the relevant data and select Save
Select View Authorized Representatives for this Patient to view any Authorized Representatives assigned to them. For more information on this option see How To Set Up and Assign An Authorized Representative
The Insurance tab

See How to Add Patient Insurance for more information about this tab.
If Medical Provider Networks are used in your state, you can associate the patient with one here. Read How to Set Up a Provider Network to learn more.
The Work / Employment tab
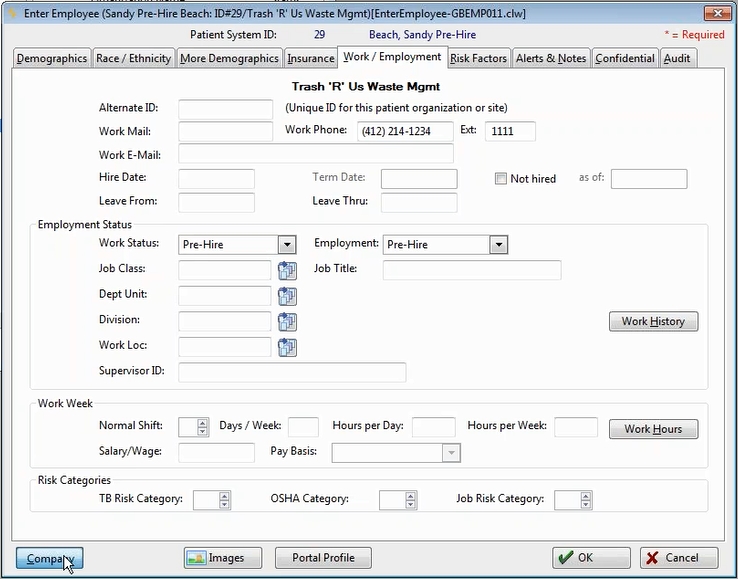
The Work / Employment tab includes data fields such as:
| Field | Description |
|---|---|
| Alternate ID | Unique ID for the patient organization or site |
| Work mail, Phone, Ext. | The employee's work address, employee/patient work telephone number and extension |
| Work E-Mail | E-Mail address |
| Hire Date | Date employee/patient hired. |
| Term Date |
If a Term Date is entered, then by default, this employee will not show up on the Employee Lookup List or on surveillance and compliance reports. (A Hire Date must be entered in order for the Term Date field to be available. This will change the Work Status to Terminated. |
| Not hired | Check this box if employee/patient was not hired. This has the same effect as marking a patient terminated, as described above. It is intended for use with individuals who receive pre-placement physicals, but who are not hired. |
| as of | This will become available if the Not hired checkbox is checked. |
| Leave From | Enter the start date for leave of absence, family leave or paid leave. (one of these options should be chosen from the Work Status dropdown). |
| Leave Thru | Enter the date the employee returned to work from their leave. |
When the application receives an interface record with the status of "Not-Hired", the software will check the Not hired box on this window. If the record also contains a termination date, this will populate in the "Not-Hired As of" date field. If no termination date is sent through the interface, the software will default the "Not-Hired As of" date with the date the record is received.
Employment Status Fields
| Field | Description |
|---|---|
| Work Status (dropdown) |
These options are hard coded in the application. They include:
|
| Employment |
These options are hard coded in the application. These options are available:
|
| Job Title | Enter the Employee/Patient Job Title. |
| Job Class |
These are defined during implementation. They are entered on the Select Job Class Code window. How these are tracked is defined in the System Admin Parameter, it can be by Company or Global. Your name of this section may be different since it can be defined on the Organization and Personnel Codes tab on the System Admin parameters. |
| Dept Unit | These are defined during implementation. They are entered on the Select Dept Unit Code window. Your name of this section may be different since it can be defined on the Organization and Personnel Codes on the System Admin parameters. |
| Division | These are defined during implementation. They are entered on the Select Dept Unit Code window. How these are tracked is defined in the System Admin Parameter, it can be by Company or Global. Your name of this section may be different since it can be defined on the Organization and Personnel Codes tab on the System Admin parameters. |
| Location |
These are defined during implementation. They are entered on the Select Location Code window. How these are tracked is defined in the System Admin Parameter, it can be by Company or Global. Your name of this section may be different since it can be defined on the Organization and Personnel Codes tab on the System Admin parameters. |
| Supervisor ID |
Supervisor ID is set at the Department Level or Associated directly with the Employee. Your Supervisors can be added on the Select Supervisor or Manager screen. If associated with the Employee you can assign a Tracking Level by Company or Global. Your name of this section may be different since it can be defined on the Organization and Personnel Codes tab on the System Admin parameters. |
| Work History button | Displays any work history entered for this employee. |
These fields are mostly use by hospital employee health departments. Occupational health clinics will use this section to terminate employees from companies. This is done by entering a Term Date.
Job Class, Dept Unit, Division, and Work Location, if entered, are automatically added to visit and incident records when created providing a record of the patients situation at the time of the accident. Moving the patient to a different on of these entities will not affect earlier visits. If a visit is entered with incorrect information, these fields can be manually updated on the AUDIT tab of both the visit record and the incident record.
Certain reports can be grouped using these fields.
For a company which uses different visit instructions for different groups within the company, Company Specific Visit Category Protocols can be created which are used only for patients of a certain Job Class or Dept Unit. These entities are specific to a company. Read How to Set Up Organization Codes to learn more.
This tab is not displayed for Private Practice patients.
Work Week
| Normal Shift | The number associated with the employee shift. |
| Days / Week | Enter the number of days per week work |
| Hours per Day | Enter the number of hours a day scheduled to work |
| Hours per Week | Enter the number of hours a week scheduled to work |
| Salary/Wage | Enter the dollar amount for this employee |
| Pay Basis |
Defines how the employee is paid:
|
Work Hours

The software has the ability to import employee hours worked from your payroll system each pay period. That information can then be used to produce very accurate figures on the Injury and Illness Rates Report.
You can see the work history imported or entered for an employee by clicking the Work Hours button to display the Patient Work Hours window.
By entering a Start date on this window you can narrow your search.
Risk Categories
-
OSHA Category
-
Most Employee Health clients use the OSHA category to identify those people who should get the Hepatitis B immunization. So, for example, only those people in OSHA risk category 1 get the Hep B immunization. You can then run a compliance report and determine who is or is not compliant. This field is so called because prior to the Bloodborne Pathogens standard, OSHA used 3 risk categories to classify people whose jobs exposed them to blood. While this is no longer the case, the convention has persisted.
-
-
TB Risk Category
-
TB Risk Category is used to identify people who are 3 month or 6 month testers, if you have any people receiving TB skin tests at these intervals. When you set up the medical activity for TB skin test, make 12 months the default repeat interval, as there is then no need to set up a TB Risk category for people who receive TB skin tests annually.
-
-
Job Risk Category
-
These are more complicated, and you should request support if you want to use them. Very few people use them now in hospitals, since the TB risk category and OSHA risk category cover the vast majority of employees Client organizations. You would want to use a job risk category when the repeat frequency for a certain test was different for people depending on the risk associated with their job -- just like the HepB and TB skin tests. You can have up to 10 different risk categories, but each person can only belong to a single category, so you would need to look at all the immunizations or tests you have to administrator (besides TB skin tests and HepB) and create the categories based on the combinations of services people are to receive.
-
The Risk Factors tab

If you are using Provider Charting, the allergy, tobacco, and alcohol fields are updated by running the appropriate Wizard. The information can be manually entered if you are not using Provider Charting.
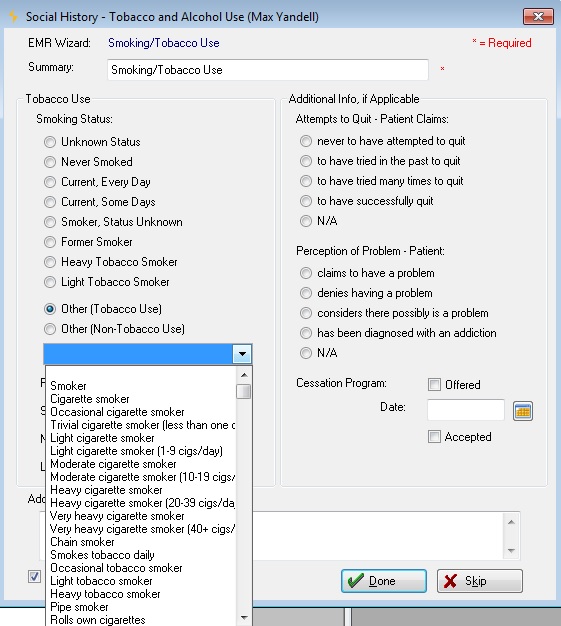
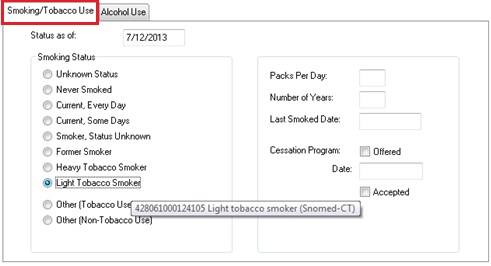
As part of Meaningful Use Stage 2 and the implementation of SNOMED CT codes within our software, Codes for Tobacco Use have had their respective descriptions expanded. New Smoking / Tobacco statuses are now available in: EMR Wizard Smoking / Tobacco Use (Social History); and, Demographics - Risk Factors tab, Smoking / Tobacco Use sub-tab. In each case for those statuses which are specifically defined, a hover-over feature allows users to see the SNOMED CT code that applies. Additionally, there are two "Other" categories: "Other (Tobacco use)"; "Other (Non-Tobacco Use)". Selecting either one of these produces a dropdown menu of SNOMED CT codes. No hover feature applies to the menu as the codes are taken directly from the SNOMED CT table. Within Demographics under the RISK FACTORS tab, the topics of Smoking/Tobacco use and Alcohol Use have been split into two separate sub-tabs, where previously, those topics existed in a single sub-tab.
[Smoking/Tobacco Use] wizard window.
Under Tobacco Use, the Smoking Status list contains radio buttons that may be selected to describe the patients level of tobacco use. When hovering over a particular selection the SNOMED CT code is displayed.
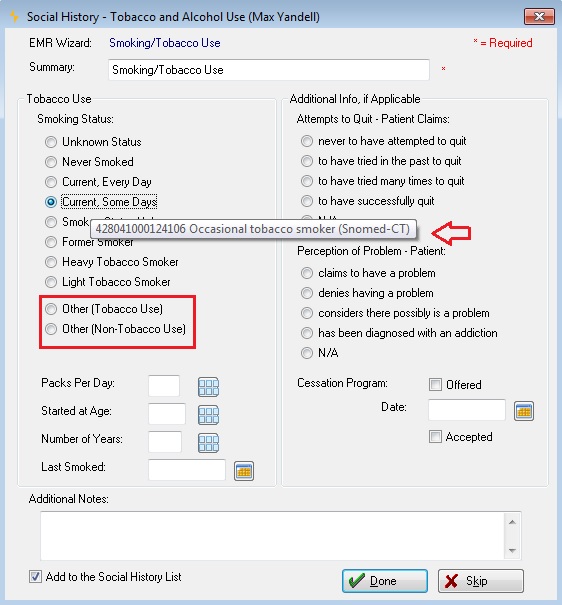
Social_History-Tobacco_and_Alcohol_Use
There are two “Other†categories that represent Tobacco Use and Non-Tobacco Use. Neither of these buttons will display the SNOMED CT code when hovering. However, when one of the “Other†categories is selected, a dropdown menu of choices is displayed. Users may select from that menu, SNOMED CT codes are not part of the description.
Other (Tobacco Use)
Social_History-Tobacco_and_Alcohol_Use
Other (Non-Tobacco Use)
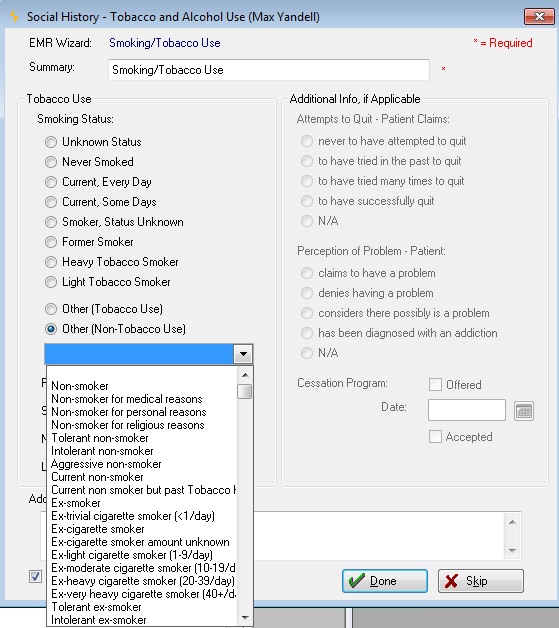
Social_History-Tobacco_and_Alcohol_Use
Two other areas use the same selection structure:
Clinical Problems List for Social / Work Status [Enter Social History]
Demographics
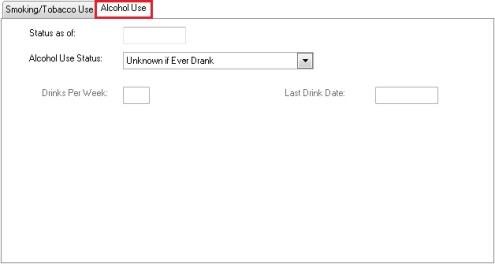
Within Demographics, Risk Factors tab, there are two sub-tabs.
Smoking/Tobacco Use
Alcohol Use
The Alerts & Notes tab
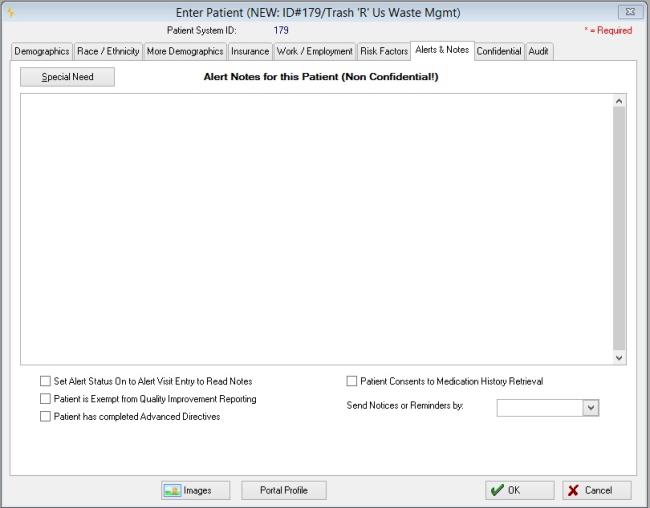
The Notes entered here can be viewed, but not altered, on the Patient Chart.
-
Set Alert Status On to Alert Visit Entry to Read Notes:
-
If checked, a large red message will be displayed on the [Enter Visit] window instructing the user to view the ALERT NOTES tab.
Patient is Exempt from Quality Improvement Reporting:
-
The Quality Improvement Report generates lists of patients that meet certain user specified conditions. The intent is to provide a reporting tool for identifying ways to improve service and to monitor results. It can analyze populations, treatments, and labs results. Checking this box to exclude a patient from that report.
-
-
Patient has completed Advanced Directives:
-
If your clinic uses scanning, this flag is automatically set the first time an advanced directive document is captured (scanned) for this patient. If your clinic does not use scanning, the flag can be set manually to indicate that there are advanced directive documents in the patient's file.
-
Scanned images can be designated as advanced directive documents (ex: Living Wills, Power of Attorney, etc.). If one or more advanced directive documents have been scanned for a patient, users and physicians will be notified of that fact with a red message displayed above the Alert Notes on the [Enter Visit] window.

-
-
Patient Consents to Medication History Retrieval:
-
This checkbox governs Medication History retrieval for the patient. This preference must be checked prior to visit being logged, otherwise the information will not be available until the next visit within 24 hours. SureScripts requires that you have on file a record of the patient’s consent to retrieve their Medication History. If this flag is not checked the application will not query the SureScripts network for medication history for the patient when viewing Eligibility and Formulary Benefit Information while prescribing a medication.
-
-
Send Notices or Reminders by:
-
A patient's preference for how letters and notices should be sent can be entered here. When letters are sent, one option is to send at indicated in this field. The choices are Postcard, Telephone, Email, and Do Not Send.
-
The Confidential tab
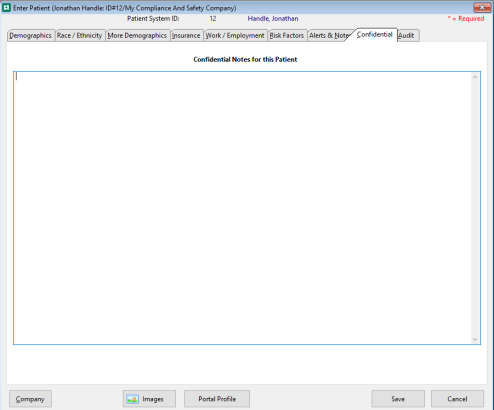
The Confidential tab is a large text entry field which can contain confidential notes. It is only available to users with the proper security rights. Confidential notes are entered from the Patient Chart, and can only be viewed here.
The Audit tab
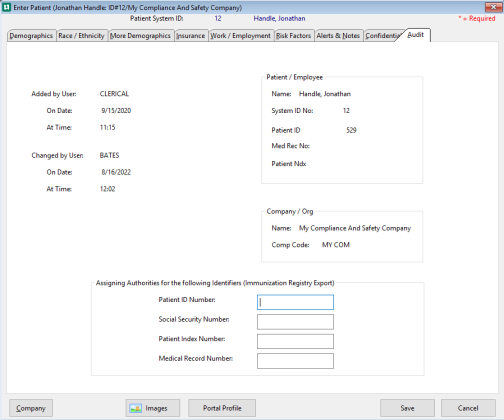
The Audit tab displays background information about the record.
Change Patient
View or change an existing patient
Here are multiple ways to reach employee demographics:
-
From the Home Nav Bar, click the Demographics button.
-
Enter name on Patient Search pop-up window
-
The Search Patient window opens with your matching selections
-
Search for and select the desired employee
-
Select Edit.
-
-
OR, From the Home Nav Bar tab, click the View Chart button.
-
The Select Patient window opens
-
Enter the patient information
-
Select Search List or OK Search for and select the desired employee
-
Search for and select the desired employee
-
On the Patient Chart, click the Demographics button in the lower center of the screen.
-
-
OR, you can also access employee demographics from Provider Charting by clicking the Demographics button:
When you reach the [Enter Patient] window, make changes as described in the topic on adding a patient.
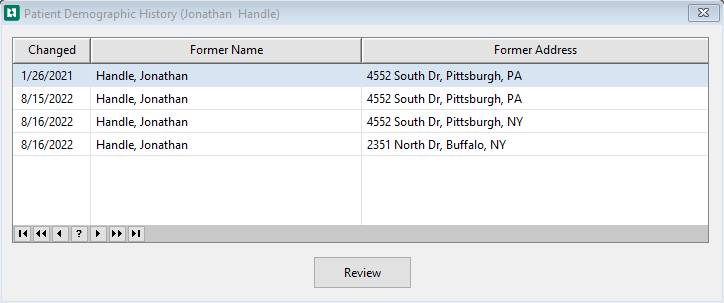
View demographics change history
-
On the DEMOGRAPHICS tab, click the History button found on the right, just beneath Suffix.

-
The [Patient Demographics History] window will be displayed.
-
Highlight the date of interest, and click Review to display the [Demographic History] window. At the bottom, you will see the user who made the change, along with the date and time. The information in this record shows the values of fields before the change made on this date.
-
-
Close window.