Patient Check Out Overview
If you haven't already done so, please read the Patient Check-In Overview, Visits Overview, and Visit Category Protocols Overview topics before continuing!
Summary
In the software, the term "check-out" refers to more that simply getting the patient out the door. It incorporates all the tasks to be performed after the clinical work is finished. For all visits, check-out includes charge entry, recording the visit duration and status, and printing a summary of the visit for the employer. It can also include scheduling follow-up appointments, capturing work status information, printing a state form, or entering clinical results. If there are results which will not be received from the lab for a couple days, the "check-out" procedure will not be complete until that information is entered on the visit.
The Tasks
Checking a patient out in the program includes a number of tasks, serving several purposes:
-
Entering times allows you to document wait time and length of visit for employers.
-
Marking the status of the visit lets you identify visits with pending entry work.
-
Scheduling follow-up appointments helps manage your work load.
-
The work status of the patient and work restrictions let the employer know if the patient can be assigned to modified duty until ready to return to the regular job.
-
Diagnostic codes, charting notes, and referral information all pertain to the injury and treatment of the patient.
-
Entering and/or confirming all activities performed fills in the medical record and prepares the visit for billing. (If will only be rarely that you directly enter billing information such as fees or payer. the program does that automatically in the background, letting you focus on the clinical aspects of the visit.)
-
For some activities you may enter information specific to the activity such as which dose of HBV or the detailed results of an audiogram.
-
Physician's orders allow you to track a number of possible orders from the provider, including therapy, medications, lab work, etc.
-
You can produce a visit summary for the employer and in some states, a First Report of Injury, or other forms required on Workers' Comp visits.
-
You can print user defined PDF forms, customized for your clinic and companies, which pull specified information from the database, and allow you to enter additional information specific to this visit.
-
And finally, if your clinic has been set up for it, you can scan reports and other documents into the patient record.
Who does all this?
Clinic procedures vary a great deal with respect to when and by whom the various tasks are performed. There is not a single "right way" (although there are certainly some "wrong ways!") It all depends on the flow of patients and information through your clinic:
-
Nurses might enter work status, diagnostics, restrictions and referrals.
-
Physicians might use our Electronic Medical Record to generate charting notes.
-
Entry and/or confirmation of activities performed might be done by a billing clerk.
|
|
If your clinic uses the Net Health Employee Health and Occupational Medicine Provider Charting, several of the jobs described here will be performed within the charting workspace. |
Charge Entry vs Clinical Results
Two of the steps for completing a visit are closely related, and sometimes are done by one person as a single step, other times by more than one person as two or more steps. The first step is charge entry, or rather, making sure that all activities performed have been recorded. For a physicals and other Occupational Health visits, you will not typically enter activities at the end of the visit. They will have been selected in advance-all you have to do is confirm that they were performed. At check-out, you simply see to it that all activities have been selected, and the program will work in the background to determine the actual fee. To complete an Urgent Care or Workers' Comp visit, you will have to select each activity performed.
The program also let's you record certain clinical information about the visit, and that is the second step. This includes such things as lab results, indicating the step of a multi-dose activity such as a hepatitis B vaccination, or determining the date for a repeating activity such as TB testing. To capture this information, the clinical staff might make notes on the Encounter Form to allow the front desk to enter clinical results at the same time that the charges are entered. Or, it may be that clinical results will be entered by the clinical staff either at the time of the visit or later.
The chapter in this help system on checking out a patient will cover the charge entry part of the process. Separate topics are dedicated to the clinical results part of the job. You can read Clinical Results Overview and Immunizations and Surveillance Overview to learn more about that, and to find links to the many related topics.
Billing and Charge Entry
Let's say a little more about billing and charge entry. The program is a "rule driven" system. A lot of work has gone into setting up your companies and fee schedules. The billing rules determine who will pay for a visit, for instance, the software knows to split a drug screen off of a Workers' Comp visit and bill it to the employer, while the rest of the visit goes to the carrier. There are separate standard fee schedules for employers, carriers, and private practice patients. Furthermore, special fees may have been entered for companies, carriers, and other payers. If a company wants a certain group of activities, perhaps all substance abuse testing, on a separate invoice, the software knows and handles that automatically. It should be very unusual for you to have to think about billing, as such. Mostly, you simple let the software know what activities have occurred and it handles the billing end for you. You might, on occasion, need to mark an activity no charge, such as recollecting a lost or damaged specimen. You might have an employer who requires a prospective employee to pay for a pre-employment physical, in which case you'll need to indicate an override payer. But mostly, you just enter the activities performed.
Injury Documentation
An important concept to understand in Net Health Employee Health and Occupational Medicine is the distinction between Visit and Incident Records. The visit record covers what occurs in the clinic. For Workers' Comp visits, you might also want to capture information that applies to the injury itself, such as the body part, OSHA and safety log details, and insurance information. All that information goes in the incident record. The chapter on Injuries, Illnesses, and Exposures covers the subject in detail.
End of Visit Reports
A summary report can be printed at the end of each visit with information about the visit. The Work Status Summary is printed after Workers' Comp visits. The Encounter Summary is printed after all other types of visits. In addition, a Patient Clinical Summary can be printed after any visit. The user can select the elements of history to be included on the report. Instead of a paper report, an electronic version can be created using the ASTM CCR Document Electronic File an electronic file format for exchanging information between healthcare systems format. This is a format commonly used for exchanging patient information between health care systems (such as that used by another provider or a personal health record.) When the Clinical Summary is produced in the CCR format, it will be created in an encrypted file in the secure folder. It must be decrypted to give to the patient.
Where Do I Start?
There are potentially a lot of steps to checking out a patient, and if you are not careful, it is easy to get confused or to miss a step. You will probably find the job easier to do if you always do the tasks in the same order. The [Enter Visit] window has been designed with that in mind. A logical flow of activity is to enter certain fields on the GENERAL tab, then follow the tabs across the top of the screen from left to right, then the applicable buttons down the right from top to bottom. You will never have to enter something at all of these locations, but following this path takes you past everything you need to do in an orderly manner.
On the screen, this path works out to be something of a spiral. We have, in fact, named it "The Great Spiral." You can view it below. When considering the check-out tasks as we present them keep in mind that visit workflows vary a great deal among clinics. We have designed these help topics around one basic flow, but yours might well vary.
Certain errors found while generating invoices are best corrected in the visit record. Components of the visit record which are pertinent to invoicing can be viewed and corrected from within the Billing program, eliminating the need to move back and forth between the Billing and Clinic modules. See the topic Billing Corrections in the Visit Record.
What Do You Want To Do?
View:
-
The Great Spiral: non-injury visits
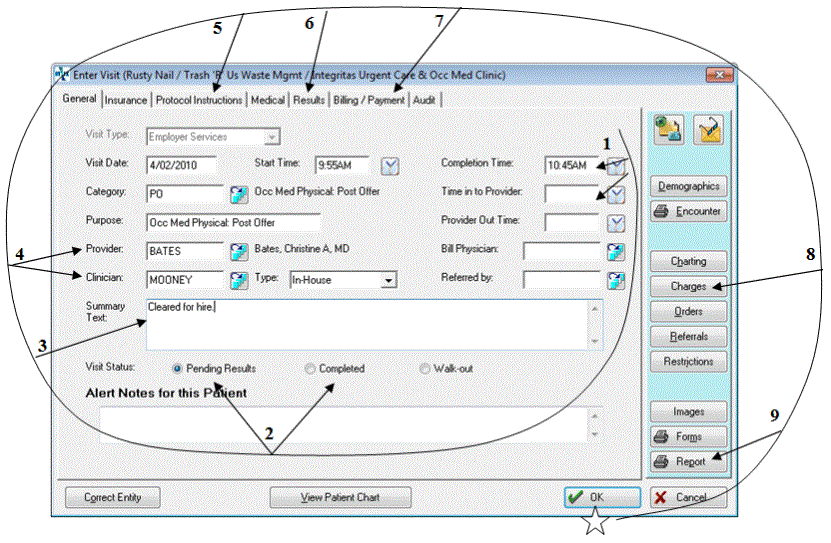
(Move the cursor to a point of interest. If a screen tip appears, click there for more information.)
-
Enter the time the visit was complete and the time the patient was shown into the provider (always).
-
Mark the visit complete or leave it pending if there is more information to be entered (always).
-
Enter summary text to appear on the Encounter Summary (sometimes).
-
Confirm the correct provider and/or clinician (always).
-
READ THE INSTRUCTIONS for Check-Out (always).
-
Enter vital signs (per clinic procedures). View charges (sometimes).
-
Collect payment for services (usually done at check-in).
-
Enter activities performed on this visit (always).
-
Enter clinical results on activities (sometimes)
-
-
Print (or fax or email) the Encounter Summary Report to the employer (always).
-
-
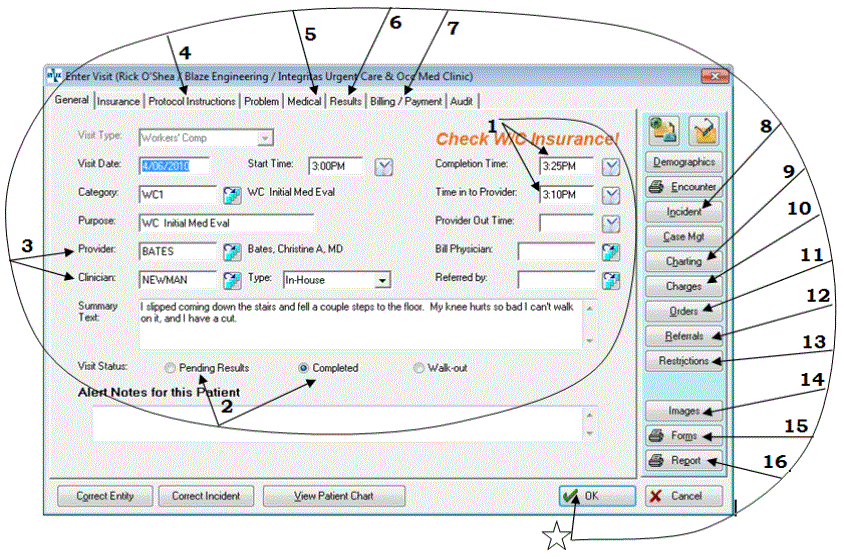
The Great Spiral: injury visits
(To learn more about an item on the screen, move the cursor to a point of interest. If a pointing finger cursor
 appears, click there for more information.)
-
Enter the time the visit was complete and the time the patient was shown into the provider (always).
-
Mark the visit complete or leave it pending if there is more information to be entered (always).
-
Confirm the correct provider and/or clinician (always).
-
READ THE INSTRUCTIONS for Check-Out (always).
-
Enter diagnosis codes, work status, and schedule follow-up appointments (diagnosis codes, always; others, sometimes*).
-
On the RESULTS tab, enter vital signs (sometimes*). You might also enter charges from this tab instead of from the Charges button.
-
Collect payment for services (as required.)
-
Enter information required on the incident (sometimes).
-
Enter charting notes (per clinic procedures*).
-
Enter activities performed on this visit (sometimes*). Enter clinical results on activities (sometimes*).
-
Enter or carry out physician orders (sometimes*).
-
Enter referral (when required*).
-
Enter work restrictions (when required*).
-
Scan documents (when needed).
-
Print the First Report of Injury (Workers' Comp initial visits) or other form.
-
Print (or fax or email) the Work Status Form to the employer (always).

* If your clinic uses the Net Health Employee Health and Occupational Medicine Provider Charting , several of the jobs listed here will be performed within the charting workspace.
-
-
Check out a patient
-
Enter diagnostic and work status information
-
Schedule a follow-up appointment
-
Enter vital signs
-
Complete or enter charges
-
Charting notes
-
Physician's Orders
-
Enter a referral
-
Enter work restrictions
-
Scanning documents
Print:
-
The First Report of Injury
-
User Defined Interactive PDF Forms
-
The Work Status Summary for Work Comp visits
-
The Encounter Summary for non-Work Comp visits
-
The Patient Clinical Summary
Billing:
Common Mistakes
Starting Slow
The biggest mistake we see clinics make with check-out occurs at some clinics which are just getting started with this software. Some want to "start slow". The idea is that if they minimize the time and learning required right now by just entering minimal essential information, later when users are familiar with the system they can begin entering everything. There are three reasons that this is not a good idea:
-
It really does not save you much time or training.
-
It is very difficult to change users habits again later. Think how much they welcomed the change initially. Do you want to revise procedures again in 3 or 6 or 12 months?
-
The final reason is that you cannot report on information not entered. That is obvious enough, and you might be quite willing to go a while without being able, say, to tell employers how long each visit takes. Keep in mind that the software is not designed just to record what happened today. It is designed to let you determine what happened over a period of time and to even compare one period to another.
Here is a example of the reporting problems caused by a slow start. Suppose you decide initially to not enter the times when the patient was shown into the provider, and when the visit was completed. By giving up the ability to document how long a visit took today, you also give up the ability to tell an employer the average length of visits for this period. If the employer complains that visits are taking too long or that his employees tell him that they spend a long time in your waiting room, you have no ability to demonstrate otherwise. For the small price of entering a time in two fields on each visit, you can tell the employee how long his employees have waited on average, and even break it down for each type of visit. If he complains that a visit took two hours when in fact it took 30 minutes, you can tell him exactly when the patient left the clinic. (Since that is printed on the end of visit summary you send, he can even know that before the employee gets back to work!)
In a nutshell, it is not worth it. Determine in advance what information you will need in the future and capture it on all visits starting on day 1.
Too Many Touches
While the program does not limit the order in which the Check-Out tasks are performed or the number of people who perform them, the simple fact is that the more times someone has to open and close the record, the less efficient your process will be. Think through carefully who has each bit of information and who can best enter it. Does it make more sense for the person with the information to enter it, or would it be more efficient for that person to write the information on the Encounter Form, allowing someone else to enter it?
Here are some guidelines:
-
As a general rule, the more someone is paid, the less time they should spend doing data entry.
-
Entering soon after the visit tends to result in fewer errors than entering later.
-
Entry by someone close to the visit tends to be more efficient that transmitting the information to someone farther away.
Remember, these are guidelines not rules. Ultimately, it is up to you to develop a procedure that is efficient and effective for your clinic.