Recording a Visit Payment, Co-Payment or Override Billing Information
If you haven't already done so, please read the Patient Check-In Overview and Realtime Price Calculation topics before continuing!
Summary
Co-payments and payments made at the time of service are entered on the PAYMENT tab of the [Enter Visit] record. An entry can be made when the patient is registered or checked out. Typically, co-payments for Private Practice non-injury visits and payments for physicals will be made at registration, since those amounts are known in advance. Full payments for injury visits cannot be made until check-out, after services are performed.
In most cases, the billing setup in the program will carry all the information necessary to invoice the correct payer and clinic users will not need to do anything. On rare occasions it might be necessary to enter billing override information for the visit. This can include an override payer, an override account, making the visit no charge, indicating which of multiple patient insurance policies should be used, and entering a PO number.
Urgent Care Discounts
In Urgent Care settings, clients need to ability to provide an incentive for their customers to pay in full at the time of the visit. This is generally offered in the form of a special discount, although in some instances a special discount fee schedule might be preferable. As part of the Billing Program setup, the software allows you to establish discounts for full payment at the time of service. You can enter a single across-the-board discount, and/or discounted item override fees.
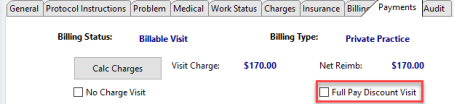
Once a discount and / or fee schedule has been set up, users can flag any Private Practice visit as a "Full Pay" visit, select Calc Charges during visit entry, and the discounts are automatically applied to the standard fee schedule that is used for Private Practice visits. The discounted fees will appear on the Encounter Summary / Receipt document and are passed along to the Billing and A/R module, where the fee that was collected in the visit record is automatically applied to cancel out the invoice.
Apply Co-Pay to Specific Charges
By default, when the software applies a co-payment to the invoice it will start with the first charge on the visit. Alternatively, you can at the time of the visit indicate the charge(s) to apply it to. This can be done from the PAYMENT tab seen below, or from the RESULTS tab, CHARGE SUMMARY sub-tab.
Security
A security measure can be set that requires the approval of a supervisor in order to reduce or remove a co-payment or payment from a clinic visit after the Encounter Summary Receipt has been printed at the end of the visit.
The user must have one of these rights assigned:
-
System Administrator Access
-
Clinic Manager Access
-
Accounting Manger
To require an Administrator must authorize a change to a co-pay or payment an option on the Billing Parameters must be selected.
To set this up:
-
From the Home Nav bar
-
Select Setup/Admin
-
From the Setup & Admin Nav bar
-
Select Billing Setup
-
From the Setup and Administration extended menu
-
Select Billing System Parameters
-
Administer Billing System setting window opens
-
Select Cash / Adjustments tab
-
Check Require Administrator Security Level (and password) to Change or Delete Copayments
Once the Encounter Summary is printed, if a user who does not have Clinic Manager, Accounting Manager or System Administrator user rights attempts either to lower the amount of the co-payment or to clear it altogether, an authorization window will pop up requiring the entry of a user code and password by either a Clinic Manager, System Administrator, or Accounting Manager. Otherwise, the change is prevented.
![]()
An amount will be occasionally be typed in incorrectly. To allow easily fixing mistakes that are noticed immediately by the person entering the payment, any change can be made before the Encounter Summary Receipt is printed without supervisor approval.
Collectible Amount
The software can calculate the amount that can be collected from the patient for Private Practice visits only. The calculation uses several pieces of information: the Co-Pay, Deductible, and Deductible Met fields from the patient's insurance policy record, along with the net reimbursable amount for the visit. Here is how it works:
| Status | Collectible Amount |
|---|---|
| Unmet Deductible (Deductible - Met Deductible) = 0 | Co-pay |
| Unmet Deductible > Net Reimbursable | Net Reimbursable |
| Unmet Deductible < Net Reimbursable |
Unmet Deductible + Co-Pay (But not greater than Net Reimbursable) |
To calculate the Suggested payment use the dollar sign on your Private Practice Payment tab. This will do a behind the scene calculation defined above to gather this information if entered.
Enter Payment or Co-Payment on a Visit
Steps to Complete Before Entering a Payment
-
If the patient has multiple insurance policies, indicate the one paying for this visit.
-
If the payer is the patient's primary policy, simply confirm the information.
-
To change the Insurance select the pencil
 to erase the original insurance and then select the magnifying glass
  to open the Patient Guarantors window and select the correct insurance. If an incident is attached to the visit and an override insurance is selected, then that incident will also be updated with the carrier and guarantor information to bill for this case.
 -
For all visits, complete charges.
Enter Co-Payments or Payments
-
Click the Payment tab of the Enter Visit window.
-
If this is an Urgent Care visit that is being paid in full by the patient, and if you offer discounts for full payment, select the Full Payment Discount checkbox . (Read the topic on Usual and Customary Fee Schedules to learn about setting up the discount fee schedule.)
-
-
Select the Calc Charges button. This will calculate the charges, including applicable discounts, and display the total of the charges below the button. Remember that this only works after entering / completing charges.
-
Determine the amount of the payment.
-
Private practice / urgent care injury visit: If the co-pay has been entered with the patient's insurance information, the co-pay amount will appear in red on the GENERAL tab.

-
On the Payment tab under Payment / Co-Payment section, the co-pay is listed along with deductible and the Coinsurance percentage. Listed below is the amount collected so far if available. Select the dollar sign to see the suggested amount to be collected based on the information entered on the patient's insurance.

-
The Results tab of the Enter Visit window includes a Charge Summary sub-tab, which displays a list of activities entered on the visit. It also has a Calc Charges button which will lookup the charge for each activity and add it to the display. Depending on the setting for Realtime Price Calculation in your Billing System Parameters, the use of this button can have an impact on the price used if prices are changed between adding charges to the visit and processing charges before invoicing.
-
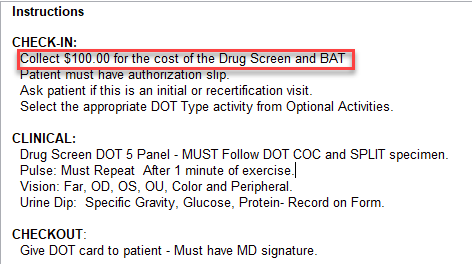
Patient paid Occupational Health visit should have the amount included on the Protocol Instructions tab.
-
Company physical on cash only basis:
-
The Net Reimbursable will be the amount to collect.
-
-
-
Select Accept a Payment
-
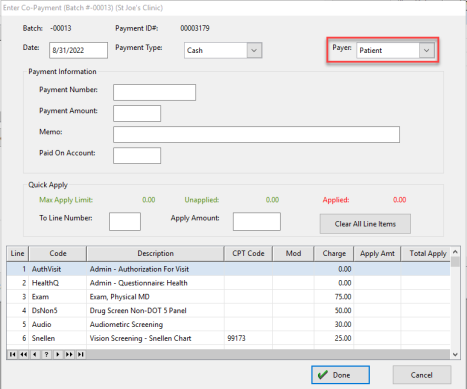
Enter Co-Payment (Batch#) (Clinic) window opens
-
Enter Date (default is current date)
-
Select Payment Type from dropdown
-
Payer default is default. Change using the dropdown if needed
-
-
Payment Information section
-
Enter Payment Number if available
-
Enter Payment Amount
-
Enter Memo - Can note what the payment is for
-
Paid On Account - Enter an amount here for future charges
-
-
Payment Breakdown - enter if known
-
Enter Copay
-
Enter Deductible
-
Enter Coinsurance
-
Enter Other if needed
-
-
Quick Apply
-
Enter Line Number to apply payment
-
Enter Amount for that line item
-
Repeat these steps for all line items that need paid
-
-
Select Done
Patient Paid Employer Services Visit
On occasion, you might have an Employer Services visit, most likely a post offer physical, which will be paid by the patient. The visit should be logged as coming from the employer you will use the employer protocol if there is one. If the patient is responsible for all of the charges when accepting the payment change the Payer to Patient on the Enter Co-Payment window.
A second possible situation is where the employer pays for the bulk of the visit, such as a manager’s physical. However, there are certain optional activities, perhaps EKG or audiogram, for which the patient can pay if s/he chooses, getting the benefit of the employer's special price.
Situation 1: Setting up in advance for the patient to pay for full visit.
-
From the Home Nav Bar
-
Select setup / Admin
-
Select Companies
-
Highlight the company
-
Select Edit
-
Select Protocols from the bottom of the window
-
highlight the protocol you want to view
-
Select Edit
-
Select the first billable charge from the Protocol Activities tab
-
Double click the billable activity.
-
Change Override Payer Type to Employee.

-
Select Save
-
Repeat steps 9 - 12 for all billable activities.
Situation 2: You learn of the need to accept full payment from the patient at the time of the visit.
-
Log the visit as an Employer Services visit for the company.
-
Complete all of the charges
-
On the Payment tab
-
Select Accept a Payment
-
Enter Co-Payment window opens
-
Select Payer dropdown to change the payer to Patient
-
Complete the payment information
-
Select Done
Situation 3: It is possible that you could learn at the time of the visit that certain activities are to be paid for by the patient:
-
Log the visit as an Employer Services visit for the company.
-
On the Enter Visit window,
-
Select Charges
-
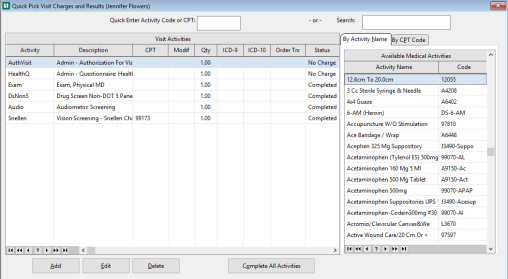
On the Quick Pick Visit Charges and Results window
-
Double click the first activity for which the patient is paying.
-
On the Enter Medical Activity Charge window
-
Change Override Payer to Patient
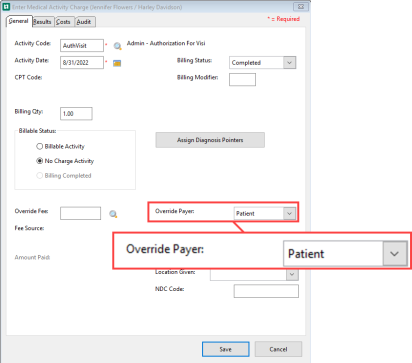
-
Repeat steps 6 & 7 for all activities for which the patient is paying.
Apply Co-Pay by Line Item
A co-payment entered on the Enter Co-Payment window, by default, is applied to activities on the visit, starting with the first, and working down until the entire amount is applied. It is possible to tell the software at the time of the visit to apply the payment to one or more specific activities.
On the Enter Visit window:
-
Select Payments tab
-
Select Accept a Payment
-
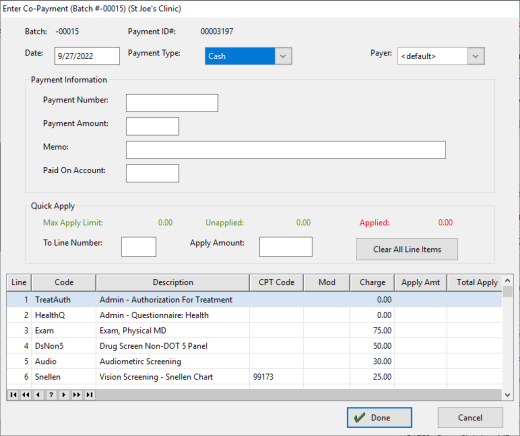
The Enter Co-Payment window opens
-
Enter:
-
Date
-
Payment Type (from dropdown)
-
Payer
-
-
Enter Payment Information (this header changes and is dependent on the Payment Type)
-
To Apply by Line Item (Quick Apply):
-
To Line Number field
-
Enter line number and click tab
-
-
Apply Amount field
-
Enter Amount to be applied to line this line number and click tab
-
-
-
The payment now appears in the Apply Amount and Total Apply columns for that line
-
Repeat step 6 for other items this payment covers
-
Click Done
-
The program will apply the payment as indicated when charges are processed and the invoice is generated.
-
The amounts applied by line will be displayed on the Charge tab on the Enter Visit window
Multiple Payments During a Single Visit
The software allows clinics to record two payments when a patient is paying their copay or deductible. Payments do not need to be entered as a single record, and patients may get a receipt reflecting the multiple forms of payment.
The application has a separate Payment tab on the visit where the user can record multiple types of payments.
The billing and payment functions are split into two separate tabs. The Payments tab is located on the Enter Visit window to accommodate accepting multiple types of payments.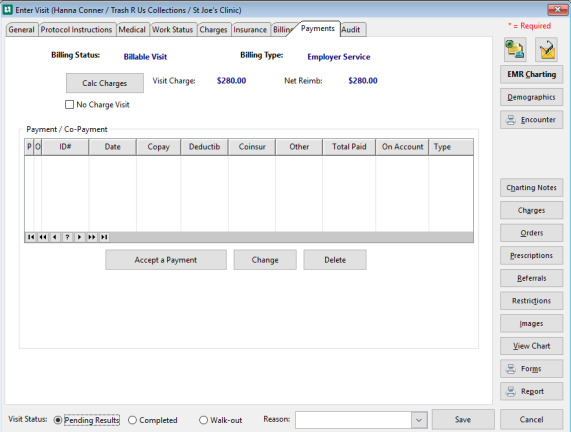
To accept payments select Accept a Payment.
The Enter Co-Payment window opens
The bottom portion of the screen will list all of the charges
-
Enter the top section
-
Enter date
-
Payment Type
-
Payer if other than default
-
-
Complete the Payment Information
-
Payment Number if applicable
-
Payment Amount
-
Memo if needed
-
Paid On Account (if collecting money for a past bill or for a future charge)
-
-
Quick Apply (if applying by line item)
-
Enter the To Line Number field
-
Enter the Apply Amount
-
-
Select Done
The amount entered will display in the Apply Amt and Total Apply columns 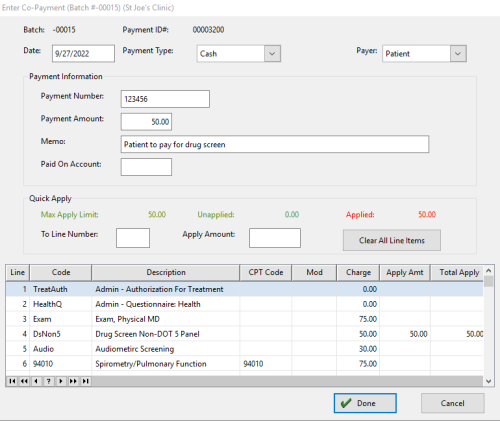
Paid on Account allows a payment for outstanding balances to be collected and not associated with this visit. The amount will be applied to the patient's account balance at a later time.
With each payment, users can record the breakdown showing what amount was collected for the copay, deductible, coinsurance and/or other amounts. This is a categorization as it is known at the time of the visit.
The payment may also be applied in total or in part to a specific line number in the Quick Apply section. If a line number is selected, the payment amount must be applied on enough line items to exhaust the full amount. If no item is selected, the system will begin at the top of the charges and begin applying the payment until the entire amount is used.
If the patient is required to make a second payment, for instance, if there was a test performed during the visit and the insurance did not cover it, our system will accept a second payment (and third, etc., if necessary), by using the PAYMENT tab as described above. In addition, the second payment does not have to be the same type as the first one. For example, one payment may be cash, while the other is a credit card.
If you have a patient who has been flagged in Collections as a Cash Only patient and subsequently, the patient comes back in, then on the Visit Record, PAYMENTS tab:
1. You CAN accept a Payment on Account (which you must then apply to the account in the billing program using the Apply Unapplied Cash function).
2. You CANNOT accept a co-pay toward insurance (even if you have entered their insurance company on the insurance tab), without FIRST releasing the Cash Only flag in the Collections program.
3. The Sent To Collections flag (which is set in the Collections program) does not affect the PAYMENTS window. If the account was sent to collections and if the patient came in with money, typically, a clinic would accept the payment and then resolve the matter later with the Collections Company.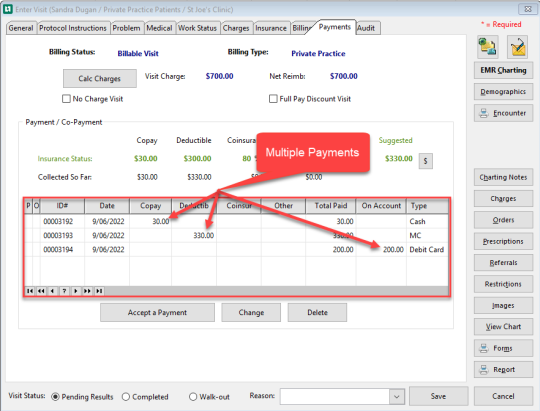
Example above shows 3 payments accepted for 1 visit. The first was a copay, the second was a deductible, and the third is Payment on Account.
The payments and Payment on Accounts will be listed out separately on the Encounter Summary receipt portion of the report. In addition, each payment can be assigned to the specific line item or items to which it applies. Each payment will be captured as a separate transaction in the copay cash receipts batch to make balancing the cash batch easier.
When the invoices are created, the payments will be applied against the appropriate invoice for the visit and any payment on account amounts will appear on the Apply Open Cash / Credit window to be applied against open invoice balances.
If a payment has been entered incorrectly
Click the Clear Payment button on the Payments tab of the Enter Visit window. Then, re-enter the payment correctly. The ability to do this might be restricted, as explained in the Security section above.