How to Check-In Patients for Drug Screens or Physicals
If you haven't already done so, please read the Patient Check-In Overview and How to Add a Patient topics before continuing!
Steps to Check In a Patient for a Drug Screen or Physical
To log a walk-in:
-
On the Home Nav Bar select Check-In, or on the Appointment Calendar window select Check-In a Patient.
-
The Select Patient window displays
-
Enter Patient Information
-
Select OK
-
The Log Visit or Encounter window opens
-
Select Log a New Walk-In Visit.
-
The Enter Visit window opens (with Patient Name / Company / Clinic)
-
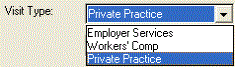
Select the Visit Type. Select Employer Services for Physicals and Drug Screens. This will limit the list of Visit Categories
-
Select the Means of Arrival from the dropdown if used by your organization
-
Arrival Time is the time the patient arrived at the Clinic
-
Visit Date will auto populate with current date
-
Start time is the time the patient is the time the patient registered
-
Select the Visit Category using the magnifying glass
-
The Purpose will automatically fill with description of the Visit Category selected
-
Time in to Provider is when the Provider sees the patient
-
Provider Out Time is the time the Provider leaves the Patient
-
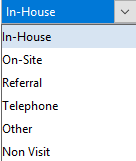
Enter the Type of Visit from the dropdown. In-House is the default.
-
Enter the Provider (If seeing this Patient)
If the selected Provider has a Billing Physician already setup (linked) with it, that physician will auto-fill in the field "Billing Physician". Users still have the ability to override the auto-filled entry by selecting another Billing Provider using the magnifying glass to the right.
-
Select the Protocol Instructions tab and read the instructions for Check-In.
-
Select Demographics and confirm the patients information. Then select Save if changes were needed or Cancel.
-
If a payment is to be collected, record it on the Payment tab.
-
Select Encounter from the right pane of the Enter Visit window and select services, and print encounter form.
- Appointment Notes button: Use this button to display any Appointment Notes or Reservation Notes corresponding to the Visit. If there are no Appointment Notes or Reservation Notes for the Visit, the button will not display. If either Appointment Notes or Reservation Notes exist for this Visit, the button may be selected to display a separate pop-up window containing the text of those notes in read-only mode. Click OK to exit the pop-up window. Using the Appointment Notes button is not reflected as an action within the audit record.
-
Select Save to log the visit.
To log a scheduled visit:
On the appointment calendar:
-
Look in the Provider column at the designated time to find the appointment.
-
Highlight the appointment.
-
Right-click on the appointment for this patient to pull up a menu.
-
Click on Log a Visit on the pop-up menu.
-
The Enter Visit window opens

-
The Visit Type will be selected from the Appointment
-
Select the Means of Arrival from the dropdown if used by your organization
-
Enter the Arrival Time
-
Visit Date, Start Time, Category, Purpose, Type, and Provider will be auto-filled from the Appointment
-
Select the Protocol Instructions tab and read the instructions for Check-In.
-
Select Demographics and confirm the patients information. Then select Save if changes were needed or Cancel.
-
If a payment is to be collected, record it on the Payment tab.
-
Select Encounter from the right pane of the Enter Visit window and select services, and print encounter form.
- Appointment Notes button: Use this button to display any Appointment Notes or Reservation Notes corresponding to the Visit. If there are no Appointment Notes or Reservation Notes for the Visit, the button will not display. If either Appointment Notes or Reservation Notes exist for this Visit, the button may be selected to display a separate pop-up window containing the text of those notes in read-only mode. Click OK to exit the pop-up window. Using the Appointment Notes button is not reflected as an action within the audit record.
-
Select Save to log the visit.
If you cannot find the appointment by looking at the calendar:
-
Select Check-in a Patient on the right pane of the Appointment Calendar
-
Select Search the Schedule.
-
The Select Patient window opens
-
Enter patient's name
-
A second Select Patient (Across All Organizations) window opens with the patient on the left
-
If the patient has more than one company assigned to them highlight the company associated with this visit.
-
Click Select
-
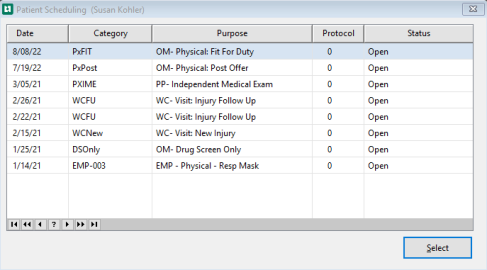
Patient Scheduling (patient name) window opens
-
Highlight the appointment
-
Click Select
-
The Enter Visit window opens
-
The Visit Type will be selected from the Appointment
-
Select the Means of Arrival from the dropdown if used by your organization
-
Enter the Arrival Time
-
Visit Date, Start Time, Category, Purpose, Type, and Provider will be auto-filled from the Appointment
-
Select the Protocol Instructions tab and read the instructions for Check-In.
-
Select Demographics and confirm the patients information. Then select Save if changes were needed or Cancel.
-
If a payment is to be collected, record it on the Payment tab.
-
Select Encounter from the right pane of the Enter Visit window and select services, and print encounter form.
- Appointment Notes button: Use this button to display any Appointment Notes or Reservation Notes corresponding to the Visit. If there are no Appointment Notes or Reservation Notes for the Visit, the button will not display. If either Appointment Notes or Reservation Notes exist for this Visit, the button may be selected to display a separate pop-up window containing the text of those notes in read-only mode. Click OK to exit the pop-up window. Using the Appointment Notes button is not reflected as an action within the audit record.
-
Select Save to log the visit.