Documenting Work Restrictions
If you have not already done so, please read the Incident Record Overview and Check-Out Patients Overview before completing this topic.
Summary
The Work Restrictions function in the software enables you to capture specific and detailed information regarding when restrictions are assigned and released. While the primary use for work restrictions is for Workers' Comp visits, you may have Private Practice visits where the patient wants documentation to give his employer of limitations due to a non-work injury. Return to work physicals also often require documentation of work restrictions. Work restrictions will print on the Work Status Summary sent to the employer after a Workers' Comp visit, as well as the Encounter Summary printed for the patient at the end of a Private Practice injury visit.
|
|
Prior to assigning any restrictions, the specific restrictions used in your organizations need to be set up on the Work Restrictions table. |
Work restrictions may be added to the patient record from the [Enter Visit], [Enter Incident], or [Case Management] windows. If an employee is hired with a work restriction (or job accommodation), you can document the restriction on the Clinical Problems List, [Work Restrictions] pane of the patient chart.
|
|
If your clinic uses Provider Charting then work restrictions will be entered by the provider on the ORDERS tab of the Charting Template for the visit. You do not need to set up the Work Restrictions table. |
As you select work restrictions you may indicate a Stop Date. Restrictions will print on the Work Status Summary for all visits that occur on or prior to the Stop Date. If no Stop Date is entered, the restrictions will be in force indefinitely. A common practice is to enter the date of the next visit as the Stop Date. Based on physician instructions at that visit, the restrictions can be extended by changing the Stop Date, or closed by leaving it as it is.
What Do You Want To Do?
-
View the [Work Restrictions] window
-
Document work restrictions (non-EMR clinic)
-
On the right side of either the [Enter Visit] or [Enter Incident] records, click the Restrictions button. From the [Case Management] window, click the Lost Timebutton on the right, then click theWork Restrictionsbutton on the left side of the [Get Lost Time and Restrictions] window.
-
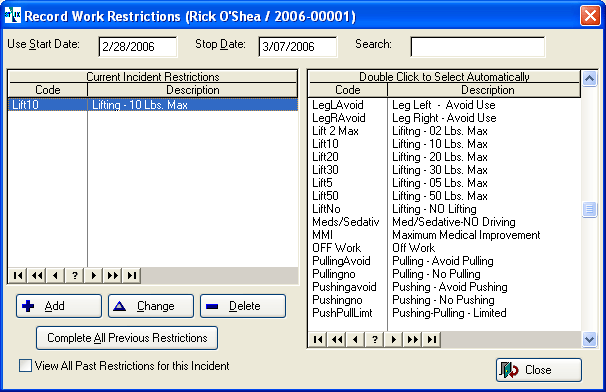
At the top of the [Record Word Restrictions] window, enter the UseStart Date and Stop Date fields for the restriction. The Stop Date will often be the date of the follow-up appointment. If it is unknown, leave it blank.
-
Using the Search box and the VCR buttons at the right window pane, search for and double click the work restrictions that apply. Each selected restriction will appear in the left pane.
-
To add additional details to any individual work restriction, double click the restriction in the left pane. Note that in the Description field, you can change the Description to make it more specific to this employee. This will reduce the number of restrictions in your table, and in particular, can eliminate the need to have those that are rarely used.

-
If a restriction is permanent,check thePermanentbox. (the program will automatically check theWork Relatedbox, so UN-check it if needed.)
-
To add text which will print on the Work Status Summary, if your system has been set up to do this, enter a Note. (This option is set on the VISITS/SCHEDULING tab of the [Enter Clinic Parameters] window.)
-
To add charting notes about the restriction(s), click the Charting button. (A charting note entered here will NOT print anywhere.)
-
When you are finished adding restrictions, click Close. (If in the Case Management program, click Closeagain).
-
-
Extend or release work restrictions
If documenting an injury follow-up visit, you may need to update existing work restrictions. This could mean documenting that a restriction has been lifted, or changing the STOP Date for the restriction, if it has been extended beyond the current visit.
-
From the [Enter Visit] or [Enter Incident] records, click the Restrictions button on the right side of the window. From the [Case Management] window, click the Lost Time button on the right, then click the Work Restrictions button on the left side of the [Get Lost Time and Restrictions] window.
-
If all restrictions have been released, click the Complete All Previous Restrictions button on the bottom left side of the window.
-
To complete or extend a single restriction, double click the restriction in the left window.
-
Press the TAB key once so you are in the Stop Date field.
-
Enter the date the restriction was lifted (typically, the visit date) or the date to which the restriction was extended (typically, the subsequent appointment date).
-
-
When you are finished updating restrictions, click Close. (If in the Case Management program, click Close again).

If your clinic uses Net Health Employee Health and Occupational Medicine Provider Charting work restrictions can be viewed and changed on the WORK STATUS tab of the [Generate Patient EMR Charting Note] window, or on the PROBLEMS LISTS tab of the Patient Chart.
-
Common Mistakes
When you select work restrictions from the list in a visit, you will usually want to enter a Stop Date before you begin selecting. The stop date is inserted into restrictions as you select them. If you select a restriction, then enter a stop date on the [Record Work Restrictions] window, it will do nothing for restrictions already selected. Once selected, the only way to change the stop date is to highlight the restriction, click Change, and then enter the correct date on the [Enter Work Restriction] screen which displays the single record.