User Defined PDF Forms
If you haven't already done so, please read the Patient Check-In Overview topic before continuing!
Summary
In the course of their work, clinics must use many specialized forms, often employer-related, to meet regulatory requirements and otherwise manage patient information. Some examples of visits that require special forms include DOT physicals, respirator clearance exams, Merchant Marine or FAA physicals, etc.
The application allows you to create forms to be stored in the program and printed at appropriate times. This feature provides these benefits:
-
An unlimited number of forms can be stored in the program, eliminating the need for physical storage of paper forms.
-
Forms can be linked to Visit Category protocols, both generic and company specific, and printed automatically with the Encounter Form when the related protocol is used in a visit.
-
The program can automatically pre-fill forms with visit and patient identification information retrieved from the program database, placing each item in the appropriate location on the form.
-
Forms can be created to allow the user to enter additional information at the time of the visit.
Form Types
Three types of forms can be used with the software:
Pre-Fill & Print forms are associated with visit category protocols and they print automatically with the Encounter Form when a patient is checked in for a visit.
-
They can be linked to both generic and company specific protocols. This allows you to have standard clinic forms, which are printed by default, but if a company wants its own forms used, they can be added to a company protocol form in addition to or in replacement of the standard forms.
-
Pre-Fill & Print forms pull specified information from the patient's file and inserts it into the form before printing.
-
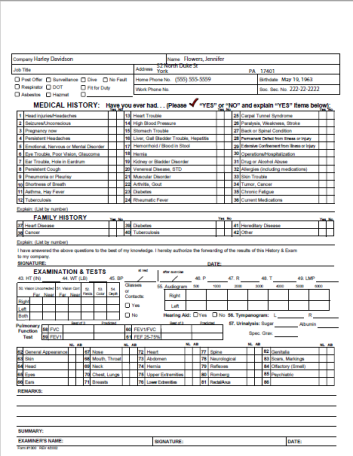
Once printed, if you want a permanent copy in the patient's record, just use the Scanning function to scan the completed form back into the software. Adobe Acrobat Reader, available from Adobe at no cost, must be installed on your workstation (where the application is installed) to print these forms. Sample printer form below:
The second type of form is Pre-Fill Interactive forms.
-
These forms automatically pull specified information from the patients file, and allow the user to enter additional information on the form "on screen" at the time of the visit.
-
The completed form is automatically stored in the database without scanning, which provides a record of exactly what was printed.
-
Pre-Fill Interactive forms are not printed automatically with the Encounter Form the way Pre-Fill & Print forms are. Instead, they are printed from the Forms button found in several places, including the Enter Visit window.
-
Adobe Acrobat Standard Acrobat Pro, which can be purchased from Adobe, is required to save interactive forms.
-
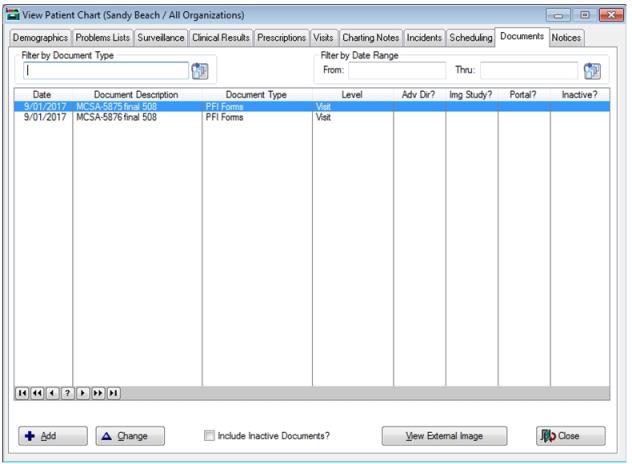
Clients have the ability to view PFI forms with a Flattened and Saved status on the Documents tab within the View Chart window.
Net Health provides a number of standard forms that are ready to use with the software, but it also gives you the ability to import additional forms that are needed in your clinic. You can use MS Word, MS Visio, or a product of your choice to do the initial framework, then the document needs converted to a PDF file and connected to the application database using Adobe Experience Manager (AEM) Forms Designer.
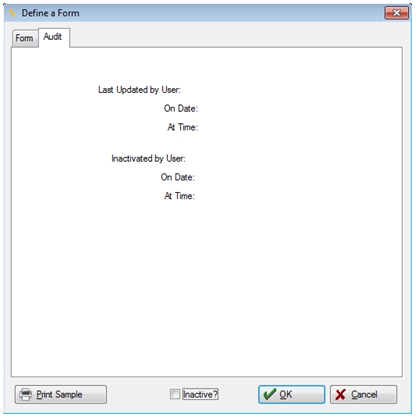
The PDF Forms entry window includes an Inactive checkbox and a tab called Audit. Checking the Inactive checkbox sets the selected PDF Form to an inactive status. The Audit tab will display two things:
-
The USER ID of the last person who updated the selected form.
-
The USER ID of the person who set the selected form to Inactive and the date and time of when that occurred.
On the Visit Category Protocols window under the Protocol Forms tab, a column titled Inactive? exists. This includes Company, Managed Care Organization and Generic Visit Protocols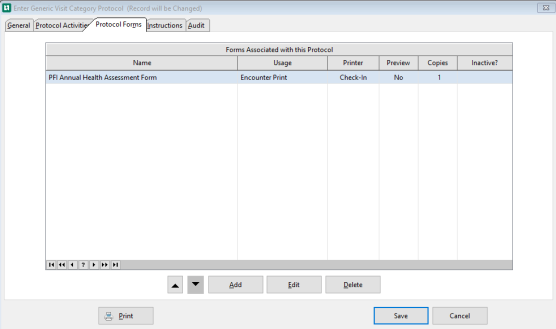
To Add a Form select Add
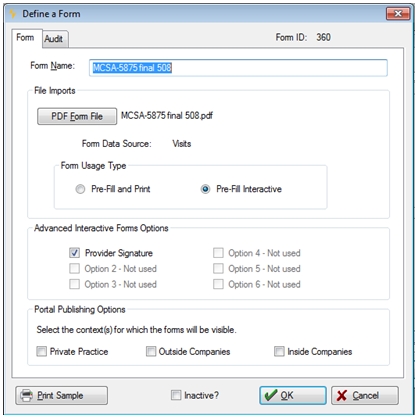
The Define a Form window opens

Enter the Name of the form
Under File Import
Select the PDF Forms File
Audit Tab:
To learn more about creating your own PDF forms, view the On-Demand Training Topic How to Create PDF Forms.
Setup to Use PDF Forms with Encounter Forms
Enable Forms
In setting up to use PDF forms, the first step is enabling the use of the feature. This is how:
-
From the Home Nav Bar
-
Select Setup/Admin
-
Select Clinic Setup
-
Select Clinic System Parameters
-
The Administer Clinic System Setting window opens
-
Select Visit / Encounter tab
-
Check the box next to "Allow PDF Forms to be used with Encounter Forms"
-
Select Save
Import Forms
The application comes with a number of standard forms. You can import as many others as you wish, as long as they are in PDF format. This is how:
-
From the Home Nav Bar
-
Select Setup/Admin
-
Select Protocols / Profiles.
-
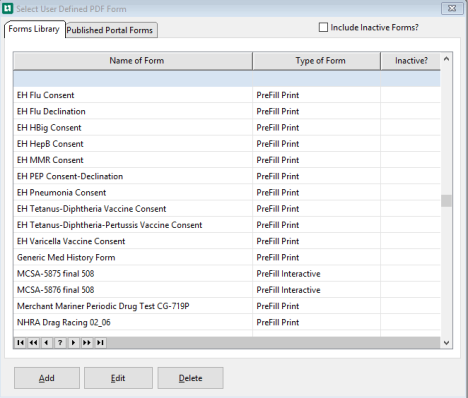
Select User Defined PDF Forms to display the Forms window.
-
If the button isn't visible, it means the box discussed above in Clinic System Parameters has not been checked.
-
This window will display all available forms.
-
If this is the first time anyone at your facility has come to this window, a message box will be briefly displayed while the software installs the set of forms provided by Net Health.
-
You can add any number of additional forms. To add a form, it must already be in PDF format, and accessible from your workstation or Network Drive. To add the form to your database, click Add. The [Forms Definition] window will be displayed.
-
For Form Name, enter the description you want displayed within when users access the form from the software. If you leave this blank, the software will fill it in with the name of the PDF file after importing. On this window, the forms appear in the order in which they were added, but on the selection window users see, they're sorted alphabetically.
We strongly recommend that you employ a naming convention that sorts the files in a way that allows users to quickly find the right one.
-
Click PDF Form File. Then using the standard Windows dialog, search for and select the PDF form.
-
Indicate whether this is a Pre-Fill and Print form or a Pre-Fill Interactive form.
-
Some forms are designed to attach the provider's electronic signature when added in a visit. The first checkbox in the Advanced Interactive Forms Options area is labeled Option 1-Not Used and it is grayed out. If this is a form that can attach the providers signature, the label will change to Provider Signature, it will be enabled, and it will be checked. If you do not want the provider's signature on this form, you can uncheck the box.

If you uncheck this box, then later decide you do want the signature, you can't come back here and re-check the box; it will again be grayed out. Instead, simply click the PDF Form File button and search for and reselect the form. Net Health Employee Health and Occupational Medicine will scan through the form again, see the place for the signature, and re-check the box for you.
-
-
Click OK. You will be returned to the [Forms] window, and the form just added will be at the bottom of the list.
-
You can also CHANGE the form associated with the description at any time. For instance, suppose one of the standard forms used with DOT physicals has been revised. The program will not allow you to delete a form if it has been used, nor does it have an inactive checkbox. Instead, change the form linked to this form record. Here is how:
-
Make sure the revised form is accessible from your work station or Network.
-
On the [Forms] window, highlight the existing form and click Change.
-
On the [Forms Definition] window, click PDF Form File.
-
Search for and select the revised form.
-
Click OK.
-
That's it! Every protocol that uses the old form will now use the new one.
Any unrevised forms that are already attached to visits will NOT be affected. When you print and save a form on a visit, the software will save the full PDF as it was printed.
-
-
Click OK when done.
Associate a PDF form with a protocol
Forms can be associated with both generic visit category protocols and company specific protocols. Once you open the protocol, the process of adding the form is the same for both. If a form has been associated with a generic protocol, it will be associated with company protocols for the same visit category by default. That can be changed, as described below.
To add a form to a generic protocol:
-
From Home Nav Bar, click the SETUP / ADMIN tab, then PROTOCOLS / PROFILE.
-
Click Generic Visit Protocols.
-
Select the protocol.
-
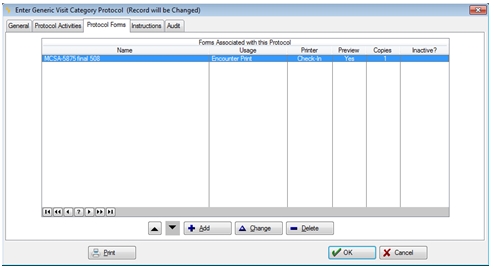
Click on the PROTOCOL FORMS tab. If you don't see it, then you have not enabled Net Health Employee Health and Occupational Medicine forms as described in the section above titled Enable Forms.
-
Click Add to display the list of available Pre-Fill & Print forms.
-
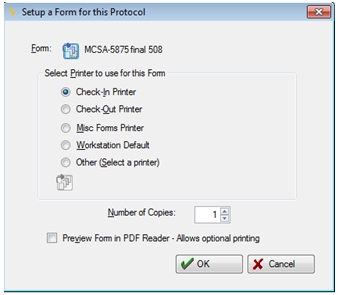
Select the form you want. The [Setup a Form for this protocol] window will be displayed.
-
If you want to change the printer for this form, make your selection. (the location of these printers is defined in Clinic Setup.)
-
If you want to routinely print more than one copy, change Number of Copies.
-
If you want to routinely preview the form before printing, check the Preview Form box. Be sure you want to do this every time before printing! It will result in the form being previewed for every visit using this protocol, giving your front desk staff the additional step of closing the preview window for each form.
-
Click OK.
-
Repeat for all forms for this protocol.
Company protocols
By default, forms on the related generic protocol are inherited, so to speak, by the company protocol. They do not show on the protocol setup screen when you are defining the company protocol, but they will be displayed at the time of the visit. If you do NOT want to include forms already linked to the generic protocol for this same visit category, check the box labeled EXCLUDE Generic Visit Category Forms When Using this Protocol. If there are multiple forms associated with the generic protocol, it is not possible to exclude some and keep others. If you check this box, but there is a form on the generic protocol that you do want to use, it will have to be explicitly re-added to the protocol here.
Print PDF forms
Print Pre-Fill & Print forms during a visit
Printing Pre-Fill & Print forms require Adobe Reader, available for free from Adobe, installed on the Net Health Employee Health and Occupational Medicine server.
-
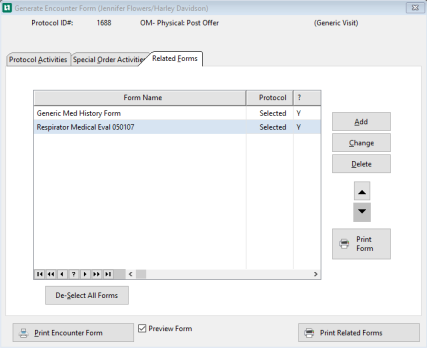
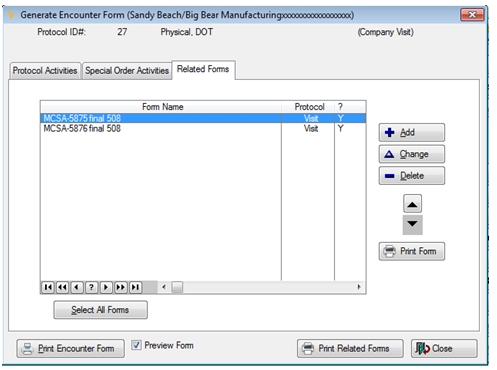
When checking in a patient for a visit, the [Generate Encounter Form] window includes a RELATED FORMS tab. This tab shows all forms selected for this type of visit, including forms related to both the company protocol and the generic protocol. If the Exclude box was clicked when adding forms to company protocol, only company forms will be seen here.
-
The Add, Change, and Delete buttons affect this visit only.
-
There are three print options:
-
-
By default, all forms associated with this protocol will print automatically with the Encounter Form. Typically, you will just click Print Encounter Form to get all forms. To avoid printing an associated form with the Encounter Form, on the RELATED FORMS tab, double click the form. The The "Y" beside the form will disappear. To reselect the form, double click it again so that the "Y" reappears.

-
To print just one form, highlight it and click the Print Form button. You might do this if the printer mangled one on the first pass. You could come back to this window and print just the one form without reprinting everything. When you do this, a window will be displayed which lets you change the print options. You can choose to preview it in the Net Health Employee Health and Occupational Medicine PDF Viewer. If you do this, you will need to click Print inside the viewer to send it to the printer.
-
To print all the selected forms without printing the Encounter Form, click Print Related Forms. This will send each form to the Net Health Employee Health and Occupational Medicine PDF viewer. You will need to click Print for each to send it to the printer.
-
- Select / De-Select All Forms:This button may be toggled between Select All Forms or De-Select All Forms. Select will place all "Y's" under the "?" on the right most column of the window and subsequently select all forms displayed under the column Form Name. De-Select will remove all "Y's" under the "?" on the right most column of the window and subsequently de-select all forms displayed under the column Form Name.
Print Pre-Fill Interactive forms
These forms only print when requested. They can be printed from the visit record, from the incident record, and from the Net Health Employee Health and Occupational Medicine Charting workspace. Printing Pre-Fill Interactive forms requires that either Adobe Reader, available for free from Adobe, or Adobe Acrobat, which can be purchased from Adobe, be installed on the Net Health Employee Health and Occupational Medicine server (or wherever Net Health Employee Health and Occupational Medicine is installed). Interactive fields can only be saved if Adobe Acrobat is installed.
-
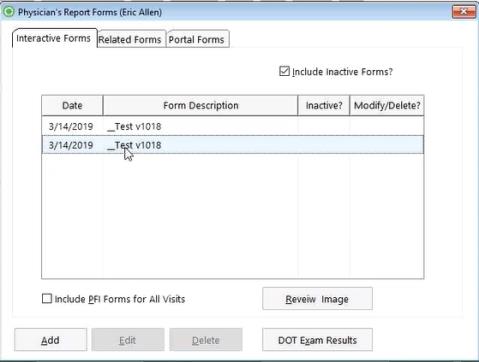
From one of the locations above, click the Forms button to display the [Physicians Report Forms] window. Depending on the type of visit, there will be two or three tabs. In all cases, there will be tabs for INTERACTIVE FORMS and RELATED FORMS. A Workers Comp visit, will also have a PROVIDER REPORT FORMS tab, which is functionally the same as the interactive forms described here..
-
Click the INTERACTIVE FORMS tab then select the interactive form from this drop-down box.
-
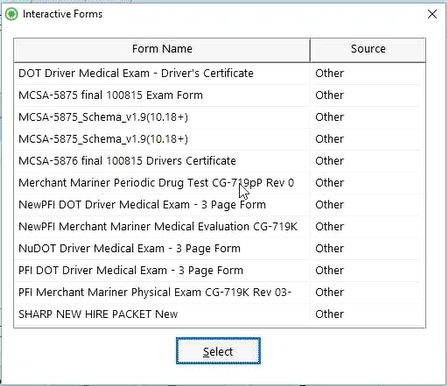
Click Add to add a new form. When the Add button is selected, a new browse window will display so users may select a for to include with the Physicians Report Forms list. Either Highlight the desired form and click Select, or double-click the highlighted form to include.
- Click Edit to alter the form. Not available for "Flattened and Saved" forms.
- Click Delete to remove the form. Not available for "Flattened and Saved" forms.
- Include PFI Forms for All Visits checkbox:
-
If the form can attach the providers electronic signature you will be given the option to do that by entering the provider's password.
- The form will be displayed in Adobe Acrobat, if its installed on the Net Health Employee Health and Occupational Medicine server (or wherever Net Health Employee Health and Occupational Medicine is installed), or in Adobe Reader if not
- If the selected form has been , the Edit and Delete option are no longer available.
- Review Image: This button becomes active for forms that have been "Flattened and Saved". It will take you to the Using the Scanning and Image Capture Function topic where your image can be viewed, changed, inactivated, etc. For forms that can be modified or deleted (Modify / Delete? is Yes), the Edit and Modify buttons are available.
- Include Inactive Forms? checkbox: Check this box to list inactive forms as well; if checked the Inactive? column will display "Yes". The default is "Checked".
-

-
Enter the required information in the interactive fields.
-
Some forms allow you to capture a patient's signature. To do that:
-
Click the Get Patient Signature button.
-
Click Capture.
-
Have the patient sign the signature pad.
-
If you are not happy with the signature, click Erase and try again.
-
Click Done to save the signature on the form.
-
-
Click the printer icon to send the form to the printer.
-
If Adobe Acrobat is installed you have two options.
-
If you click Save, you will be able to re-open the form later and make changes.
-
If you click Flatten and Save, the changes you entered will be locked in place before saving. Once you flatten it, the form can be reopened and re-printed, but you will not be able to make further changes. Flatten and Save is what you should do as a matter of routine. The only time you should use Save is if you start to work with the form and then realize there is some additional information you need to locate in order to complete it. Once you enter that additional information, you should flatten it. If you do not flatten the final version, the reliability of the document as a record could be questioned at a later date since there is no way to know if it was printed in its current form.
-