How to Print a Super Bill or Encounter Summary or Headers
If you have not already done so, please read Check-Out Patients Overview.
Summary
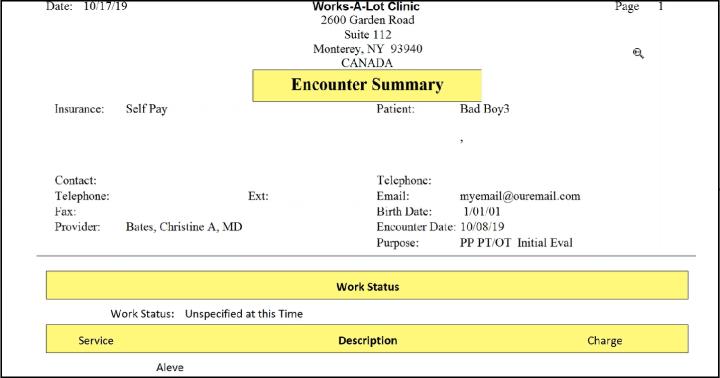
An Encounter Summary is a report, usually a single page, that lists the employee demographic details, as well as the details of the services provided during the visit. It does not include any visit results, such as the results of tests. Use this to report on the visit to the patient's employer or supervisor.
Clinical Summary
Instead of the Work Encounter Summary, the patient's Clinical Summary can be printed or sent to an ASTM CCR Document Electronic File an electronic file format for exchanging information between healthcare systems.
|
|
When the Clinical Summary is produced in the CCR format, it will be created in an encrypted file in the secure folder. It must be decrypted to give to the patient. |
A header is information printed at the top of a blank piece of paper. These can be used for forms that you may have designed, but basically they are leftover from an earlier day. Now, you can use User Defined PDF forms to accomplish the same thing, and much more. Be sure to read the topics on Using User Defined PDF Forms to learn more.
You can use the header at the top of the form, as long as the form has been designed with the spacing of the header taken into account. In the software, you should print both the Visit and the Patient headers and see the data they include.
Patient Portal
One of the requirements of ARRA's 'meaningful use of a certified EHR' is to provide patients with access to their medical data in your Net Health Employee Health and Occupational Medicine database. To meet this requirement, Net Health Employee Health and Occupational Medicine provides a Patient Portal. The Portal provides patients with access via the Internet to much of the information on the Clinical summary:
-
Problems List
-
Immunizations
-
Medications
-
Allergies
View an Encounter Summary
Steps to Print an Encounter Summary
-
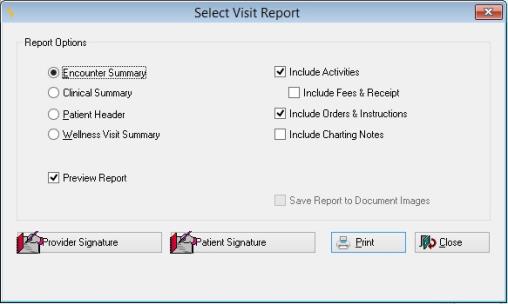
Click the Report button in the lower right side of the [Enter Visit] window. The Select Visit Report dialogue box will appear.
-
Click the desired options for the Encounter Summary (e.g. Include Charting Notes). The options displayed will vary based on the type of visit and your system setup.
-
Optionally, print the patient's Clinical Summary. An electronic version can be produced.
-
If your clinic uses electronic signatures, click the Sign button that will show in the lower left of the dialog box. The signing provider can then enter the appropriate user code and password to attache the electronic signature to the form. The electronic signature will be displayed to the right of the Sign button, and printed on the document. (Signatures are saved. If the report was signed and printed previously, you will see the electronic signature when you open this dialog box.)You will usually want to uncheck the Print Preview checkbox.
-
Click Print/Fax/E-Mail to send the report to its destination.
 Faxing and e-mailing documents directly from within the program instead of sending them to the printer first can save a great deal of time. Read Faxing or Emailing Documents for more information.
 -
If you do preview the report, then from the Print Preview function, click the printer icon
 to print or the exit icon
 to cancel the document.
 -
Click OK to close the visit record.
Save Report to Document Image: Net Health Employee Health and Occupational Medicine will save a copy of the Work Status Report or Encounter Summary as a Document Image automatically when the report is successfully printed.
The default for whether the checkbox is selected or unselected will be controlled by whether the option in the clinical parameter is set on or off (Save Report to Document Images), based on the type of document being produced. If the user selects to save the report to Document Images, the system will use the document type setup in the Clinic Parameters, based on the type of document being produced. This option will be disabled if the user has not established a Document Type for the type of reporting being produced in the Clinic Parameters.
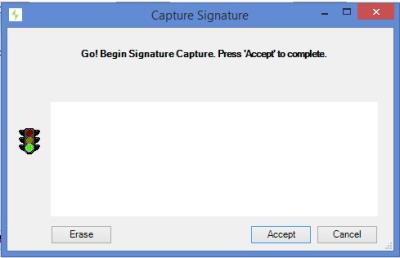
Select the Patient Signature button to display the signature capture window.
This window will interact with the Topaz signature pad. On the window the system will display the Patient Signature Statement that was setup for the Work Status / Encounter Summary Report on the Clinic Parameter. The patient must use the signature pad to enter their signature. When the ACCEPT button on the window is selected, Net Health Employee Health and Occupational Medicine will capture the patient signature and when the visit is saved, the system will save the patient’s signature. If a patient signature statement has not been defined, the system will use the default “I acknowledge the instructions given above.†The Patient Signature button is only enabled when the Work Status or Encounter Summary option is selected.
The system will print the Patient Signature line on Work Status report if a patient signature is captured.
Patient Discharge Instructions
When the correct Clinic Parameters are set for either the WC Visit Status Summary or the Private Visit Encounter Summary, the Discharge Instructions will print after the summary report after the visit is completed and the corresponding Visit Summary report is printed. This instruction sheet will include necessary instructions for the patient after they leave the clinic. This report includes the Treatment date, Visit Reason, Diagnosis, Medications, Work/Activity Restrictions, Aftercare Instructions, and Follow-up appointments.
For more information regarding Discharge Instructions for this visit, see Patient Discharge Instructions for WC visits.
If either of the visit summary reports are emailed or faxed, the discharge instruction report will print to the printer so it can be given to the patient. The same will occur if either of the visit summary reports have the option selected to "Save the Report to Document Images".
The Encounter Summary Report supports the printing of ICD-9 and/or ICD-10's so that the recipient of the report may see all of the data recorded during charting. The different code sets for ICD-10 and ICD-9 will be printed separately and labeled appropriately.
Net Health Employee Health and Occupational Medicine will print all ICD-9 and ICD-10 codes that were coded as part of the Visit on the Encounter Summary Report, if the user selects the option to "Include Diagnosis" (on the Select Visit Report window).
- If both ICD-9 and ICD-10 codes are on a Visit, Net Health Employee Health and Occupational Medicine will print the ICD-10 codes prior to the ICD-9 codes.
- All ICD-10 codes are grouped together.
- All ICD-9 codes are grouped together.
- On the first line that an ICD-10 code prints, Net Health Employee Health and Occupational Medicine will print a label "ICD-10". All diagnosis codes for this label follow and are indented to indicate they belong to this group.
- On the first line that an ICD-9 code prints, Net Health Employee Health and Occupational Medicine will print a label "ICD-9". All diagnosis codes for this label follow and are indented to indicate they belong to this group.
- For both ICD-9 and ICD-10, Net Health Employee Health and Occupational Medicine will print the diagnosis codes in the order entered by the user.