How to Check Patients Out
If you haven't already done so, please read Patient Check-Out Overview.
|
|
If your clinic uses Net Health Employee Health and Occupational Medicine Provider Charting, then check-out procedures will be somewhat different from what is described below. Several activities discussed will be performed by the provider in the charting workspace and not at check-out. (Note: If you use Provider Charting for injuries, but not for employer physicals, then check-out will proceed as described below.) |
What Do You Want To Do?
Check Out an Occupational Health Patient
-
An Employer Services (non-injury) patient
-
If needed, schedule a follow-up appointment.
-
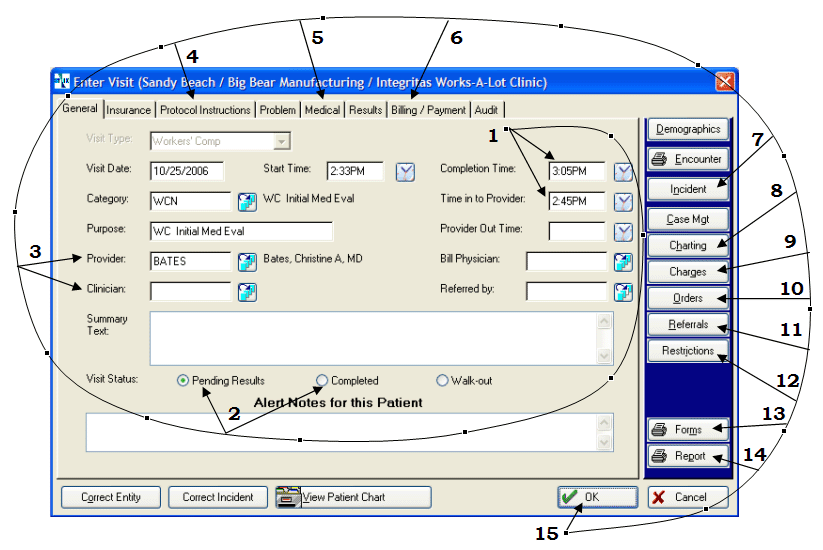
Re-open the Visit Record to display the GENERAL tab of the [Enter Visit] window.
-
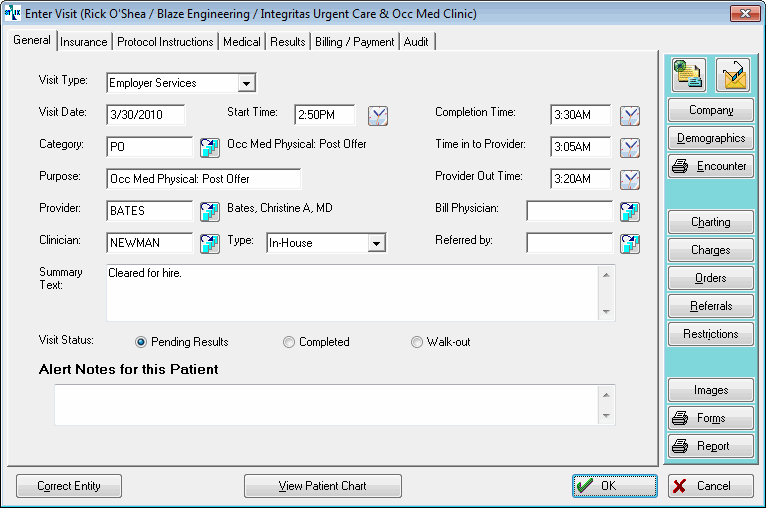
Add Complete Time and Time In to Provider.
-
Change visit Status to Complete, if appropriate.
-
Enter information in the Summary Text field to print on the Encounter Summary Report. (This eliminates the need to enter a charting note to record a brief note to the Employer, as was done in earlier versions of the software.)
-
Add or update Provider and/or Clinician, if needed
-
Read the Check-Out section on the PROTOCOL INSTRUCTIONS tab.
-
Complete or enter Charges.
-
Check Visit Orders to see if there are instructions from the provider which need to be followed.
-
Enter Charting Notes if needed.
-
Print the Encounter Summary.
-
Click OK.
-
-
Workers' Comp patient
-
Follow the steps in the order shown on The Great Check-out Spiral.
-
Add Complete Time and Time In to Provider.
-
Change visit Status to Complete, if appropriate.
-
Enter information in the Summary Text field to print on the Work Status Summary Report. (This eliminates the need to enter a charting note to record a brief note to the Employer, as was done in earlier versions of the software.)
-
Add or update Provider and/or Clinician, if needed.
-
Read the Check-Out section on the PROTOCOL INSTRUCTIONS tab.
-
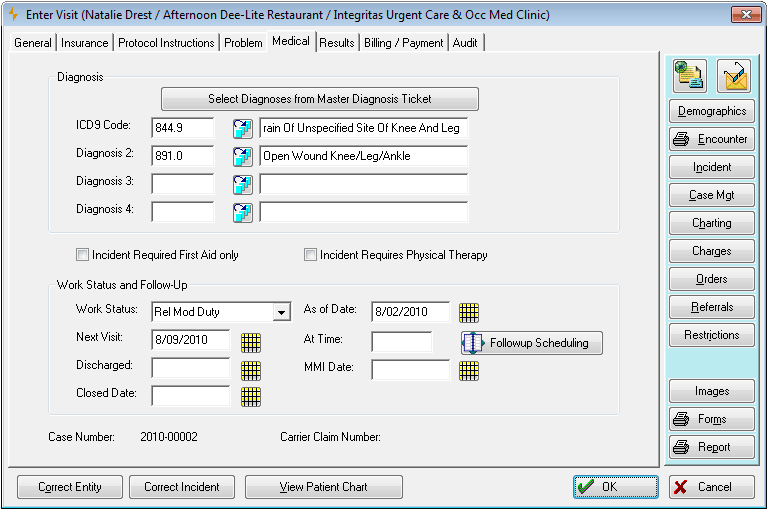
On the MEDICAL tab:
-
If needed, schedule a follow-up appointment.
-
Click the MEDICAL tab.
-
Click the Follow-up Scheduling button.
-
the program will display the week calendar for the visit provider. Use the left and right arrows under the date in the upper right to move up and back a week at a time.
-
Find an open date and time slot that works for the patient and double click it.
-
Select the visit category, probably called something like Workers' Comp Recheck.
-
Enter an Appointment Note The appointment note is entered when a visit is scheduled. It contains information gathered by the scheduler that will be needed at check-in. , if needed.
-
Change the Minutes for the appointment if the default is not correct.
-
Click OK to return to the calendar.
-
Click Close to return to the [Enter Visit] window.
-
-
Enter Work Status and follow-up information as required.
All of these fields carry over to the incident record.
-
Click the drop-down arrow beside Work Status and make your choice. Today will be entered in As of Date. It can be edited if needed. If the Work Status is Discharged, the Discharge Date will be entered automatically. If Work Status is Perm Disability the MMI Date field will automatically populate with today's date.
-
Enter a Closed Date if the case is closed.
-
-
Enter Vital Signs.
-
Check Visit Orders to see if there are instructions from the provider which need to be carried out.
-
Enter Charting Notes if needed.
-
Enter Referral if needed.
-
Enter Work Restrictions if needed.
-
Print the First Report of Injury if needed.
-
Print the Work Status Summary.
-
Click OK.
-
If needed, print patient instructions.
Check Out an Urgent Care/Self Pay Patient
-
Check-out a self-pay non-injury patient
-
Read the Check-Out section on the INSTRUCTIONS tab.
-
Add Complete Time and Time In to Provider.
-
Change visit Status to Complete, if appropriate.
-
Add or update Provider and/or Clinician, if needed
-
Check Visit Orders to see if there are instructions from the provider which need to be followed.
-
On the MEDICAL tab, schedule a follow-up appointment.
-
Collect payment and record on the BILLING / PAYMENT tab if this was not done at check-in.
-
In rare cases, enter additional information at the top of the BILLING / PAYMENT tab.
-
Enter Charting Notes if needed.
-
If appropriate, enter Work Restrictions.
-
If appropriate, enter Physician's Orders.
-
Print the Encounter Summary which, by including fee and payment information, serves as the receipt.
-
Click OK.

You might wonder why you would want to enter work restrictions and physician's orders on a non-injury visit. The primary use for these is for a patient paid Return to Work Physical when the patient is cleared to work, but some limitations are still in effect. If entered, both orders and restrictions will print on the Encounter Summary Report which can be sent to the employer.
-
Read the Check-Out section on the INSTRUCTIONS tab.
-
Add Complete Time and Time In to Provider.
-
Change visit Status to Complete, if appropriate.
-
Add or update Provider and/or Clinician, if needed.
-
On the MEDICAL tab.
-
If needed, schedule a follow-up appointment.
-
Click the MEDICAL tab.
-
Click the Follow-up Scheduling button.
-
the program will display the week calendar for the visit provider. Use the left and right arrows under the date in the upper right to move up and back a week at a time.
-
Find an open date and time slot that works for the patient and double click it.
-
Select the visit category, probably called something like Workers' Comp Recheck.
-
Enter an Appointment Note The appointment note is entered when a visit is scheduled. It contains information gathered by the scheduler that will be needed at check-in. , if needed.
-
Change the Minutes for the appointment if the default is not correct.
-
Click OK to return to the calendar.
-
Click Close to return to the [Enter Visit] window.
-
-
Enter Work Status and follow-up information as required.
All of these fields carry over to the incident record.
-
Click the drop-down arrow beside Work Status and make your choice. Today will be entered in As of Date. It can be edited if needed. If the Work Status is Discharged, the Discharge Date will be entered automatically.
-
Enter a Closed Date if the case is closed.
-
-
Enter Vital Signs.
-
Check Visit Orders to see if there are instructions from the provider which need to be followed.
-
If not covered by insurance, collect payment and record on the BILLING / PAYMENT tab. In rare cases there might be additional billing information to enter on that tab.
-
Enter Charting Notes if needed.
-
Print the Work Status Summary.
-
Click OK.
-
If needed, print patient instructions.
|
|
A visit is moved from the Clinic Status Whiteboard to the list of discharged patients when a Completion Time is entered in the visit record. Changing the Visit Status to Complete automatically inserts the completion time, so that also removes the visit from the Whiteboard. If your clinic leaves Visit Status set to Pending until all work is done with the visit, including receiving lab results, something that might not happen for a couple days, then enter the Completion Time when the patient leaves to remove the visit from the Whiteboard. The only visits that should be seen on the Whiteboard are for patient currently in the clinic. |