How to Track Physicians Orders
Summary
The primary intent of Physician's orders in the software is to allow providers using Provider Charting to automatically generate order records while charting a visit that can be implemented by the discharge nurse or others. There are a number of types or orders, some with specialized options:
-
All
-
Admin Med
-
Dispense Med
-
In House Proc
-
Lab Order
-
Radiology Order
-
Referral
-
Therapy
-
Instructions
-
Return F/U
-
DME Order
-
Other Order
Visit orders are entered by type. The text of the order can be entered, and the status can be tracked.
Clinics which do not license Provider Charting can create orders manually from the Enter Visit window.
Order Status
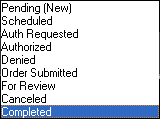
You can track the status of an order by changing its status as it moves through the process for that type of order. Here is the list of possible statuses:
-
Open
-
Closed
-
Pending (New)
-
Scheduled
-
Auth Requested
-
Authorized
-
Denied
-
Order Submitted
-
For Review
-
Canceled
-
Completed
All available statuses do not apply to all types of orders; for instance, Authorized does not apply to a follow-up return order. A new order is created with a status of pending. That can be changed later as needed to make sure that all necessary steps are taken prior to completion. For instance, once you receive and enter results for a lab or radiology order, you can change the status to For Review. The provider, after reviewing the results would change the status to Completed. There is a text field for additional notes.
For some types of orders you can track the process of getting authorization for the order. This starts by printing an Authorization Request, as described below. This will automatically change the status to Auth Requested or Denied. Spaces are provided for recording the name of the person providing the authorization as well as a reference number. Once authorized, you can create a referral record by printing a Referral Note to send the referral provider. This will automatically change the status to Completed, but you have the option of changing it to Authorized or Denied, as appropriate.
Orders Management
The status of an order can be changed by opening the order from the visit record. This is how orders which are carried out as part of discharge will typically be handled since what is of interest is just orders for that visit. The program provides two features for managing orders from all visits of a specified type and status such as referrals which are waiting for authorization. Authorization Management is specifically intended for orders which might require authorization from the payer before being implemented including referral, therapy, lab, and radiology orders. Since the authorizations process is often managed by a single individual, this routine can display the entire work load from all visits which is waiting to be addressed.
Orders Management is a more general system which also includes many of the same features as Authorization Management, but applies them to the entire range of orders.
The visit record includes a Referrals button where Referrals can be viewed and entered directly. If you enter a referral order, then create the Referral from it, you will see the referral when you click the Referrals button. If you directly enter the Referral, it will not show up as an order, nor will it show in Authorization Management.
Scanning
If you are using the the program scanning feature you can attach reports and other documents related to the order to the patient's record.
Reporting
Optionally, orders can be included when the Work Status Form prints. See the Visits / Scheduling tab on the [Clinic System Parameters] window.
Display Orders From the Visit Record
-
On the Enter Visit window select Orders to the right of the window. If any orders have been generated by the EMR, or manually entered earlier, they will be listed on the Orders from this Visit for {patient name} window.
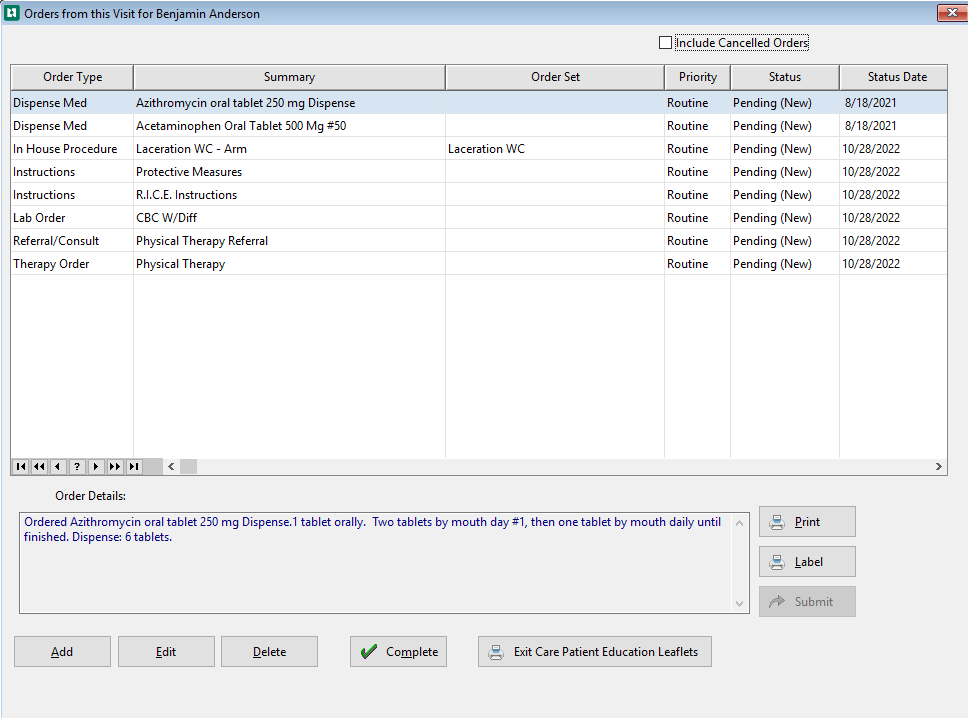
To view the details of an order, highlight the order of interest and select Edit to display the visit order window. (This window will have various names, depending on the type of order.)
- Select the Label button to create a labels to be used on either the paper lab order form or the lab specimen tube. If a Patient Identifier is defined in the Admin Clinic System Settings it will print on the label. If the selection for Patient Identifier is "None", then no identifier will print. If the Enable Patient and Company Address label parameter on the Admin Clinic System Settings Misc tab is unchecked, then the Label button on this window is not available.
- Select Print to display the following window:
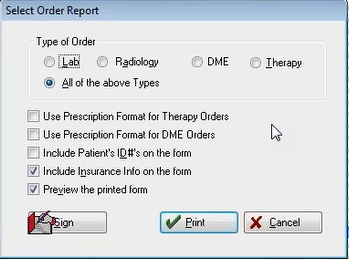
- Type of Order: Select the specific type of order to print or select all order types to print.
- Use Prescription Format for Therapy Orders : If Therapy or All is selected and this box is unchecked, this order prints on the Orders report and the status on the Orders from this Visit window is not changed. If Therapy or All is selected and this box is checked, this order prints as a Therapy prescription and the status on the Orders from this Visit window is changed to complete.
- Use Prescription Format for DME Orders: If DME or All is selected and this box is unchecked, this order prints on the Orders report and the status on the Orders from this Visit window is not changed. If DME or All is selected and this box is checked, this order prints as a DME prescription and the status on the Orders from this Visit window is changed to complete.
- Include Patient's ID#'s on the form: Check this box to include the Patient's ID# on both the report and the prescription.
- Include Insurance info on the form: Check this box to include the Insurance information on both the report and the prescription.
- Preview the printed form: Select this checkbox to preview the form as it will be printed.
Submit button: This button is available only if any of the Lab / Radiology orders are ready to be submitted to an interface. Select the order you would like to submit by highlighting the row and clicking Submit. For Lab / Rad orders, the submit will include an interface if one is set up.
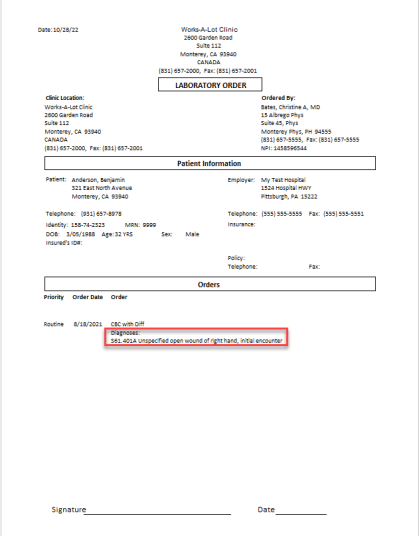
As of build 10.18, Lab Order print does not print the Diagnosis section of the report anymore. It will however append the primary ICD-9 or ICD-10 code and description if there are no ICD-9 or ICD-10 codes associated with the order to the end of the orders description. The primary code / description will be the ICD-9 if there is an ICD-9 entered and no ICD-10's on the visit. The primary code / description will be the ICD-10 if there is an ICD-10 entered and no ICD-9's on the visit. If both ICD-9's and ICD-10's are entered on the visit, the system will use the user selected reporting option to determine the appropriate one to print.
When Complete
is selected and the status of the Medication Order is either Dispense or Administration, the system will open the Enter Medication Dispense Order window. The user will select the check box next to either Dispensed or Administered. The user (By), date, and time will default to the current user, date, and time.
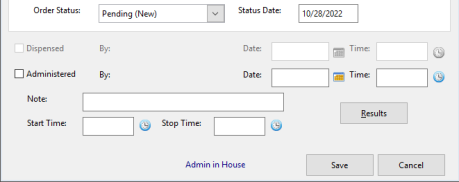
A note can be added. If a Start and Stop Time are needed, as an example an IV was started, these times can be entered here. When Save is selected a pop up window displays asking "Would you like to review / sign the charting note created as a result of (Dispensing / Administering) this medication?" select Yes or No.

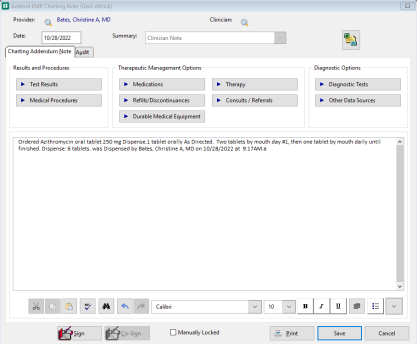
If Yes is selected the Addend EMR Charting Note window displays for the user to review and / or sign.
This documentation is documented on the Patient Visit Discharge Instructions.
Work with the Orders Management feature (only available with EMR Charting)
Accessed from the Home Nav bar
Select Orders
From here the user can:
-
Update the status or authorization information, attach image, send message.
-
As part of tracking orders, after displaying existing Orders as described above there are several additional steps.
-
The details of the currently highlighted order are displayed in the Order Details section at the bottom of the window. If this tells you all that you need to know to complete the order, there is no need to open it. Instead, simply click the Complete button.
-
This only changes the status to Completed. If you need to change to any other status, the order must be opened.
-
-
To open an order, highlight it and either double-click or select Edit.
-
Select the drop-down arrow for Order Status and select the appropriate status from the displayed list. This list can be different depending on the type of Order. The program will always change Status Date to today when the status is changed.
-
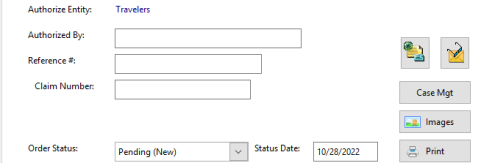
For Referral and Therapy orders, update authorization information, if available.
-
Attach an electronic signature by clicking the Sign button, and entering the signature.
-
Some Order Types allow the user to attach an image. Attach an image or scan a document by selecting Images.

-
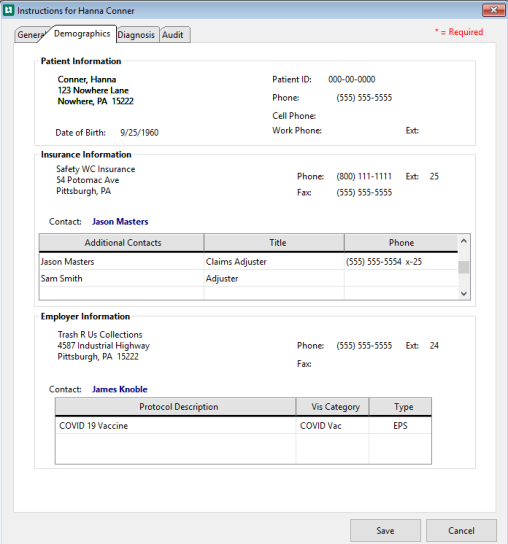
On some Orders Types there will be multiple tabs Select the Demographics tab to see information about the patient, insurance company, and employer.
-
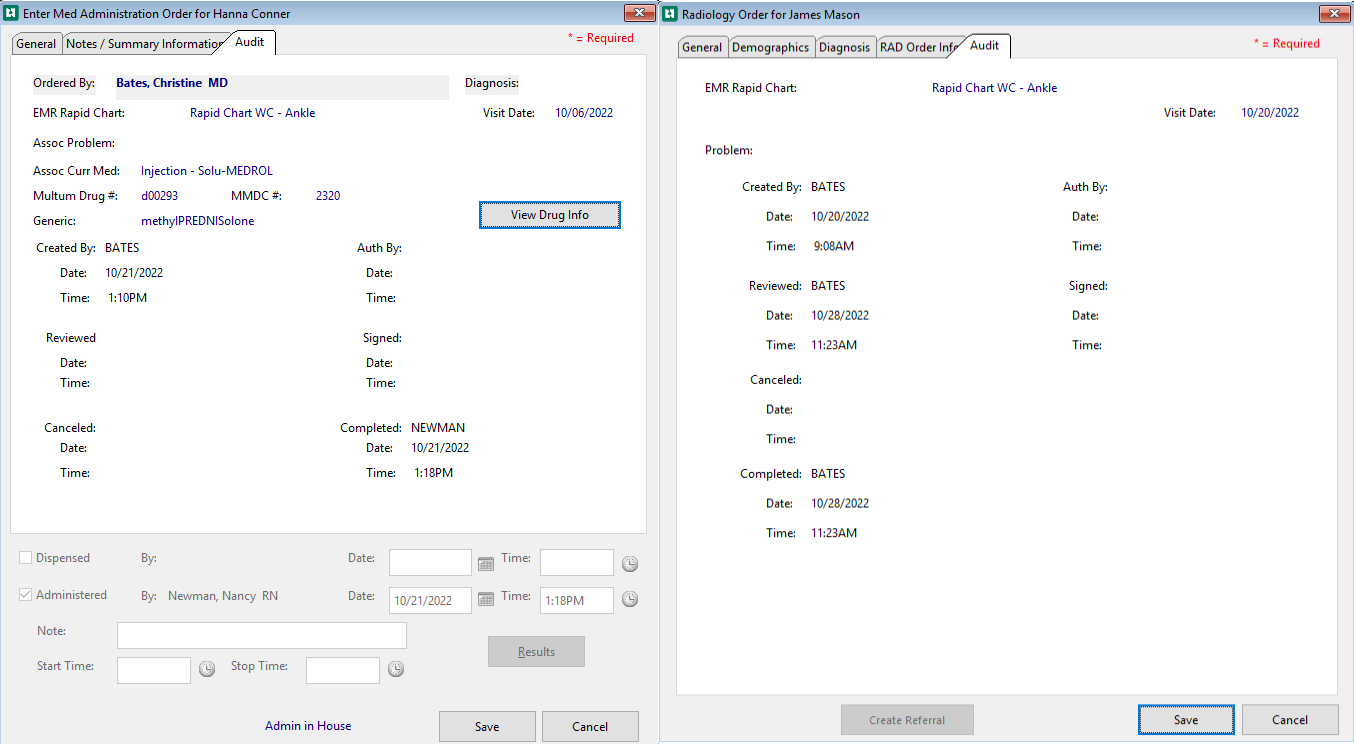
Click the Audit tab to see information about the who created the order and who changed the status. Different Orders document different information as can be seen on the 2 Audit tabs displayed below.
-
Select Save.
-
Print an Authorization
From the Home Nav bar
-
Select Orders
-
Select Order that needs an Authorization printed
-
The Order opens
-
From the bottom of the window select Request Authorization
-
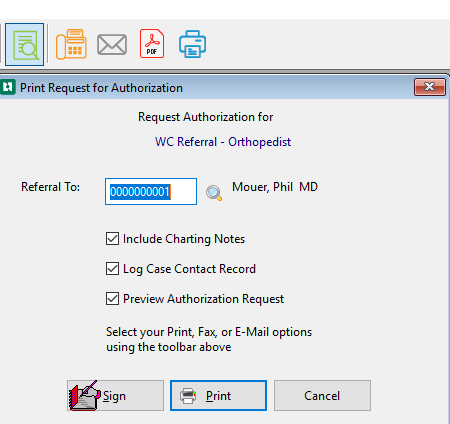
The Print Request for Authorization window opens
-
Use the magnifying glass to select the provider you are referring this patient to
-
Use the check boxes to:
-
Include Charting Notes - Prints the Charting Notes on the Referral Authorization Request
-
Log Case Contact Record - Creates a case note documenting that the request has been sent.
-
Preview Authorization Request
-
Select your Print, Fax, or E-Mail option from the toolbar above.
-
Select Sign
-
Select Print
-
-
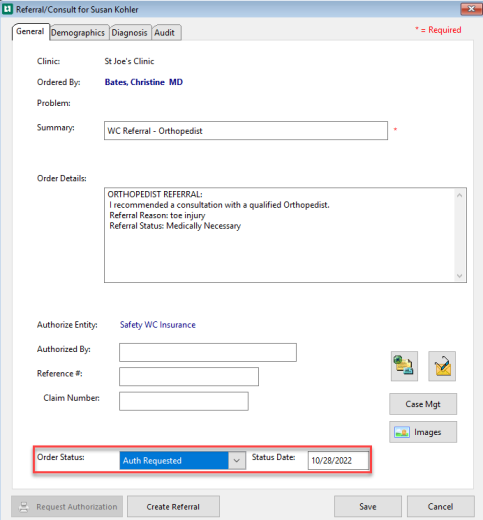
Back on the Referral / Consult for (patient name) window the Order Status has changed to Auth Requested and today's date is the default.
Create a Referral
-
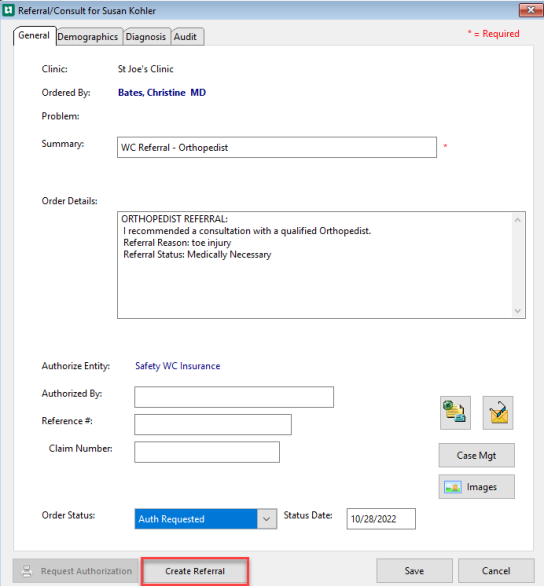
After creating an Request Authorization a Referral can be created by selecting the Create Referral from the bottom of the window.
-
On the General tab
-
The Enter Referral for (patient name) window opens
-
Enter the Date of the referral visit. If you do not know the date, enter the date the referral was made.
-
Enter the Referral Time if known
-
Use the magnifying glass to select the physician or other provider to whom you are referring the patient.
-
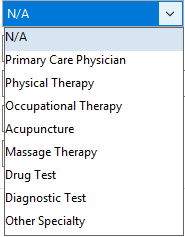
Use the drop-down to select the Referral Type.
-
Category is not required. It does not mean anything to those outside your organization. If there is a physical therapy facility associated with your clinic, the visit category may be of use. Otherwise, leave it blank.
-
Enter a Purpose for the referral in the Purpose field. This is a required field. If you selected a Category, the program will have filled in the Purpose. This field can be edited if needed.
-
Purpose Code is optional. When the magnifying glass is selected the SNOMED CT Lookup and Select window opens and a SNOMED code can be assigned.
-
SNOMED CT stands for Systemized Nomenclature of Medicine â€" Clinical Terms. It is a standardized, international, multilingual core set of clinical healthcare terminology that can be used in electronic health records (EHRs).
-
Select the Status of the Referral using the radio buttons:
-
Pending
-
Scheduled
-
Completed
-
Cancelled
-
-
On the Notes tab
-
The physician can write a note for the referral provider on this tab.
-
On the Audit tab
-
The Referral Trx number
-
Created By
-
Date
-
Time
-
Changed By
-
Date and Time
-
Status as Of Date
-
Time
-
Clinical Summary Provided
-
-
From the bottom of the window
-
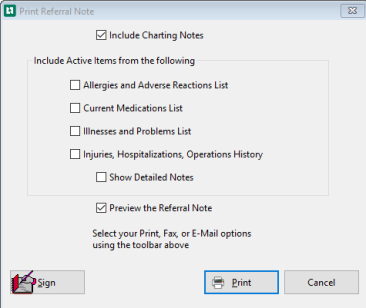
Print Referral Note - Opens the Print Referral Note window select the items to be included
-
Sign optional
-
Print or use the option on the toolbar to Fax or E-mail.
-
Select Save
-
Back on the Referral / Consult window the Order Status changes to Completed with today's date.
-
The Request Authorization and Create Referral are now grayed out.
-
Select Save
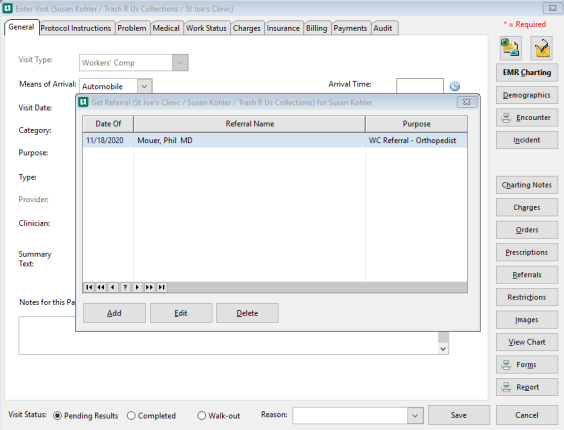
Once the referral has been created, it will be visible when you click the Referral button on the Enter Visit window.
Print Patient Instructions with Exit Care
Patient instruction documents can be printed from Exit Care at clinics which have licensed the system. This can be done from several locations, typically by the discharge nurse. There are Exit Care buttons in two locations: the Instructions tab of the application, and the menu bar on the Enter Visit window. Since only one user at a time can have a particular charting note open, this task is best performed from the Enter Visit window since the provider is often completing the charting note at that time.
Manually Enter Other Orders
On the Enter Visit window select Orders from the right of the window
OR
From the EMR Charting Workspace select Orders from the right of the window
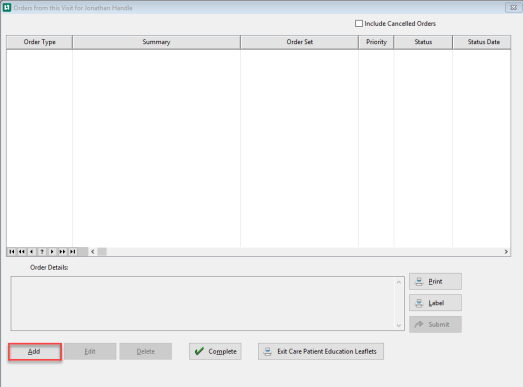
Both options opens the Orders from this Visit for (patient name) window
-
Select Add
-
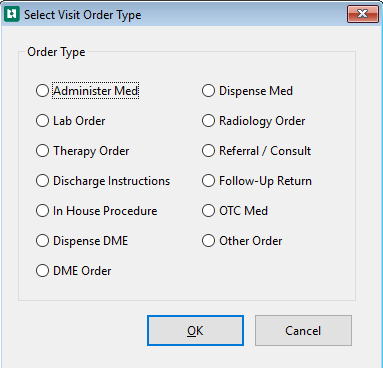
The Select Visit Order Type window opens
-
Select the Order Type you want.
-
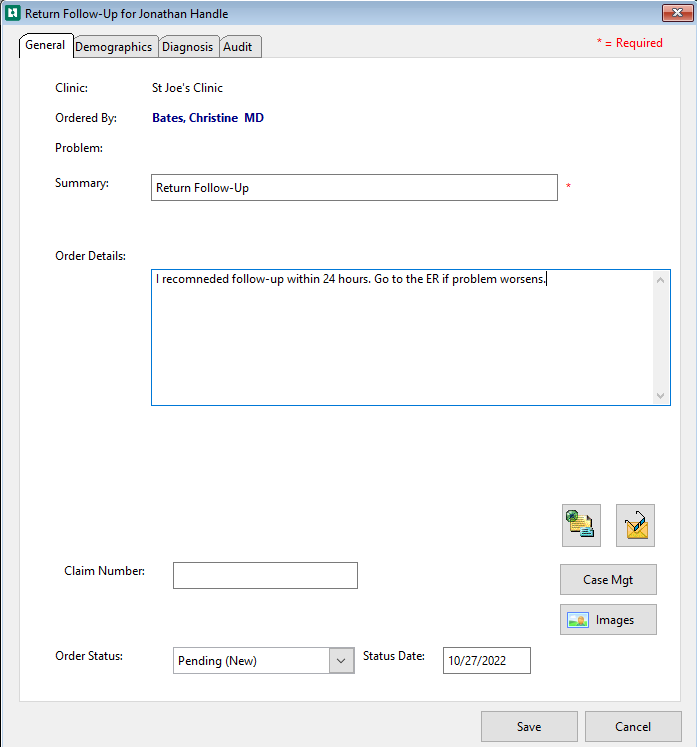
Select OK to display the Order entry window:
-
On the entry window enter a brief description in the Summary field, if one does not populate, this is a required field. This is what will display on the list of orders for this visit.
-
Enter the Order Details. This displays what needs to be completed for this patient.
-
Enter a Claims Number if available.
-
If appropriate, change the Order Status by clicking the drop-down arrow and selecting from the status list. The program will always change Status Date to today when the status is changed.
-
Case Management takes you into the case management system where you can record case notes, such as conversations with insurance companies to obtain authorization for referrals, and create case ticklers for activities that need to be performed in the future, such as making a follow-up call to a referral provider to learn the patient's status.
-
Optionally, attach an image or scan a document by selecting Images.
Referral and therapy orders have several additional features. Read the topic on Authorization Management to learn more.
-
The Authorizing Entity is displayed.
-
An Authorized By name can be entered.
-
A Reference # can be entered.
-
There are buttons for printing an Authorization Note and an Authorization Request.
-
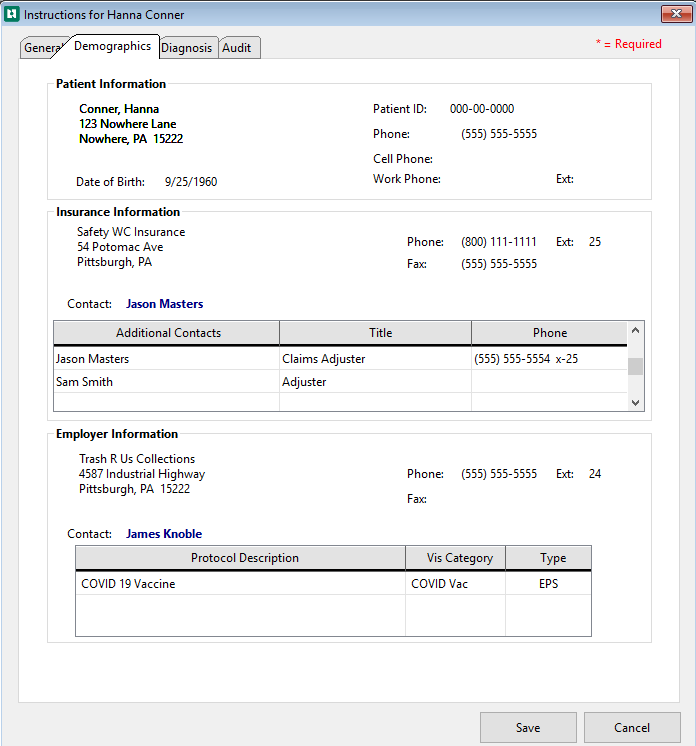
Click the Demographics tab to see information about the patient, insurance company, and employer.
Manually Enter Medication Orders
If you are not a Prescribing Provider you will not be able to add a medication.
On the Enter Visit window select Orders from the right of the window
OR
From the EMR Charting Workspace select Orders from the right of the window
Both options opens the Orders from this Visit for (patient name) window
-
Select Add

-
The Select Visit Order Type window opens (If you are not a Prescribing Provider Administer Me and Dispense Med will be grayed out)

-
Select the Order Type you want: Administer Med, Dispense Med or OTC Med.
-
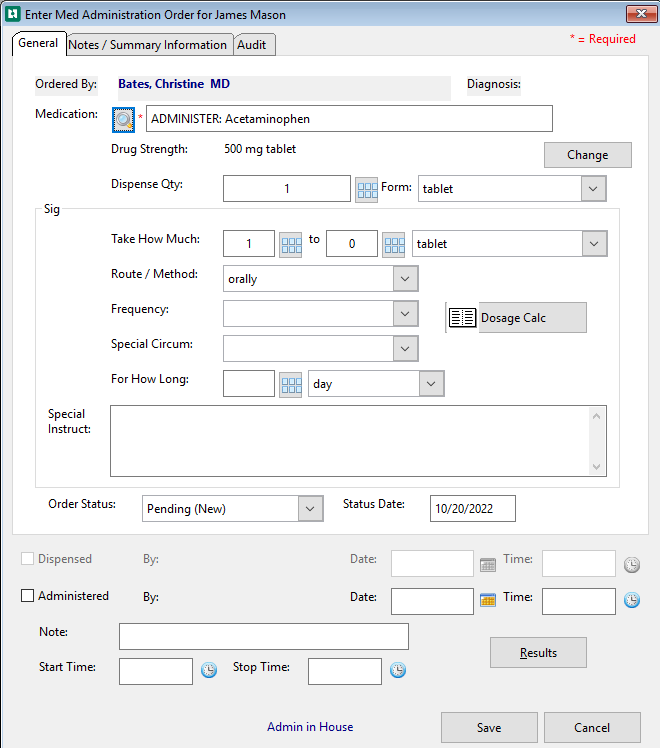
Click OK to display the Enter Prescription window. (While this is not a prescription, which can only be entered from the application Provider Charting, it uses the same entry window since the parameters are the same.
-
Click the magnifying glass beside Medication to display a list of all medications in your system. Search for and select the med you want.
The program will enter the default details for this specific medication based on your Medication Setup.
-
If appropriate, make needed changes in the details.
-
The default Order Status is Pending. The program will always change Status Date to today when the status is changed.
-
Optionally, enter Special Instructions.
-
Select Save when done.
