Case Management
Summary
Case management provides a place for you to keep track of non-medical activity related to an injury. The heart of the process is scheduling and recording relevant actions. These include such things as:
-
Conversations with insurance companies to obtain authorization for referrals.
-
Follow-ups with employers regarding a patients work status
-
Calls to patients to find out how they are doing.
-
Follow-ups with referral providers to learn the status of the patient's treatment.
If an unscheduled action occurs you can enter a "case note" with the details. When you learn that an action needs to be taken in the future, you can enter a "tickler" to schedule it. When a scheduled event occurs you can complete it, converting it into a case note and adding the details of the outcome.
A case can be assigned to a case manager, and access to cases can be limited by case manager. Reports on scheduled activity can be run for one or for all case managers.
The program includes a function for managing referrals and authorizations. From it, you can print, fax or e-mail an authorization request to the appropriate person. When authorization is received, the status can be changed to reflect that and a referral note can be produced to send to the referral provider. When these actions are taken, the program can be told to create a case note.
The case manager has access to information collected on the incident record via that Details and Summary buttons. Some of the fields which can be seen are related to case management and can be entered or changed here. Some are, while pertinent to the case, medically related and cannot be changed by the case manager.
A number of reports are available which cover the management of cases, lost and restricted time, and case costs. Additional reports provide analytic and summary information about incidents.
|
The Case Management Screen
Net Health Employee Health and Occupational Medicine offer an efficient environment for case management, providing easy access to the features of the software pertaining to case management. This is done while masking medical details from a case management user who does not need access to the information on the actual treatment. The center of the Case Management window displays two panes , one for completed case notes and the other for case ticklers. In addition to viewing and adding notes and ticklers, buttons provide access to case contacts and several screens which display different information about the incident. Depending on user rights, charting notes can be viewed or added, lost and restricted time can be entered and case costs can be recorded.
Select the menu option "Cases" to display the following browse:
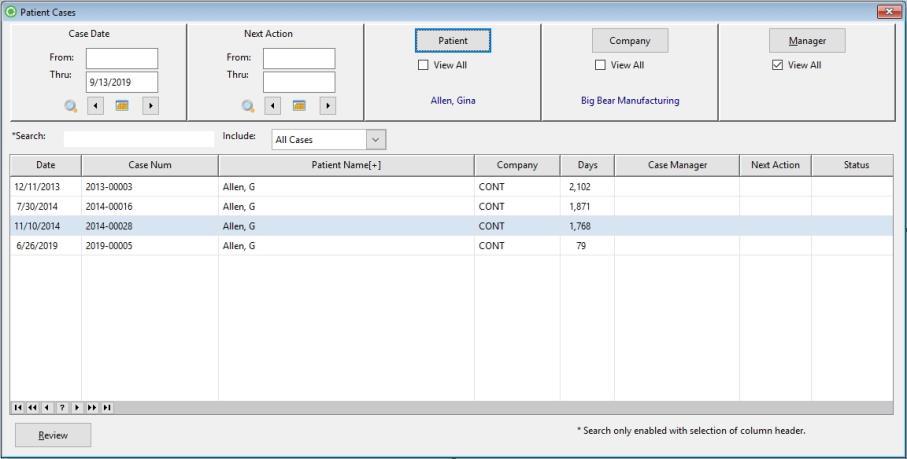
| Column Sorting | Users may sort columns by clicking the column title. (Not available for all columns.) |
| Cases Date |
Enter the From date of the Case Period or select a specific period from the icons below the date selections. The system will limit the list to only cases that began on or after this date. A From date without a Thru date shows all cases on or after the From date. Conversely, A Thru date without a From date shows all cases on or before the Thru date. If From and Thru dates are blank, the system does not apply a date filter. The From date default is the current date. |
| Cases Thru |
Enter the Thru date of the Case Period or select a specific period from the icons below the date selections. The system will limit the list to only cases that ended on or before this date. A From date without a Thru date shows all cases on or after the From date. Conversely, A Thru date without a From date shows all cases on or before the Thru date. If From and Thru dates are blank, the system does not apply a date filter. The Thru date default is the current date. |
| Calendar / Period icons |
|
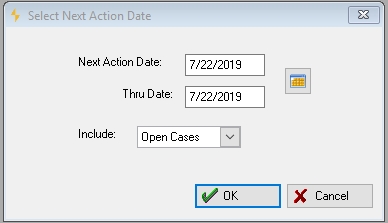
| Next Action From |
Enter the From Next Action date or select a specific period from the icons below the date selections. The system will limit the list to only cases with a Next Action date that began on or after this date. A From Next Action without a Thru Next Action date shows all cases with a Next Action date on or after the From date. Conversely, A Thru Next Action date without a From Next Action date shows all cases with a Next Action date on or before the Thru date. If From and Thru Next Action dates are blank, the system does not apply a date filter. The From Next Action date default is the current date. |
| Next Action Thru |
Enter the Thru Next Action date or select a specific period from the icons below the date selections. The system will limit the list to only cases with a Next Action date that began on or before this date. A From Next Action without a Thru Next Action date shows all cases with a Next Action date on or after the From date. Conversely, A Thru Next Action date without a From Next Action date shows all cases with a Next Action date on or before the Thru date. If From and Thru Next Action dates are blank, the system does not apply a date filter. The Thru Next Action date default is the current date. |
| Employee / Patient |
Click the Employee / Patient button to select a specific employee (or patient). This button will immediately display the Employee / Patient search and allow you to choose and limit the list to a single employee (or patient). Select the "View All" checkbox box to list all employees / patients. Users may check or uncheck the "View All" checkbox to toggle between a single Employee / Patient and a full list. View all is the default. This button label is determined by a parameter located in the Administer System Global Settings window - General tab under: "Label for Employee /Patient". |
| Company |
Click the Company button to select a specific company. This button will immediately display the Employees / Patients within that company. Select the "View All" checkbox box to list the employees / patients in all companies. Users may check or uncheck the "View All" checkbox to toggle between a single company list and a full list. View all is the default. This button label is determined by a parameter located in the Administer System Global Settings window - General tab under: "Label for Company / Site". |
| Manager |
Click the Manager button to display the Get Case Manager window. From here, uses may choose and limit the list to cases belonging to a single manager. Select the "View All" checkbox box to list the employees / patients for all Case managers. Users may check or uncheck the "View All" checkbox to toggle between a single Case Manager list and a full list. View all is the default. |
| Search |
Users may filter the list by specific Search criteria. Click a column to sort which will force the system to use that field as the search criteria. Enter your text to filter the list. This function also has an incremental wild card search which will adjust the list by character string as you enter them. For example, if you enter an "A", the list will populate all (of the selected) search column values that begin with "A". If you then add another letter, "AB", the system will filter the search even further to only those items that begin with "AB". Not all columns are available to search. |
| Include |
This drop-down menu allows users to limit the list based on the following selections:
|
 Will provide options to select standard date ranges(e.g. last week, last month, etc.)
 Will provide a calendar option with arrows that advance or retreat one day at a time.
Once an Employee / Patient is selected, click the Review button to display the Case Management window:

To access an Employee / Patient by "Next Action, See the "Next Action From and Thru" date fields above.
To access an Employee / Patient by "Next Action, See the "Employee / Patient" button above.
-
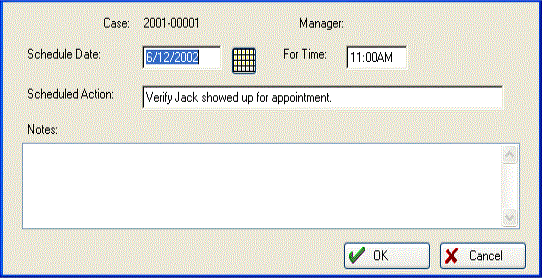
Create a tickler
-
From the [Case Management] window, click your mouse anywhere in the [Scheduled Action] pane (lower pane) to activate the window.
-
Click Add to display the Enter Case Action window:
-
In Schedule Date, enter the tickler date.
-
In For time, enter the time of the tickler, if needed.
-
In Scheduled Action, enter a reminder to yourself.
-
Click OK.
-
Click Close.
-
-
Enter case notes (complete a tickler)
-
Highlight the scheduled action you want to complete.
-
With your left mouse button depressed, drag the tickler to the [Completed] pane.
-
Release the mouse button.
-
Complete the Case Actions window, using the TAB key to move among the fields.
-
Click OK.
-
Click Close.
-
-
Add (unscheduled) case actions/notes
-
Click your mouse in the (top) [Completed Actions] pane.
-
Click Add.
-
Complete the [Enter Case Call or Action] screen, using the TAB key to move among the fields.
-
Click OK.
-
Click Close.
-
Access Incident and Visit Information - Access the Case Summary Window
-
Review the details of the case (read-only)
-
Click details to display Case Details window:

-
There are 5 tabs.
-
Most of the fields on these tabs are read-only.
-
Some fields which are directly related to case management such as claim number can be edited here. The other tabs include fields that carry information that relate to the progress of the case such as first date absent from work.
-
The MEDICAL tab includes fields which can also be entered from a visit such as Work Status.
-
-
Click Close.
-
-
Review medical charting notes
-
Click Chart. If this button is "grayed-out", you do not have user access to this function, and should request access from your Security Administrator The person who manages all security functions, such as establishing security parameters, setting up useraccess rights, and reviewing and purging audit logs, supporting users who encounterproblems (such as forgetting their personal passwords) and determining other security settings related to compliance with the HIPAA Security Standard. .
-
Highlight the note to review and click Change. In spite of the label on the button, usually changes cannot be made.
-
Click OK when finished.
-
Click Close.
-
-
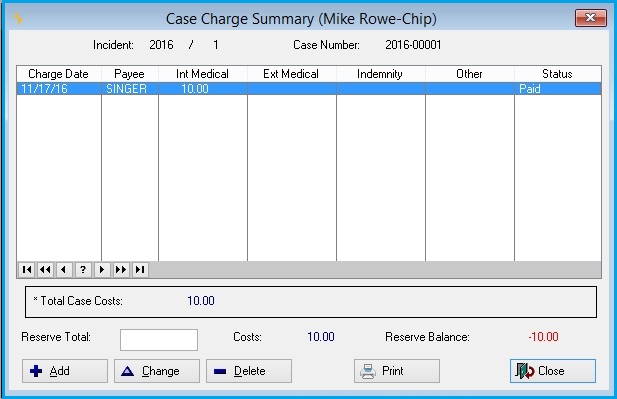
Track case costs
The program uses this window to calculate case costs for various reports. If your organization is using the Billing program, the charges listed may have been added automatically by the Billing program, and you should not delete them. If you do delete them, however, they are deleted from the case record, not from the billing and A/R files.
You may use this function to review charges, as well as to add charges you may find out about from a Referral Provider.
- Click the Costs button from any window.
- Click Change to modify a charge, or Delete to remove a charge.
- Click Add to a record a case charge.
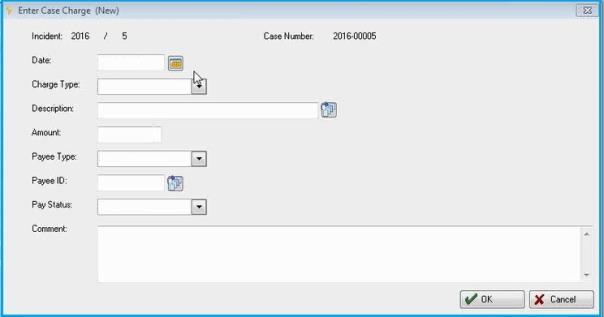
- Date: This field will default to the "Incident Date Of" field value but the field will be highlighted so the user can begin typing to change the date without having to click on the field.
- Charge Type: Drop-down for the user to select the type: Internal Medical; External Medical; Indemnity; and Other Charge options. The default on each new entry will be set to the External Medical option. When the screen is displayed after a record is saved and another record is added, the software will default this field to the value populated from the previous record.
- Description: The user may click the look-up icon and position on the Select Medical Activity window. The user may then select a medical activity from this window to populate this field.
- Amount: The dollar amount will automatically populate from the Employer Service, Standard Fee Schedule for the medical activity selected. The system allows the user to make changes to this dollar amount field from what was pre-populated.
- Payee Type: Drop-down for the user to select the type: Provider; Referral Provider; Attorney; and Other options. The default on each new entry will be set to the Provider option. When the screen is displayed after a record is saved and another record is added, the software will default this field to the value populated from the previous record.
- Payee ID: The look-up icon will take the user to different selection windows based upon the Payee Type selected. When the screen is displayed after a record is saved and another record is added, the software will default this field to the value populated from the previous record.
- Provider â€" Displays the Select Provider window where the user can select a Provider from the list.
- NOTE: The Provider, Credential field will contain the affiliate's rate if it is different from the majority set on the medical activity fee schedule. These providers will be marked as an external provider. When users look up the provider for the charge, they will see the different rate on the browse window in the Credential column to alert the them to override the charge amount during entry.
- Referral Provider Displays the Select Provider window where the user can select a Referral Provider from the list.
- Attorney Displays the Select Attorney window where the user can select an Attorney from the list.
- Other â€" This field is not available for entry.
- Provider â€" Displays the Select Provider window where the user can select a Provider from the list.
- Pay Status: Drop-down for the user to select the type: Paid; Unpaid Timely; Unpaid Not Auth; and Request Check. The default on each new entry will be set to the Paid option. When the screen is displayed after a record is saved and another record is added, the software will default this field to the value populated from the previous record.
- Comment: The system allows a maximum of 1,000 characters to be entered for a comment about the charge.
- OK: Save the record.
- Cancel: Cancel and not save the record.
Two reports provide summary information about lost and restricted time.
-
Record or review a referral
-
Click the Referrals button.
-
Click Change to update/modify a referral provider record or Delete to remove a referral record from the Case Summary.
-
Click Add to record a new referral.
-
Enter Date of referral.
-
Use the table locator icons to identify the Physician or other provider and the [Visit] Category (e.g., Referral PT).
-
Optionally, complete the Purpose field.
-
Optionally, click the NOTES tab to review notes written to the Referral Provider. DO NOT ADD NOTES HERE! Case notes should be added as explained above.
-
Click OK.
-
Click Close.
-
-
View incident Scheduling
Click Scheduling to view all scheduled appointments for this incident. Appointments cannot be added from this window. They still must be added through the appointment calendar or the MEDICAL tab on the visit record.
-
Click Change to change the time, date, or other items on the appointment record.
-
Click Print to obtain a report of all the open appointments. Appointments with a completed or canceled status will not be included on the report.
-
-
Case Management Reports Overview
-
Printing the case summary report
-
Click the Print button from any window.
-
Select the destination for the report: Print, Preview, email, or fax.
-
Optionally, click Select Printer to choose a different printer.
-
Click OK.
-
Click OK to close the [Case Summary] window.
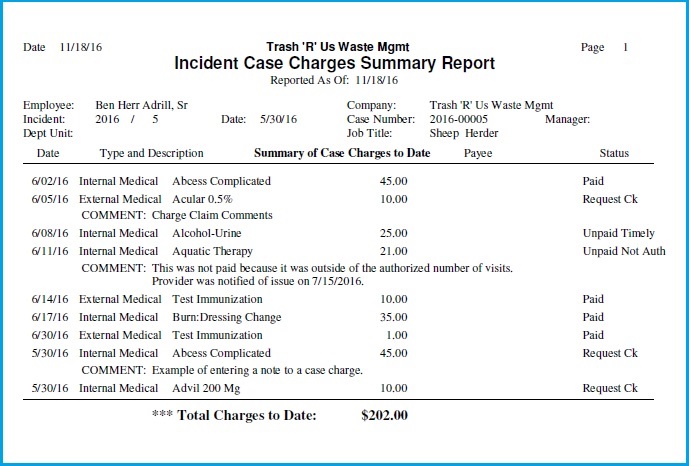
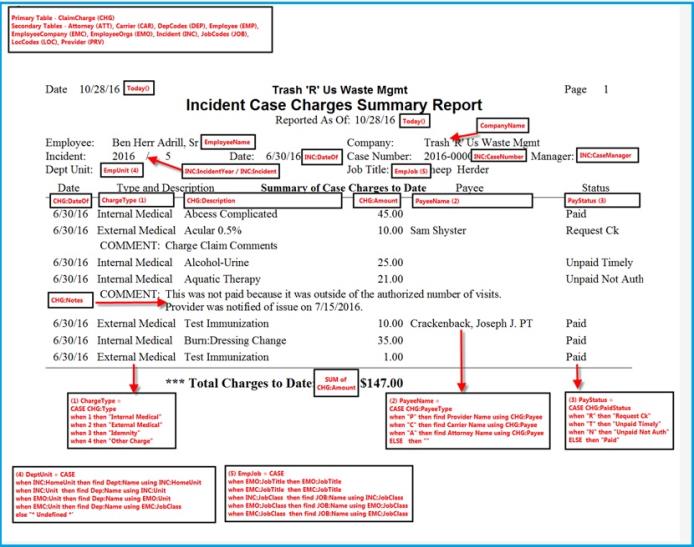
Report Example:
-
-
Scanning documents
-
Manage Authorizations