Referral Authorization Management
Summary
Many states and worker's comp carriers require that referrals, therapy and many types of radiology or lab procedures be authorized before being carried out. Without authorization, payment will be denied.
Some states, such as California, have mandated that the comp carrier must respond to a request for authorization within X period of time (e.g. 5 days). If no response is made, the procedure is automatically considered authorized. It is typically the role of a case or authorizations manager to request, obtain and track authorizations, and this is often a full time job.
The Visit Orders function provides a method for managing the process of obtaining referral authorizations. If you are using Net Health Employee Health and Occupational Medicine Provider Charting, the process begins when the physician's order for the procedure is entered in the program as a visit order. If you are not using the charting function, visit orders can be entered directly on the visit record during patient check-out.
Regardless of how the visit order gets entered, it is managed from the visit record:
-
Each order has a field that allows the status of each order to be tracked.
-
A Request for Authorization form can be printed, faxed or emailed from the visit order entry using the information for that particular order and directed to the responsible authorizing party (carrier, employer or MCO).
-
A Case Management action history record is automatically generated whenever an authorization request is created.
While authorizations can be accessed from the visit record via the Orders button, authorization management will usually be done from case management. The [Case Management] window includes an Authorizations button which displays all of the visit orders that are either pending authorization requests, or for which authorization requests have been issued. The manager can generate authorization requests and update the order status. In order to best facilitate the authorization management process, the browse list of authorizations in case management groups the affected visit orders by payer and patient. Finally, as visit orders are flagged as authorized, Case Action records are created behind the scenes to document their receipt, and tickler records can be generated to assist the case manager in proper follow-up.
In addition to generating authorizations, the case manager can also generate the actual referrals directly from the visit orders, once authorization has been obtained.
The Visit Orders topic gives the details on generating a Request for Authorization, changing an order status, and printing referral notes.
Managing Authorizations
The authorizations feature presents a filtered list of authorizations for you to work with. Only orders with an Order Type of Referral, Lab, Radiology, Therapy, and Other can be included on this list. The list can additionally be filtered on several factors, as discussed below. Once the requested list is displayed, you can open each individual authorization to print requests and change status.
-
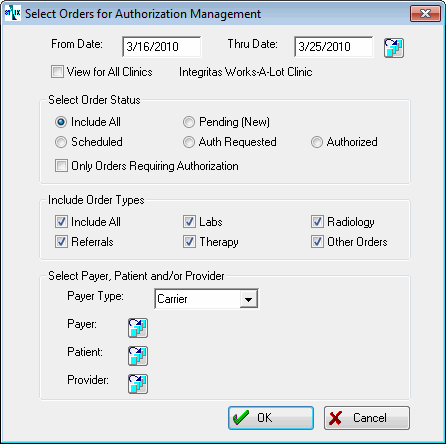
On the Home Nav Bar, click the Authorizations button to display the Select Orders for Management window:
-
Enter the date range you want to display.
-
Click the radio button under Select Order Status to limit the list as desired.
-
The Only Visits Requiring Authorization checkbox only affects Workers' Comp visits. Orders of types Referral, Lab, Radiology, Therapy, and Other can be set to require authorization. This is done by checking a box labeled Approval Always Required on the AUTHORIZATIONS tab in company protocol setup. Then, when the Only Visits Requiring Authorization checkbox is selected here in Authorizations Management, the display will be limited to orders just those orders.
-
Check the order type(s) you want. Checking Include All will automatically check all other boxes.
-
The three choices in the section labeled Select Payer, Patient, and/or Provider give you an optional ability to filter the list based on your interest of the moment.
-
If you want to filter by Payer, first select the correct Payer Type. Then, click the table icon
 beside Payer. Search for and select the payer account you want.
 -
To limit the display to a single patient, click the table icon beside Patient, then search for and select the patient of interest.
-
To limit the display to authorizations requested by a single in your clinic, click the table icon beside Provider, then search for and select the provider of interest.
-
-
Click OK to display the Authorizations Management window, which lists all authorizations requested on the previous screen.
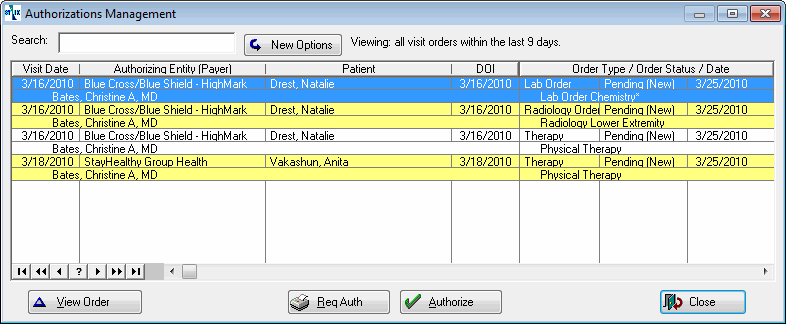
(If you want to change the filter on the records displayed, click New Options to return to the [Select Orders for Authorization] window shown above.) -
To work with an authorization, highlight it.
-
If you know without looking at the details that you want to either request an authorization or flag it as authorized, click the related button at the bottom of the screen. Req Auth will do the same thing as Step 11. Authorize will change the status to Authorized.
-
-
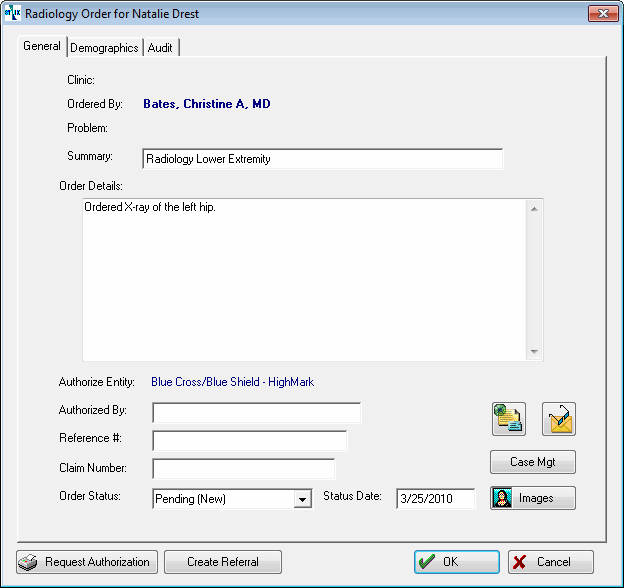
To see the entire order, click View Order. This will display the Visit Order Detail window. This window will vary in name, based on the type of order.
-
Optionally, click DEMOGRAPHICS to see additional information.
-
-
Change the Order Status, or other fields, as needed. the program will always change Status Date to today when the status is changed.
-
Click Request Authorization to print an Authorization request addressed to the appropriate insurance carrier. When you do this, the program will change the status of the order to Auth Requested and "gray out" the Request Authorization button.
-
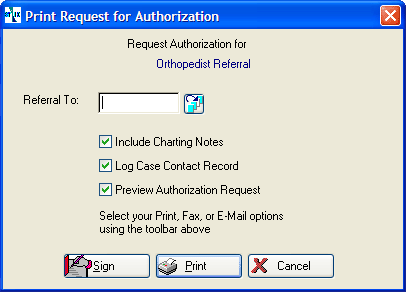
Clicking Request Authorization to open the Print Request for Authorization window:
-
Click the table icon beside Referral Provider, then search for and select the physician or other provider to whom you are referring the patient from the drop-down list in the Physician field.
-
Check or uncheck as appropriate the boxes to Include Charting Notes and Log Case Contact Record.
-
Select print options, which include faxing or e-mailing instead of sending to the printer.
-
Optionally, add an electronic signature to the authorization request.
-
Click Print to complete the process.
-
-
Click Create Referral to create a referral record and print a referral note with details of the referral which can be sent to the referral provider. When you do this, the program will change the status of the order to Completed and "gray out" the Create Referral button. You may want to change Order Status to Authorized. You can also change the status to Denied when needed.
-
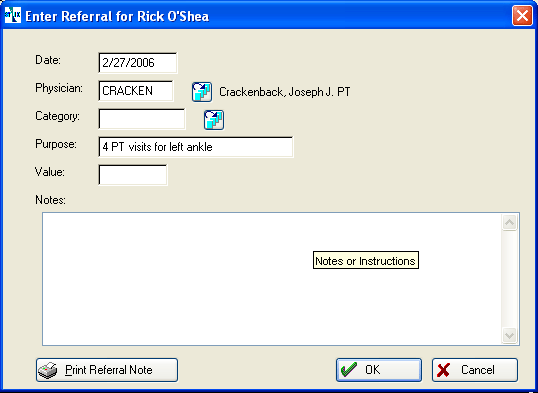
Clicking Create Referral will open the Enter Referral window:
-
Enter the Date of the referral visit. If you do not know the date, enter the date the referral was made.
-
Select the physician or other provider to whom you are referring the patient from the drop-down list in the Physician field.
-
Categoryis not required. It does not mean anything to those outside your organization. If there is a physical therapy facility associated with your clinic, the visit category may be of use. Otherwise, leave it blank.
-
Optionally, enter a Purpose for the referral in the Purpose field; If you selected a Category, the program will have filled in the Purpose. You can change it if you wish.
-
If the physician has written a note for the referral provider, click the NOTES Tab and enter the note to the referral provider.
-
Optionally, add an electronic signature to the Referral Note.
-
You can print the referral note, or if setup for it, you can fax, or e-mail the note. Click the Print Referral Note button.
-
-
Click OK.
|
|
When you print either an authorization request or a referral note the button will be grayed out refers to part of a screen that cannot be used because it is inactive or otherwise not accessible. This part of the screen appears slightly gray. , indicating that it has been done. This means the button no longer functions. If you need to reprint one of these forms, change Status back to Pending and the buttons will be enabled again. |