Summary
One of the most powerful benefits the program provides is the ability to produce a very large number of reports that can assist you in managing your clinic, tracking finances, and reporting to employers.
To access reports, from the Home Nav Bar, click the REPORTS tab. For the full range of reports, click the Provider Clinic Reportingbutton.
Report Options
The report setup windows were designed to provide consistency from one report to the next in terms of how you make report selections. All report setup windows have a yellow More Options panel on the right side, to make it easier for you to know immediately where you are. The panel includes the following options, although not all options will appear on every report. The options displayed depend on the nature of the report. These standard options are explained below, and will not be repeated in the instructions for generating specific reports.
-
All Clinics checkbox: If checked, the program will report across all clinics.
-
Clinic button: This button is only available when theAll Clinicscheckbox is unchecked. It allows you to select a single clinic for the a report. The clinic selected shows in the title bar of the report dialog.
-
All Companies checkbox: If checked, the program will report across all companies.
-
Company button: This button is only available when the All Companies checkbox is unchecked. It allows you to select a single company (hospital, campus, location) for the a report. The company selected shows in the title bar of the report dialog.
-
Organization button: This presents a window which repeats the choices above, plus two other options.
-
-
The Select Company Option drop-down box includes, in addition to Current Company and All Companies, the choice of Select List of Companies. When this is chosen, a SELECT COMPANY tab will be added to the report dialog. There will be two panes. The one on the left will list all companies in the system. The one on the right will list companies you have selected for this report. Find companies by using the Search field or the VCR buttons. Select by double-clicking the company, or by highlighting the company and clicking the right arrow between the panes. Unselect by double-clicking the company in the right pane, or by highlighting and clicking the left arrow between the panes.
-
Four filter fields, only available when selecting for all companies, allow you to limit the report based on State, Region, District, and Complex.
-
-
Sub-Group button: This provides a number of options for selecting based on department, division, work location, job class, work status and risk groups.
Sub-Group Options
This dialog box provides a number of options for limiting reports to just the patients you want:
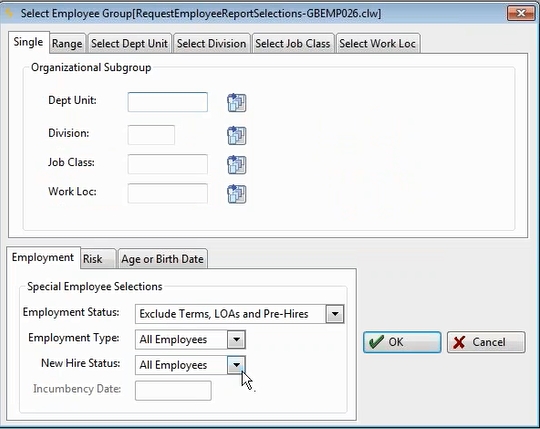
The SINGLE Tab
This tab allows you to limit the report to a single Department Unit, Job Class, Division, or Work Location:
The RANGE Tab
This allow you to select a range of Department Units, Divisions, Job Classes, or Work Locations.

Employment sub-tab: Special Employee Selections
These selection options (based on fields in Patient Demographics) allow for the following choices:

-
Selecting employees based on status. This selection gives you options to exclude terminated employees, employees whom have died, or employees on leave of absence.
-
Selecting employees based on type. This selection gives you the option to include employees for a specific employment type (e.g. full time, part time, etc.), for non-employees only (e.g. volunteers and students), or all types of employees.
-
Selecting employees based on hiring status. This selection provides the option to include pre-hire employees, new hires employees only, and incumbent employees only, or all employees. An incumbency cut-off date field is entered when selecting to include new hires or incumbent employees, but not pre-hire employees.
Risk sub-tab: Risk Category Subgroups
These selections allow you to limit the report based on risk categories. Read Risk Categories Setup to learn more.
|
|
You can make multiple selections from the Sub-Group Options, allowing you to precisely target the activity you want for your report. However, remember that every selection you make reduces the activity that will be included on the report. If you make too many selections, you may end up with a report that is empty, or, contains so little information that it is of little use! |
The SELECT DEPT UNIT tab
In a hospital setting, there are multiple departments that a given supervisor is in charge of. These typically do not fall into any particular order with respect to department codes. This tab allows you to select a list of departments for the report:
-
When setting up to run one of these reports, make sure that the All Companies box is not checked and that the correct company has been selected. The selected company name will show in the title bar of the report dialog window.
-
Click the Sub-Group button in the yellow More Options area of the report dialog window.
-
Click the SELECT DEPT UNIT tab. This tab includes a browse list on the left listing all departments for this company and another browse list on the right which will list the departments you have selected:
-
In the left DEPT UNIT browse list, search for the first department you want on this report.
-
Double-click the department, or highlight it and click the right arrow button between the two browse lists to move the department to the SELECTED DEPT UNIT browse list on the right.
-
Repeat steps 4 & 5 until you have selected all departments you want for this report.
-
If you select an incorrect department, find it in the SELECTED DEPT UNIT browse list and either double-click it or highlight it and click the left arrow between the two browse lists. It will be removed from the list of selected departments.
-
Click OK when done.
The SELECT DIVISION, SELECT JOB CLASS, and SELECT WORK LOC tabs all work the same as the SELECT DEPT UNIT tab.
|
|
Note that if you want to run a report for a specific company, organization or sub-group, you must select the desired option(s) prior to running the report! |
-
The ASCII File radio buttons enable you to create one of three types of ASCII file. Selecting Excel will create an Excel CSV, that is, comma delimited, file which can be imported into a spreadsheet. Selecting Fixed produces a file where each field takes the same amount of space forming defined columns of information. Fixed length files are less useful, but are just the thing in certain circumstances where information needs to be imported into another program. Exported reports that contain PHI Protected Health Information is covered by HIPAA privacy regulations. must be encrypted. You will know that an exported report will require encrypting by a message to that effect on the Dialog window when you name the file. Protected files are placed in a secure folder and cannot be copied out of that folder without being encrypted by the Net Health Employee Health and Occupational Medicine Secure File Encryption Manager.
-
When the ASCII box is checked, the system will prompt you for the file destination specifics. Once you click the Print button on the report window, in addition to the usual report display, your file will be created based on the destination given.
-
The Graphcheckbox, when selected, will cause the software to produce a graph of your data. The standard report is produced first, followed by the graph. Once the graph is displayed on your screen, you can right click your mouse on the graph to open up a dialogue box with options for how to display the data. This choice is not available for all reports
-
The Label File checkbox is useful for reports that are to be mailed out, or for reminder letters. If you check this box, the program will produce an text file that can be used with your Word Processing Program's mail merge function to produce mailing labels.
Standard Report Setup Options:
-
When you are setting up a report that includes a date range In report set-up, a group of dates that includes a FROM and a THROUGH date, to specify the dates for which the report should be run. , the table icon
 to the right of the Thru date accesses a menu of standard date ranges. Selecting the desired range from the menu can be faster than typing in the dates.
-
The Report Style section most often allows you to select a Summary or Detail report. Summary will include only the statistics of the item(s) for which you are reporting. Detail provides more detail in the report, which varies according to the report. For example, if you select Summary for a report of Injuries by Department, you would produce a report of the number of injuries in each department for the selected reporting period. The same report run for Detail, will include a listing of each individual injury in each department.
-
Many of the reports also include the ability to be run using reporting variables to provide multi-leveled groupings. In these cases, a single report can provide a huge amount of information, simply by selecting different reporting variables in the Report By section of the report setup window. When you select a Report By variable, such as Visit Category, the report will be grouped by Visit Category. At the time when you select the Report By variable, a table icon
will appear that, when clicked, will display a lookup list for that variable (for instance, a list of visit categories.) If you select one, the report will be limited to just that one value, say, Post Offer Physicals.
This section in reports has one, two or three variables that may be chosen from this list:
Nature of the Incident (Injury, Illness, Exposure)
Severity
Body Part
Body Zone
Physician
Event Type
Reason/Cause
Root Cause
Object or Substance
Sharps Device
Work Activity
First Response
Diagnosis
Company
Division
Location
State
Region
District
Complex
Job Risk

The report produced will depend completely on which variable is selected first, second or third. If department is selected first, for example, and Body Part is second, you will get a report sorted first by department, then by body part. However, if you select Body Part first and Department second, you will get a report of Body Parts first and Departments second. These are two very different reports! Therefore, westronglyrecommend that you alwaysPrint Previewyour reports!
-
All reports have a default Report Title. However, you can change it any time you run the report. If you memorize the report, the software will save the title you created. The Sub-Title field offers you the opportunity to add a subtitle to the report. This is particularly useful when you are selecting specific options: For example, the report Title might by, Injuries by Body Part and the sub-title, Report for Nursing Department.
-
Incident reports include an INCIDENT SELECTION tab. You can use these selections to report incident data more specifically. Of course, to have the software produce the requested data, you must be tracking the data in the software! In all cases, the default option is to include ALL.
-
Injuries, Illnesses, Exposures, All (Incidents): Select one of these choices to determine which type of incidents to include in the report.
-
OSHA Recordable, Non-Recordable, All: Select one of these choices to include only OHSA recordable incidents in the report, only Non-Recordable incidents, or All incidents.
-
Workers Comp, Non-Workers Comp, All: Select one of these choices to include only Workers' Comp incidents, only Non-Workers' Comp incidents, or both (All).
-
Hospitalizations, Fatalities, All: Select one of these choices to include only those incidents that required hospitalization, or only those incidents that resulted in fatalities, or all incidents.
-
Female Employees, Male Employees, All: Select one of these choices to include only females, only males or both.
-
Cost, No Cost, Medical, Indemnity, All: Select one of these choices to include only those incidents that involved costs, only those that involved no costs, only those that included medical costs (internal or external), or only those that involved indemnity payments (salary replacement).
-
Lost Time, Restricted Time, Either Lost or Restricted Time, No Lost or Restricted Time, All: Select one of these choices to include only those incidents that resulted in lost time, only those that resulted in restricted duty time, only those that resulted in either lost or restricted duty time, only those that resulted in no lost time, or all incidents.
-
Work Related, Non-Work Related, All: Select one of these choices to include only work-related incidents, only non work-related incidents, or both (All). Note: The program enables you to track non work-related incidents, if desired, which is why this selection is available.
-
Non-Equipment Related, Equipment Not Supplies, Failure to Use Equipment, All: Select one of these choices to include only incidents that were non-equipment related, only those that involved equipment and not supplies, only those caused by the employee's failure to use protective equipment, or all incidents.
-
Declined Comp Cases, Motor Vehicle Accidents Only: Select one of these choices to include only those incidents in which the case was declined by your insurance carrier or TPA as Workers' Comp, only motor vehicle accidents, or all incidents.
-
-
You can Memorize reports for future use. Get the report set up the way you want (and run it to be sure it is what you want!) Click this button
 , then click Memorize again on the following [Memorized Reports] window, and the program will save all the report options that you selected. The next time you want to run the report, click Memorize again on the report setup window, and select your report from the list. See Batch Reporting for details.
Report Destination
-
By default, most reports are sent to the Print Previewer before being sent to the printer. You can change this and send them straight to the printer by unchecking the Preview Report checkbox seen on most report dialogs.
-
You can fax and email reports without ever sending them to the printer. (This requires special Setup.)
Report Types
Net Health Employee Health and Occupational Medicine reports are organized in the program according to type. Some reports are repeated in two or more sections of the program, and in some cases, behave differently depending on which tab you click to run them, as explained below in more detail:
-
Clinic Management Reports
Clinic Management reports are designed to assist both in managing the clinic and producing statistics for managerial reports, budgeting, etc.
-
Visits and Surveillance (and Immunization) Reports
Reports about immunizations are included under the generic heading of "surveillance" even though they are technically not surveillance.These reports are designed for Clinical use, and are not intended to be distributed to managers. Consequently, they include employee names and other identifying information, if a detailed report is requested. For more information, see Visits and Surveillance Reports.
-
Incidents and Follow Up Reports
These reports are designed for Safety Department use, as well as for case management or exposure management. For more information see Incidents and Follow Up Reports.
-
Case Management Reports
Case Management reports are designed for supporting your case management activities. Some are found on the CASES tab of the [Home Nav Bar], others on the CASE MANAGEMENT tab of the [Reports Launch Pad].
-
Employer Reports
Employer Reports consist of a set of tools for reporting to your employer clients. These reports are primarily clinical in nature, but some of them provide monetary information. Net Health Employee Health and Occupational Medicine and Net Health Employee Health and Occupational Medicine offers a tremendous amount of power for company reporting for two broad purposes, reporting to employer clients and managing your clinic.
-
Financial Reports
The Clinical and Billing programs capture and produce a substantial amount of information-both clinical and financial. The wide range of financial reports built into the software allows users to look at this information from different perspectives for different purposes.
-
Letters and Lists
The Letters and Lists function enables you to produce reminder letters, both for routine surveillance and immunizations, and for employees on exposure follow-up protocols. For more information, see Letters and Lists.
-
Batch Reporting
If you have a group of reports that you run periodically, you can memorize the reports, and then aggregate them into batches. When you want to run the reports for the period, you can tell the software to run the batch: all you have to add is the date range! For more information, see Batch Reporting.
-
Individual Employee Reports
All the reports and letters noted above are designed to find groups of employees, either to display on a report, or to send a reminder. The program also includes individual employee reports, such as might be run from the Patient Chart. For example, if you are tracking an employee's Workers' Comp case, you might produce a Case Summary Report.
For more information, see Individual Employee Reports.