How to Schedule a Follow Up Appointment
If you have not already done so, please read Check-Out Patients Overview.
Summary
The program allows you to schedule a follow-up appointment from within the visit record, the appointment calendar, or the Home Nav Bar. All scheduled appointments that are linked to the incident for this visit will print on the Work Status Summary.
If you are documenting an exposure, before scheduling a follow-up appointment for the employee incident please read Assigning an Exposure Follow Up Protocol, as it may be more appropriate to assign the employee to an exposure protocol A series of medical activities that are scheduled in a specific pattern, according to guidelines established by Infection Control. The Exposure Protocol is set up one time. During the set-up, rules are established regarding which activities are to be performed and when. Once the Exposure Protocol is established, it can be assigned to the employee following an exposure. If assigned, STIX will automotically schedule follow-up dates according to the protocol. If follow-up is scheduled using a protocol, STIX can use the "next due" dates to find those employees who are due for follow up, and send them a reminder. and let the software do the scheduling.
If you are scheduling a patient to return after an Employer Services visit, perhaps for a TB skin test read or the next Hep B vaccination, you will need to follow the regular procedure for scheduling an appointment. This should be done before reopening the visit record to check the patient out since the program does not provide the option of scheduling an appointment from the visit record for Employer Services visits.
If You Have Not Licensed the Block Scheduler
If you do not have the Appointment Calendar function in the software, you can schedule an appointment in your (paper) book, then document the appointment in the software. Please read the Schedule File and Appointment Calendar topic for additional clarity.
The advantage to you of having the appointment in the software, even if you schedule manually, is that if the patient calls to cancel or change the appointment and cannot remember when it is, you can quickly find the appointment instead of paging through your book. In addition, if you complete the appointment in the software, logging the visit is much faster, since you have already added to the software the visit category and Clinician and/or Physician seeing the employee. If most of your visits are walk ins vs. scheduled appointments, this approach will probably suffice for you. However, if you schedule a lot of visits, we would recommend licensing the Appointment Calendar program and get rid of the paper book.
What Do You Want To Do?
-
Schedule the appointment from the visit record
-
Re-open the visit record.
-
Click on the MEDICAL tab of the [Enter Visit] window.
-
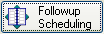
Click on the Follow-up Scheduling button.
-
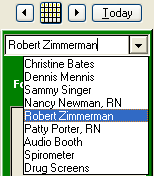
The program will display the week calendar for the visit provider.
-
The provider can be changed in the drop-down box in the upper right.
-
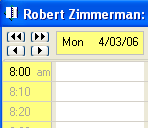
Use the left and right arrows above the provider to move up or back a week at a time.

-
-
Find an open date and time slot that works for the patient and double click on it.
-
Use the VCR buttons in the upper left of the calendar window to move up and down through the day.
-
-
Select the visit category A classification of visit types for purposes of (a) tracking utilization of your department; (b) determining what screens and buttons to display in the visit record; and (c) defining treatment protocols for physicals. If you are part of an Occupational Health Clinic that is using STIX for billing, the Visit Category also determines how the visit will be billed , probably called something like Workers' Comp Recheck.
-
Enter an Appointment Note The appointment note is entered when a visit is scheduled. It contains information gathered by the scheduler that will be needed at check-in. , if needed.
-
Change the Minutes for the appointment if the default is not correct.
-
Click on OK to return to the calendar.
-
Click on Close to return to the [Enter Visit] window.
-
-
Schedule the appointment from the Home Nav Bar
-
On the Home Launch pad, click the Appointment Calendar button.
-
Click the down arrow at the top of a column and select the provider with whom you want to schedule the appointment.
-
In the same column, find an open time for the appointment and click the mouse on that time.
-
Right click the mouse, and select New Appointment.
-
Using the Select Patient Dialog Box or the Select Patient Lookup List, find the patient for whom you are documenting an incident visit.
-
You should be on the [Enter Appointment] window. Verify the date and time are what you want.
-
Enter the code of the category into the Category field OR click the table icon
 to the right of the Category field. Search for and double click the desired visit category
-
-
If you select a visit category that has been designated as an IncidentFollow-up Result Type visit, the program will prompt you as follows:
-
You have selected an incident follow-up type of visit for (Employee). Is this correct?
-
Click YES, then select the correct incident. If not correct, click NO and repeat step 7.
-
-
If needed, overwrite the visit Minutes Required.
-
Add any appointment notes you wish.
-
Click OK. You will return to the appointment calendar, and the appointment will be scheduled.
-
Click Close to close the window.
-
-
From the incident record
-
On the right side of the Incident Record, click the Scheduling button.
-
Click your mouse in the top pane, then click the Add button.
-
Enter the date and time of the visit.
-
Click the table icon
to the right of the Category field and select the appropriate follow-up visit category. -
(You will not receive a prompt to link to a particular incident because you started from the Incident record, and the software assumes this visit is related to the same incident).
-
Click the table icon
to the right of the Clinician and/or Physician fields and select the appropriate person(s). -
If you want to add a note to the schedule record, click the NOTES tab and enter it.
-
Click OK to return to the Incident record.
-
-
From the Month-At-A-Glance Calendar