Exitcare Patient Instructions
Summary
The application is integrated with documentation software from Exitcare. This system includes over 2000 documents of concise, clear, easily understood discharge instructions for your patients. These documents are designed for maximum readability and often include illustrative drawings in full color. For more information on how Exitcare determines the content of documents, visit its Website, www.ExitCare.com.
The system is very flexible, giving you the ability to create your own documents from scratch or to clone existing documents and alter them to better fit your needs. Document categories can be created allowing you to group those which you use most often on easily accessible lists. A single document can be listed under multiple names to make it easy to find, such as "Knee-Sprained" and "Sprained Knee". Multiple documents that are often ordered as a group can be bundled under a single name for quick selection.
Exit Care does not allow you to alter or delete the documents that come with the system. You can, however, flag them as "inactive" which will remove them from the selection list. If you later want to make one available it can just as easily be returned to active status.
When Exitcare is accessed from within the application, Information about the visit is passed to Exitcare for incorporation into the documents. A button for accessing Exitcare is found in three locations:
-
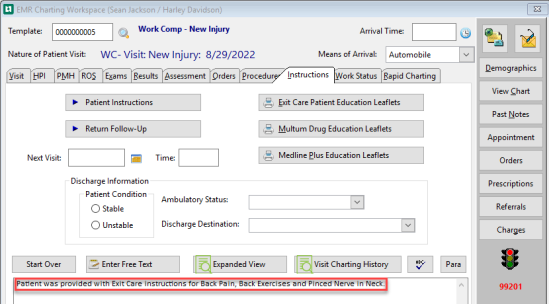
The INSTRUCTIONS tab of the EMR Charting Workspace window
-
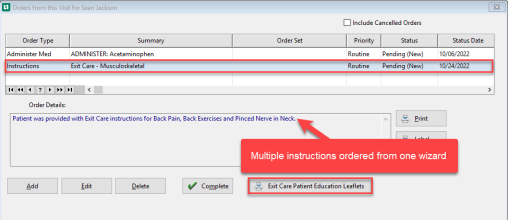
The Orders from this Visit for (patient name) window reached by selecting Orders from the right side of the EMR Charting Workspace.
-
The [View Orders for This Visit] window reached from the Orders button on the [Enter Patient Visit] window
Integrating Exitcare into Your Procedures
Exit Care Documented as a Template Element
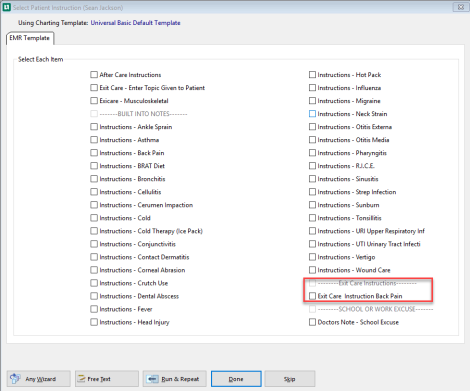
Typically, it will not be the provider who prints Exitcare documents. Instead, the provider will create an Instructions Order for the documents needed and the discharge nurse will print them before the patient leaves. There are a couple of approaches for how this is done in the application. The first is to put the documents to be available on a particular template directly on the Patient Instructions Template Element. When the provider clicks the Patient Instructions button on the Instructions tab, the list of documents will be seen and the selection made. Since there will be other items on this window you might want to designate the Exitcare documents with an asterisk, or even by saying "(Exitcare)" beside each.
-
When selected it documents this as an order and documents it in the charting note.
-
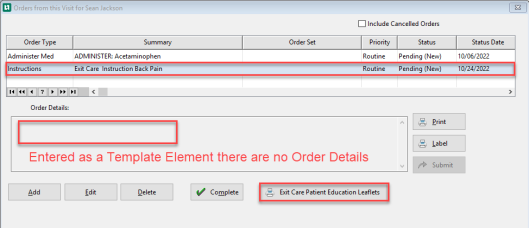
Select Exit Care Patient Education Leaflets
-
Print Leaflet
-
Return to the Orders from this Visit for (Patient Name)
-
Select Edit from the bottom of the window
-
From the Order status dropdown select Completed.
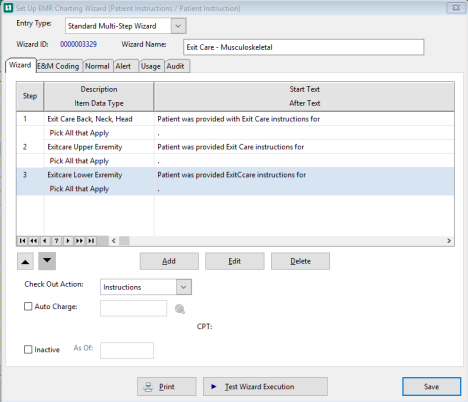
Exit Care Documented on a Wizard
The other approach is to create wizards for Exitcare documents. Running the wizard will present the user with a list from which multiple documents can be selected. The advantage of the wizard approach is that if multiple documents are ordered, it puts them all in a single order record for easier management by the discharge nurse.
-
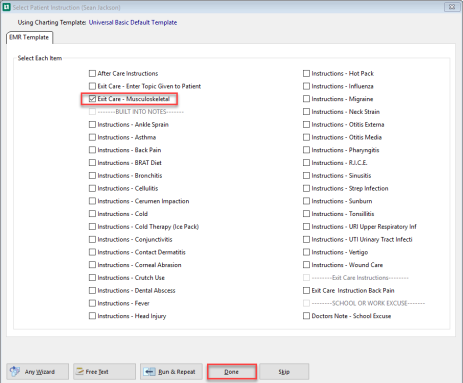
On the EMR Charting Workspace, from the Instructions tab, select Patient Instructions
-
The Select Patient Instructions (Patient Name) opens
-
Select the Wizard for your Exit Care Instructions
-
Select Done
-
The Wizard opens
-
Select as many of the topics as needed
-
Select Done to add these to the Orders and document them in the charting note.
-
Now select Orders from the right side of the EMR Charting Workspace
-
The Wizard order displays listing the instructions for multiple topics to be printed
-
Select Exit Care Patient Education Leaflets
-
Exit Care opens locate the appropriate topic ( Explained below)
-
Print the topic to give to the patient
-
Return to the Orders from this Visit for (Patient Name)
-
Select Edit from the bottom of the window
-
The Instructions for (Patient Name) window opens
-
Change Order Status to Completed from the dropdown (The Status Date will default to the current date)
-
Select Save
Selecting Documents
There are several methods for locating the documents you want in Exitcare:
-
Alphabetically: The master list of documents is alphabetical and includes a search function. By default, it searches for document titles that begin with the text entered. A click of a radio button will change it to searching for documents with the entered text anywhere in the title. Another choice allows you to locate every document that has the entered text anywhere inside the document. Be wary of this-it takes a long time to search that many documents.
-
By category: Exitcare comes with a number of predefined categories, and you can create additional ones of your own. You determine the documents in each category, and a document is not restricted to a single category. Since the category lists are much shorter, it is much easier to find what you are after. Here is a tip: start the name of your categories with "aa". This will put them at the top of the list.
-
By diagnosis: When you click the Exitcare button in the application, the software passes some information about the visit to Exitcare for inclusion in the printed document. If any ICD-9 or ICD-10 codes have been entered on the visit, it also sends those. When Exitcare receives one or more ICD-9 or ICD-10 codes, it displays a separate list (on a different tab than the alphabetical search) that shows documents related to each diagnosis. This is probably the fastest method for making your selections.
Using Exitcare
From Orders from this Visit (Patient Name) window select Orders on the Enter Visit window.
OR
From the EMR Charting Workspace on the right side of the window select Orders.
-
Select Exit Care Patient Education Leaflets
If you have not used Exit Care today, there will be a brief pause while it loads into memory. The main Exit Care window will display the patient and provider information copied from the visit.
Only one user at a time can have a particular charting note open. Since the provider is often completing charting notes at the same time that the patient is discharged, this task is best performed from the Enter Visit window to avoid conflict.
-
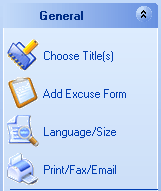
At the top of the Exitcare menu bar on the left, click Choose Titles.
-
Locate a document:
-
Alphabetically
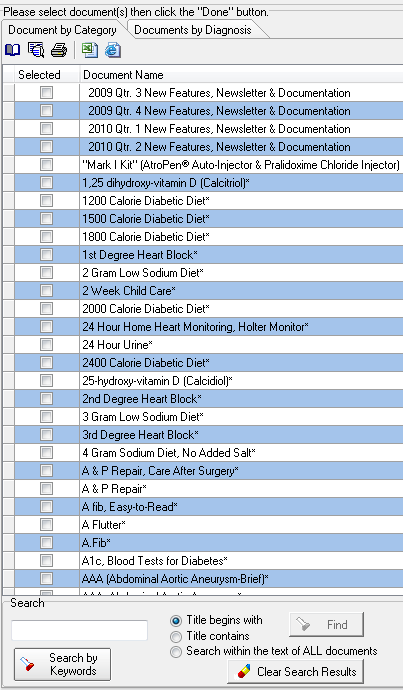
On the DOCUMENT NAMES tab displayed, search for and select the first document to print:
-
Use the scroll bar on the right to move through the file.
-
Type a key word in the Search box in the lower left. As you type Exit Care will move you to the first document which matches your entry so far. The match can be based on the keyword matching the beginning of the title, being contained anywhere in the title, or being contained inside the document. The time required for searching the contents of the documents can be considerable, so don't use that when you are in a hurry!
-
-
By Category
-
Click a Category in the menu bar on the far left of the window to limit the list to just documents in that category.
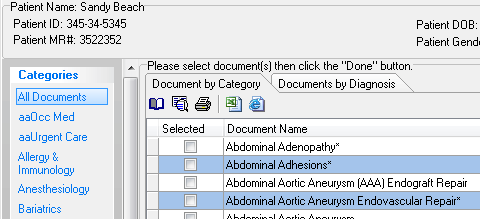
Categories are listed alphabetically. On this sample screen the Injury Care and Occ Med categories were added by the user. They were entered with "aa" at the beginning of the name to force them to the top of the alphabetical list, making them easier for users to find quickly. The other categories seen come with the system. Unwanted categories can be removed from the list by making them inactive. See the Exit Care help system to learn more.
-
-
By Diagnosis
-
If diagnostic codes have been passed to Exitcare from the application, the DOCUMENTS BY DIAGNOSIS tab seen below will be displayed with a line for each ICD-9 or ICD-10 code.
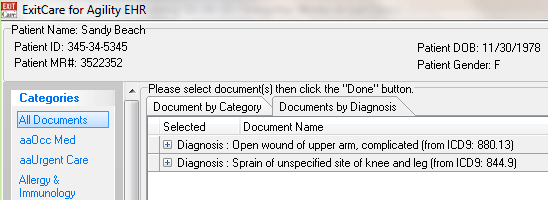
Click the "+" to show the documents for that diagnosis:

-
-
-
Select a document by checking the box beside it.
-
You can preview a document by highlighting it and clicking the Preview Highlighted Item button.
-
-
Repeat steps 3 and 4 to select other documents if you wish.
-
Select Done to return to the main window.
-
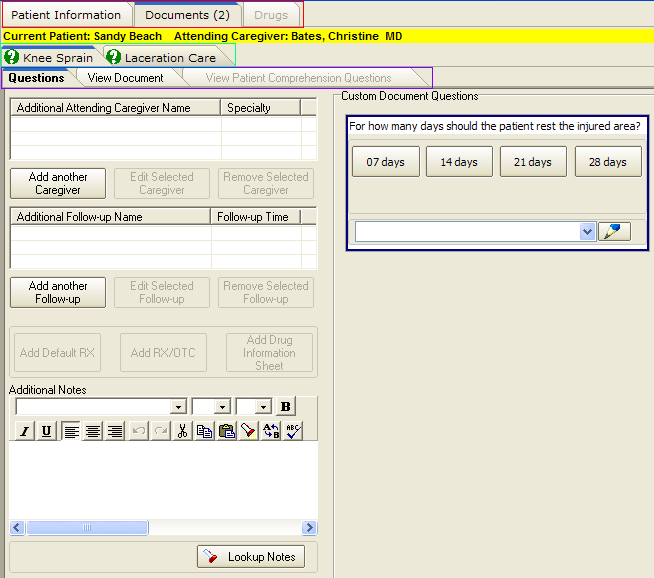
This window can be difficult to read because it is controlled by three levels of tabs at the top.
-
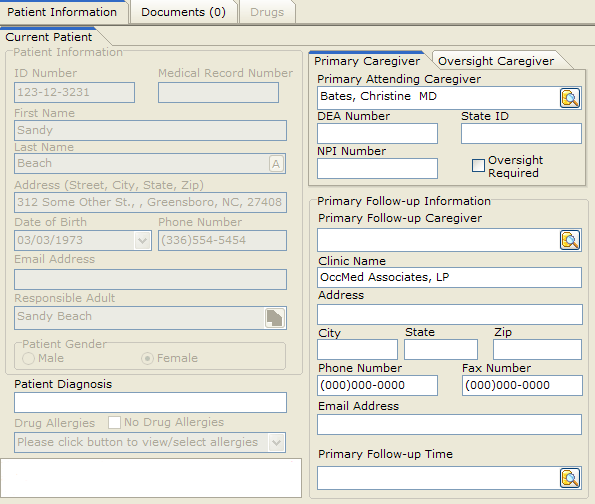
The top three tabs, outlined in red in this screen shot, are PATIENT INFORMATION (the first screen in Exitcare, shown in step 1), DOCUMENTS which is currently selected in the screen shot, and DRUGS which is disabled and will never be used. A yellow bar beneath this row of tabs shows the patient and provider names.
-
The second level of tabs, outlined in green, has a tab (with a green question mark) for each document selected, in this case, "Knee Sprain" and "Laceration Repair". If more documents had been selected, there would be more tabs on this row.
-
The third level of tabs, outlined in blue, are QUESTIONS, VIEW DOCUMENT, and VIEW PATIENT COMPREHENSIVE QUESTIONS (which is disabled). These apply to the document currently selected in the second level, in this case, Knee Sprain.
-
-
The document screen provides an opportunity to enter information to be included when the document prints.
-
On the right there can be questions. The answers to these questions will be inserted at predefined locations in the document. The one question on the Knee Sprain document in the screen shot allows you to indicate how long the patient should rest the injured area. These questions vary by document.
-
It is not likely that you will be entering an Additional Attending Caregiver Name or Additional Follow-up Name.
-
Below those two panes is a place where Additional Notes can be typed in. These, if entered, will be printed at the end of the document.
-
-
After making entries for the first document, the tab for the next document can be selected, where information can be entered specific to that document.
-
Selecting the VIEW DOCUMENT tab is not necessary, but it shows you the final product.
-
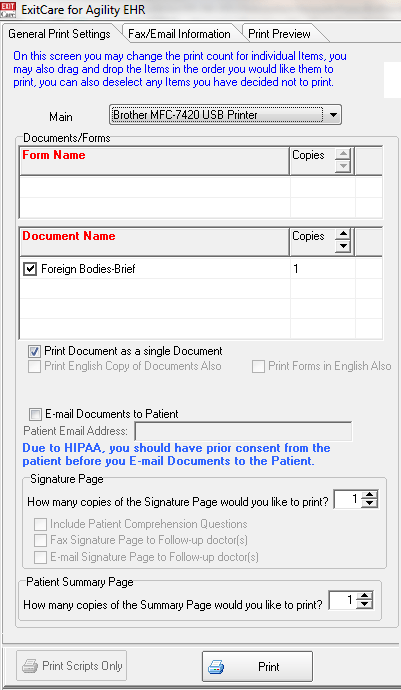
All selected documents will be printed in a batch. When ready, click Print/Fax/Email on the Exit Care menu bar on the left to display General Printing Options].
-
Several additional options are offered on this window. Typically, you will just click the Print button at the bottom of the screen to send the document to the printer.
-
When finished, do not close Exit Care. Instead, use the Windows Task Bar to return to the application, and leave Exitcare running. This will speed up your next access of Exit Care by eliminating the time required to load it into memory.
Exit Care has other features for managing documents such as the ability to create and edit documents, and create and populate categories. See the Exit Care help system for assistance.
Periodically Exit Care makes updates to its library of documents. To search for updates, Exit Care must be run as a stand alone application, not called from the application. When this is done there is an option on the menu bar on the left called Admin Login. Select that and enter the password 'exitcare'. Select Help/Options on the menu bar, then Check for Updates.
The program will search for updates and display them. Be careful before you tell it to proceed! In our experience these can be massive files which take hours to down load, something best done after hours. Some clients have had difficulty with the update routine as a result of firewall restrictions. If this occurs contact Net Health technical support to make arrangement to receive the updates by an alternate route.