How to Set Up Provider Charting Wizards
If you haven't already done so, please read Net Health Employee Health and Occupational Medicine Provider Charting Overview and Using Provider Charting Templates before proceeding. For a list of terms specific to tProvider Charting, see the EMR Glossary.
Summary
Wizards are the workhorse of the Net Health Employee Health and Occupational Medicine Charting Notes data capture system. A Wizard generates text for the charting note by collecting specific pieces of information from the user and combining it with pre-set text. The flexible design of Wizards gives every clinic the ability to create Wizards that generate the text it wants.
Certain aspects of data collection are typically common to several or even all types of visits. For instance, the questions asked about a patient's family history are probably the same for Workers Comp and Private Practice visits, regardless of the location of the injury. A clinic might have 6 or more Templates to cover all of these types of visits. It would be nice if the same setup did not have to be repeated on each and every one, and it doesn't! The process can be streamlined by creating Wizards to capture the needed information, then using those same Wizards on all relevant templates. In addition to reducing the setup time, this approach has two other advantages. First, the use of Wizards in this manner assures a greater degree of consistency across types of visits. Second, if a standard practice changes, updating the relevant Wizard updates all templates using that Wizard.
Each Charting Wizard automates the entry of information for a single Charting Template Element"Template Element" refers to one aspect of the visit, such as social history or knee exam, or diagnostic test. Functionally in Net Health Employee Health and Occupational Medicine, a Template Element refers to a single button on a tab in the Charting Workspace. For example, there is a Social History button on the PMH tab, and a Wizard created for that element is available only when charting that aspect of the visit. Likewise for the Knee button on the EXAM tab, and so on. (explained in more detail below.) Multiple Wizards can be associated with a single Template Element. This topic discusses creating Wizards. The topic Setup Charting Templates discusses associating a Wizard with a specific template.
Evaluation and Management Calculations
One of the valuable features of the Net Health Employee Health and Occupational Medicine Charting Template system is the ability to help you determine the level of the visit documentation entered and required for E/M coding. Evaluation is performed in accordance with AMA and CMS guidelines for reimbursement of evaluation and management functions. The accuracy of this coding isabsolutely dependenton the setup of Net Health Employee Health and Occupational Medicine Templates and Wizards. For coding to work, Wizards for certain Template Elements require when set up the entry of information used in the calculations, such as Medical Decision Making Risk Level and Number of Data Sources. These evaluation points are entered on Wizards so that Net Health Employee Health and Occupational Medicine can do the required calculations based on your entries on the charting note. Be sure to read the topic on E/M Calculations before you begin setting up Wizards.
|
|
If you are new to Net Health Employee Health and Occupational Medicine and are setting up Wizards for the first time, you MUST review the E/M setup information in Wizards. While the Wizards that came with your system have information entered, we at Net Health are NOT coding experts. Even if we were, interpretations of regulations vary by state and enterprise and there is no guarantee that even an expert from another locale could perfectly create Wizards for your billing environment. We cannot give any assurance that the setup in our "seed" tables meets your individual requirements. Review every Wizard you plan to use to make sure that the E/M information in it accurately reflects the aspect of the visit which that Wizard documents. |

Wizard Categories
There are four categories of Wizards:
-
Standard Multi-Step:The Multi-Step Wizard is the most powerful Wizard in Net Health Employee Health and Occupational Medicine. The information gathered and the text produced is completely controlled by your setup. It can be very simple, with only 1-2 questions, or very complicated, collecting a large number of items of information.
-
Standard Text: This very simple Wizard does one thing only: insert a segment of pre-defined text into the chart note. When selected on a visit, it inserts the text with no additional input from the user. Standard Text Wizards can be entered for any Template Element.
-
Free-Form Entry: The Free-Form Entry Wizard also does just one thing: it allows the user to type free form text to be inserted into the chart note. Free-Form Entry Wizards can be entered for any Template Element.

-
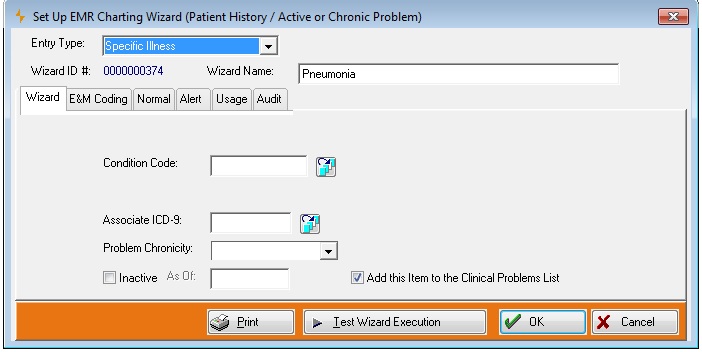
Specialty: Specialty Wizards exist for a number of very specific purposes, among them, entering current medications and ordering new meds, adding diagnostic codes, capturing surgical history, documenting alcohol use, and others, and are pre-defined within the Net Health Employee Health and Occupational Medicine program for those purposes. Some allow a degree of modification by users, but not a great deal. The [Specific Illness] Wizard is a good example. In setup, the name of the illness is entered, and optionally, and ICD-9 code. The information collected is 'hard wired' into the design of the Wizard and cannot be changed.
The Wizard types are discussed in detail below.
Standard Multi-Step Wizards
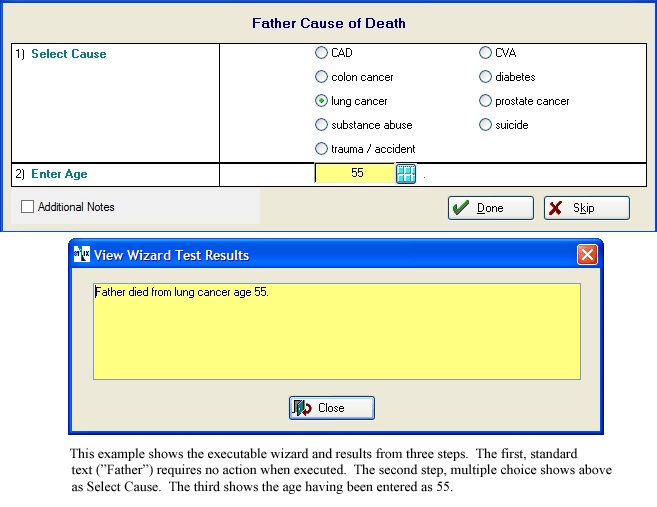
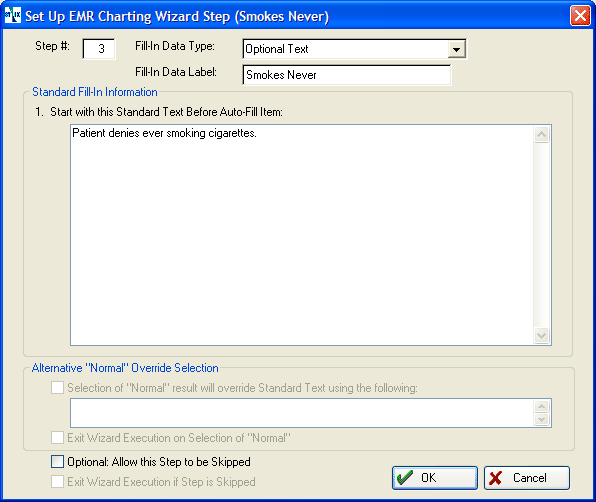
A Standard Multi-Step Wizard can contain any number of steps, and each step can be any of a large number of types. The types of steps are designed to provide great flexibility in the types of information you collect, and the text that gets generated for the chart note. The most basic type of step is Standard Text. When the provider invokes a Wizard with that step, it simply copies the indicated text into the charting note. There is no decision to make. An example of a Standard Text step might be one that copies "Patient denies ever smoking cigarettes." into the charting note.
Each of the other step types collects a specific kind of information, such as a date or a number, and combine it with standard text. For instance, you might have a date type step with the standard text of "Patient Age:". When that wizard is executed, it will prompt the user to enter the age, say, 45. Then it will insert the text "Patient Age: 45." into the charting note.
Some step types are more complicated, such as making a multiple choice selection or selecting multiple items from a pick list. A Visit Diagnosis step only appears when the Wizard is executed on a visit if the visit has multiple diagnoses. Then, it allows the provider to select the diagnosis with which the current order is associated. For example, if the patient had a knee sprain and a laceration, if an antibiotic were ordered, it would be related to the laceration.
Each Wizard is associated with a specific Template Element, such as Family History, Problem Assessment, or Procedures. Some of these elements allow you to indicate certain actions to take automatically when the Wizard is executed. For instance, a Procedures Wizard can automatically add a medical activity for billing to the visit. A Problem Assessment Wizard can automatically add an ICD-9 code to the visit.
|
|
While there is no practical limit on the number of steps on a multi-step Wizard, there are limits on how much can be displayed on the screen at one time. The maximum number of steps that can be displayed is 15. However, if some individual steps take a large amount of space then the number that can be displayed will be lower. Wizards do not have the ability to display successive pages. If they are two long to fit on a single page, then each step will be displayed individually.
|
Specialty Wizards
Unlike Standard Multi-Step Wizards, Specialty Wizards are designed to collect a specific type of information. For instance, an Allergy Wizard allows entry of information about the onset of the allergy and the possible reactions the patient might suffer. An Assessment Wizard presents a list of diagnostic codes. A Medication Wizard collects information about strength of the dose and the frequency taken.
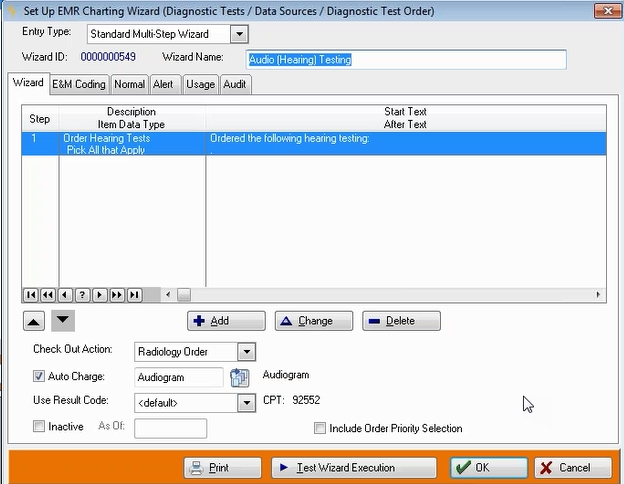
Auto-Charge
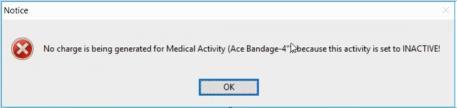
To save you time on the visit, certain wizards can be set to automatically add a medical activity/charge to the visit when the wizard is executed using the Auto-Charge feature. This includes Wizards run from Template Elements on the RESULTS, PROCEDURES, ORDERS, and INSTRUCTIONS tabs. Effective use of this Auto-Charge feature can add a high level of efficiency to your procedures by greatly reducing the need to manually enter charges. Where this is allowed, there will be a check box when setting up the wizard labeled Auto-Charge. When checked, a medical activity code can be selected to add to the visit. (Note: Auto-Charge refers to the process of adding a medical activity to a visit. It might or might not actually include a billing charge. Therefore, this process is just as important in Employee Health as it is in Occ Med.)
The charge can be added at the level of the Wizard or one of two types of Wizard Step: Multiple Choice-Pick One lists and Pick All That Apply lists. You could, for instance, have a wizard for ordering x-rays which includes a Multiple Choice-Pick One list which contains a list of x-rays. An auto-charge can be entered for each item on the list. It is even possible to drop two charges from a single wizard by having one come from the Wizard and the second from a list. For instance, a laceration repair Wizard might drop a charge from a list based on laceration length while also adding a suture kit charge from the wizard, regardless of laceration length.
When a wizard is printed from wizard setup, it includes auto-charges. This can make it easier to review your current setup when considering changes in how activities are added to the visit.
On Medications Orders Wizards when the Dispensed By field is set to Dispense In-House or Provider Administered, you can have the medication billed to the patient directly instead of the insurance carrier. When Auto-Charge is selected, a check box labeled Charge Patient Directly is enabled for that purpose.
|
|
It might be that when you first begin using Net Health Employee Health and Occupational Medicine Charting, you do not use auto-charge, but that later, you want to start using it. This can be difficult for the simple reason that it is unlikely you can enter all the auto-charges in a single sitting. That means you might have some wizards that are dropping charges on the visit, and others that are not for the period of time it takes to get all of them set up. To eliminate this problem, the AUTOMATION tab of EMR Parameters includes a checkbox labeled Disable Pending Setup. If checked, you will be able to add auto-charges to Wizards without them being implemented as the wizards are used. Once you have set up all the auto-charges, uncheck this box to begin dropping the charges on visits. |
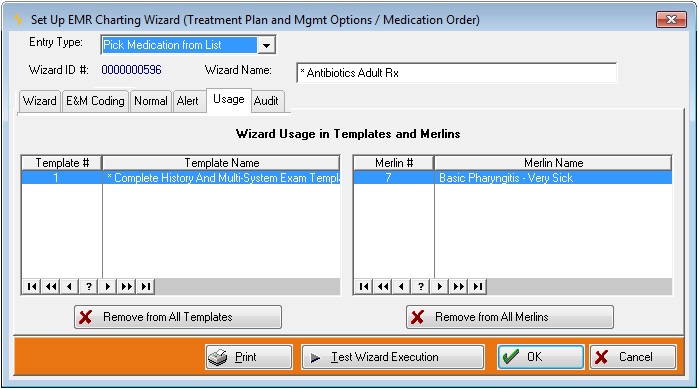
Usage
It can be useful to know all the templates and Rapid Charts which use a particular wizard. In fact, if you want to delete a wizard it is vital since deleting is not possible when the wizard is referenced from a template. The USAGE tab on the [Set Up EMR Charting Wizard] window gives you that information.
Rapid Charts
Rapid Charts allow further automation by running a predefined set of wizards as a single process. See Using Charting Rapid Charts and How to Set UP Charting Rapid Charts to learn more.
Wizard Setup
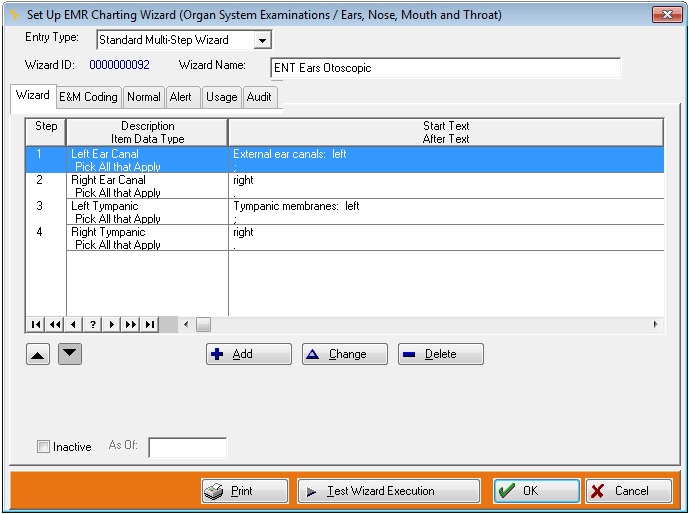
Each wizard is associated with a single Charting Template Element. Therefore, the [Set Up EMR Charting Wizards] window where you locate a Wizard to work with is organized by element. There are four tabs. Three contain elements which go into the sections of a SOAP note, and the fourth is for Workers' Comp work status. Some of the tabs have sub-tabs. In the screen shot below, the EXAMINATION AND RESULTS (Objective) tab is displayed. It contains three sub-tabs: Organ Systems, Musculoskeletal Body Areas, and Test Results.
In the Wizard setup for ROS and Exam sets, Wizards that contain multiple systems need redefined so that the EM coding and element counts are correct. If a Wizard contains multiple systems, it will need separated into individual Wizards, each containing a single system.
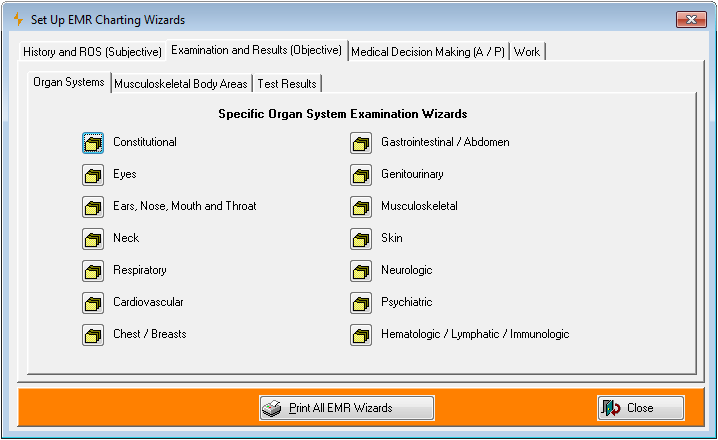
Each tab or sub-tab has one or more Template Elements. ORGAN SYSTEMS above has 14. There are several more layers below the level of Template Element. We will look at each layer in detail, but first, here is the hierarchy:

This example...
-
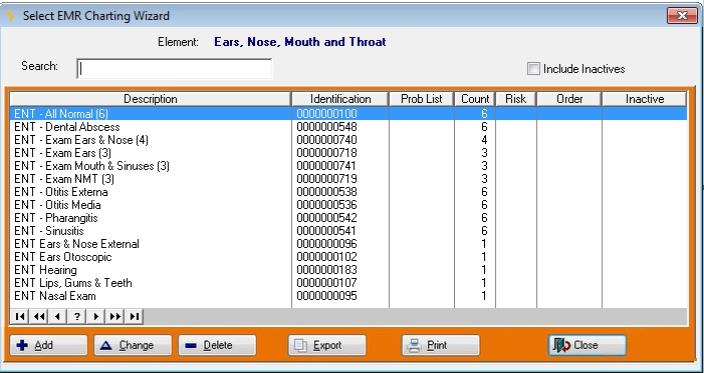
Started on the [Set Up EMR Charting Wizards] window, clicking the Ears, Nose, Mouth, and Throat element to get the [Select EMR Charting Wizard] window which lists all the Wizards associated with this element;
-
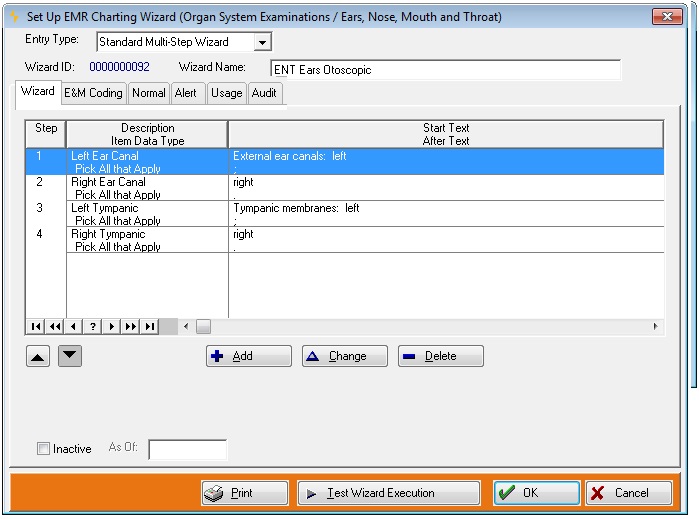
Selected the third Wizard on the list (you can't see it fully above, but it is highlighted), ENT Ears Otoscopic to get the [Setup EMR Charting Wizard] window. This example is a Standard Multi-Step Wizard, so this window can have any number of Wizard Steps on it. As you can see in the Step column above, this one has 4 steps.

This example shows a multi-step Wizard. Each Specialty Wizard has its own unique setup display. They are discussed below in the Specialty Wizards section.
-
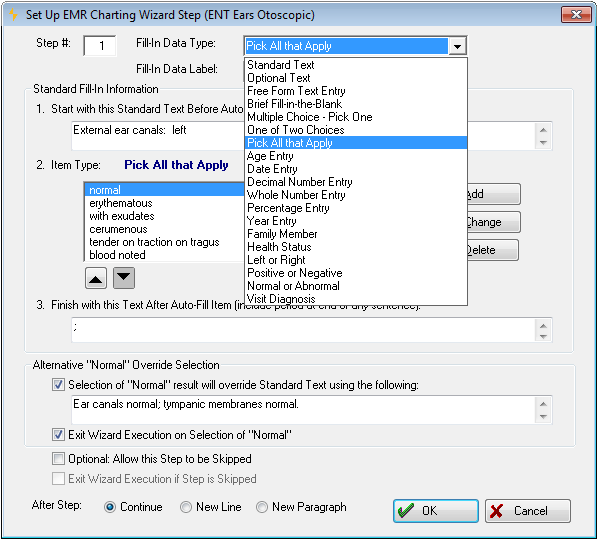
Clicked the first step to display the [Set Up EMR Charting Wizard Step (ENT Ears Otoscopic)] window.
-
One of the most important aspects of setting up a Wizard Step is selecting the Fill-In Date Type from a drop down list, part of which you can see above. There is a large number of these types, and each alters this window to let you define information for the indicated type. The Fill-In Data Type for this particular step is Pick All that Apply. This type allows you to define a list of items, and the user can select as many as are appropriate. You can see the top of the pick list above under the label Pick All that Apply.
-
Not shown above is the [Set Up Wizard Choice window] that lets you create the items for the pick list.
Head spinning? It will make much more sense after we have looked at each component in detail, although it might take you a while to get familiar with all the screens. What you should be clear about at this point is:
-
Charting Wizards can collect a tremendous amount of information in a very efficient manner.
-
You have incredible power to customize each template to collect exactly what you need to know for that type of complaint.
-
Defining a wizard and using one are both very orderly processes. The good news is that of the three things that you need to do with Wizards, define them, explain them, and use them, using them is far and away the easiest!
STAT Priority Quick Selection
For Lab and Radiology order wizards, users may turn a parameter on to allow the provider to quickly set the order priority to STAT or high priority. If the Wizard requires any responses, the user will have a selection to enter the lab / radiology priority. If the wizard does not require any responses and the provider can specify the priority, check the Include Order Priority checkbox at the bottom of the Set UP EMR Charting Wizard window.
Once either a Radiology or a Lab order (which has a checkout option action either "Radiology Order" or "Lab Order") is selected, the provider will be presented with:
- A dialog window containing a STAT checkbox if the "Include Order Priority Selection" checkbox is selected within the Wizard setup or;
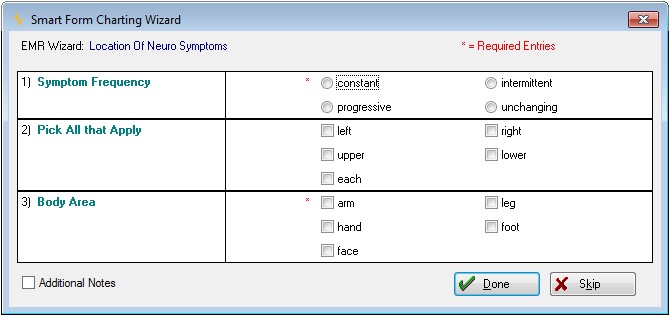
- A checkbox within the Smart Form Charting Wizard window (for multi-test panels).
Selecting the STAT checkbox will create the order as high priority.
NOTE: Users should NEVER check the "Include Order Priority Selection" for a lab / radiology order multi-step wizard.
How We Proceed From Here
There are a number of types of Wizards. For multi-step wizards, there are a number of different types of steps. There are also a number of options within Wizards which have not been discussed yet, and furthermore, they vary among Wizard types and Template Elements. It is a lot to explain in an orderly way.
Here is how we will proceed:
-
The process of locating a Wizard to work with, and the initial steps for creating a new one are common to all Wizards. The first section below discusses that, without going into any details about the specific details of Wizards.
-
The next brief section discusses Standard Text and Free-Text Entry Wizards.
-
The following section specifically discusses the more involved process of creating steps on a multi-step Wizard.
-
After that will be a section with the details of the different types of Wizard steps available when you create a multi-step Wizard.
-
Finally, there will be links to separate topics which discuss the details of the various specialty Wizards.
Add or Modify a Wizard- Common Steps
The initial steps to add or modify a Wizard are common to all types of Wizards. This section covers them:
-
On the Home Nav Bar, click Setup/Admin.
-
Click EMR Setup.
-
Click EMR Charting Wizards to display the [Set Up EMR Charting Wizards] window, shown above.
-
Search the tabs and sub-tabs to locate the Template Element you want, and click the
 button beside it to display the [Select EMR Charting Wizard] window.
-
To create a new wizard, click Add, or, to modify an existing wizard locate it, then click Change. Either action will display the [Set Up EMR Charting Wizard] window.
-
If you are creating a new Wizard which is very similar to an existing Wizard, the existing Wizard can be copied for a starting point:
-
Click Copy another Wizard to display the [Select EMR Wizard to Copy] window. This has a list of all Wizards associated with this Template Element.
-
Search for and select the Wizard to copy. (Note: For Exam Wizards only, check Include all in Class to copy wizards from other body parts. That is, if you created a wizard for knees, and wanted to use that as a starting point for a shoulder wizard, checking this box enables that.)
-
On the [Copy EMR Wizard] window, click OK to proceed or Cancel to abandon.
-
If you clicked OK, a progress dialog will show the copying progress.
-
On the [Copy Complete] window, click OK.
It is possible to copy more than one Wizard into the new Wizard. For instance, there might be a number of individual test Wizards for Knee Exams. If you want to combine several of them into a single consolidate Wizard, you could use the copy function pull in each of the separate test Wizards that you want to include.
-
-
Click the drop-down arrow beside Entry Type and select the type of Wizard you want. The options available will depend on the template element you are working with. For instance, if working on the PMH tab with Allergy Wizards, there will be choices for "Food or Substance" and "Other Non-Med Allergy" which you will not see anywhere else. There will be an Entry Type for "Specific Medication" for both the PMH tab Current Medications and the ORDERS tab Medications.
-
Enter or confirm the Wizard Name.
-
If this is a...
-
Multi-step Wizard, follow the process in the section below, Entering Mult-Step Wizard Steps, to define the steps.
-
Specialty Wizard, see the Specialty Wizards section below for links to Specialty Wizard topics.
-
-
For both types of wizard, continue on the [Set Up EMR Charting Wizard] window enter additional options as needed. The options available will vary, depending on the type of wizard and the template element it is associated with.
-
Enter E&M Coding information
There might be additional options on the [Set Up EMR Charting Wizard] window that pertain to the calculations for the Evaluation and Management level of the visit. Read E/M Calculations to learn more. In some cases the information is entered on the on the WIZARD tab. Others have an additional E&M CODING.
-
If present, click the E&M CODING tab.
-
Enter the required information. This will vary, depending on Template Element the Wizard is associated with. For instance, Bullet Points get entered for Exam Wizards while Medical Decision Making Risk Level is entered for Procedure Wizards.
-
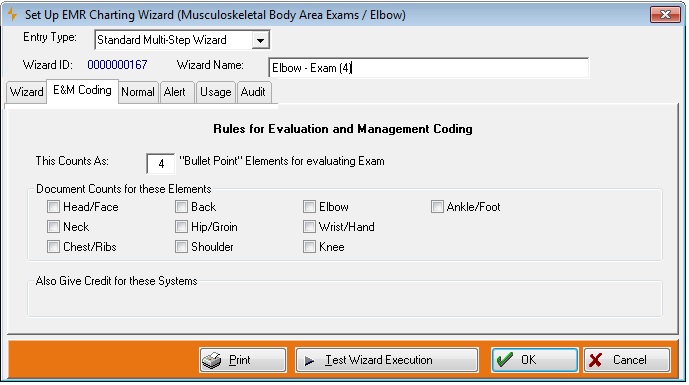
In certain EMR charting situations, providers and clinicians need to document items or findings that overlap multiple categories or elements. For example, part of a note might encompass two organ systems in the Review of Systems, or an interim history note might cover multiple elements in the History of Present Illness area. By default, a Wizard's coding values only apply to an individual element or category. Wizards for four tabs, HPI, PMH, ROS, and EXAM offer the ability to set up Wizards that overlap multiple elements, and thus allow Net Health Employee Health and Occupational Medicine to count all of those elements at the time of charting. Thus, for example, a single wizard in the HPI area can now be allowed to give E&M credit for location, duration, timing, severity and quality, all at the same time, if appropriate. This is most useful in the history areas (HPI, PMH and ROS). It can also enhance the utility of Rapid Charts.
To have this Wizard apply to multiple elements, check the appropriate boxes in the Document Counts for These Elements area at the bottom of the E&M CODING tab when it is available.
-
-
Normal tab
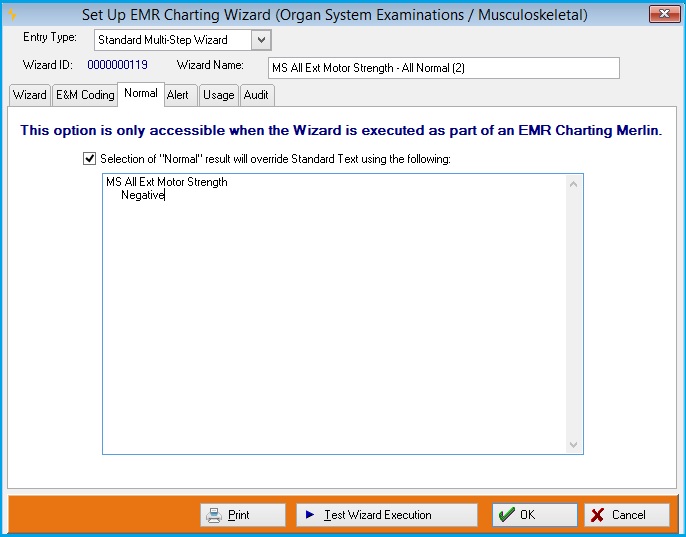
The Normal tab allows users to create their own appropriate text to display in the Charting note. This option is only available when this Wizard is executed as part of an EMR Charting Rapid Chart. Checking the box will cause the custom text, keyed in below, to override the Standard Text when then "Normal" button on the Rapid Chart execution window is selected.
-
Check Out Action
Orders, Procedures, and Instructions Template Elements allow you to select a Check Out Action. To do so, click the drop-down arrow beside that field and make your selection. A check out action will create an Order Record which instructs someone, most often the discharge nurse, to take a specific action. Orders which can be worked with from the visit record or from Orders Management. The choices for Check-Out Action will vary, depending on the particular element. As an example, you could have a Wizard automatically create an In-House Procedure order when an x-ray is ordered. Once that is created, the x-ray technician could see the details of the order and the front desk could confirm that the x-ray has been performed before discharging the patient.
-
Add to Problems List
This option is associated with Wizards run from the PMH tab, as well as medication orders. Check Add this Item to the Clinical Problems List if you want that option checked by default when the Wizard executes. On the visit, there will always be a checkbox to add the item to the problems list which can be checked or unchecked as circumstances dictate. This only controls the default setting.
-
Enter an Auto-Charge
Wizards for Results, Procedures, and Orders Templates Elements allow you to include a medical activity/charge to be automatically added to the visit when the Wizard is executed. For Multiple Choice-Pick One, and Pick All That Apply steps, a charge can be entered which is only added to the visit when that step is selected. Effective use of this Auto-Charge feature can add a high level of efficiency to your procedures by greatly reducing the need to manually enter charges. Where this is allowed, there will be a checkbox and a field for selecting the medical activity. To add a charge to the wizard:
-
Check the box beside Auto-Charge.

-
Click the table icon
 to the right of the field beside Auto-Charge to display the [Select Medical Activity] window.
 -
Search for and select the medical activity to be billed when this Wizard executes.
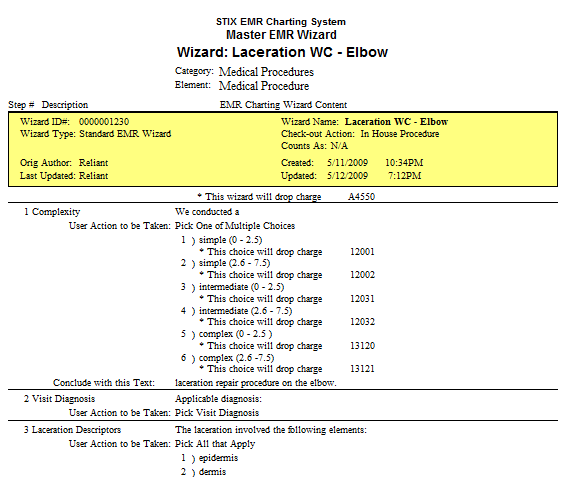
All auto-charges on a wizard can be seen by printing it.
-
-
Add ICD-9 Code
Wizards for certain Template Elements allow you to include an ICD-9 code to be automatically added to the visit when the Wizard is executed. For Multiple Choice-Pick One, and Pick All That Apply steps, an ICD-9 can be entered which is only added to the visit when that step is selected. Where this is allowed, there will be a field labeled ICD-9 Code.
-
Click the table icon to the right of the field beside ICD-9 Code to display the [Select ICD-9 Code] window.
-
Search for and select the ICD-9 Code to add to the visit when this Wizard executes.
-
-
Add to Work Restrictions List
Work Restriction Wizards have a checkbox on the E&M CODING tab labeled Add this Item to the Work Restrictions List. Check the box to do just that. NOTE: This box is NOT checked by default.
-
-
To see how the wizard will appear on a visit, click the Test Wizard Executionat the bottom of the window.
-
Fill in the information requested on the wizard window.
-
Click Done.
-
The text generated based on your entries will be displayed on the [View Wizard Test Results] window.
-
Click Done.
-
-
Optionally, click Print to print out the content of the Wizard Setup. This can be useful if the person doing the setup entry work is not one of the providers. A wizard can be printed and given to the provider who can write in needed changes. The report includes all auto-charges on the wizard. (Tip: Along with printing, click Text Wizard Execution and capture a screen shot of the Wizard as it will look on the visit.)
There are a lot of ways to handle screen shots. Here is an easy one:
-
With the desired window displayed on the screen, and press the print screen button, typically in the upper right of the keyboard, and labeled [Prt Scr]. The actual key or combination of keys can vary. For instance, on many laptops a combination of the "function" key ([Fn]) and [Prt Scr] is used.
-
Open a new document in your word processor.
-
Click the paste icon on the toolbar, or right click, then click Paste on the pop-up menu. The image will appear in the document.
-
Print, and if you wish, save.
One problem with this is that printing the entire computer screen can result in the window of interested being smaller than is easily read. Programs like Paint (which has the advantage of being part of Windows) and Adobe Elements can be used to crop the image. A program that can crop the image can probably print it, also, eliminating the need to paste it into a word processing document.)
-
-
Optionally, click the AUDIT tab and enter the name of the Original Author of the wizard.
-
Click OK when done working with the wizard.
Entering Free-From Entry and Standard Text Wizards
Completing entry for these two categories of Wizards is very simple:
-
Standard Text Wizards: In addition to the common steps above, there is only one thing to do, which is enter the standard text to be inserted when this Wizard is executed. When it is executed, unlike other categories of wizard, no window will appear for the user, because no additional input is needed. It will simply insert the text.
-
Free-Form Entry Wizards: In addition to the common steps above, there is nothing else to do to set up a Free-Form Entry Wizard. When the Wizard is executed on a visit, a free text entry box will be displayed where the provider can type in the needed text.
Entering Multi-Step Wizard Steps
This process applies to Standard Wizards. The specialty wizards which collect information on things like allergies, injuries, medications and events have screens specific to the specialized information they collect. They are each described below in the section on Specialty Wizards.
For multi-step Wizards:
-
Follow the steps above to get to the [Set Up EMR Charting Wizard Step] window.

-
Select the Fill-In Data Type by clicking the drop-down arrow and selecting the type you want from the list. The number of choices on this list will vary, based on the Template Element you are working with.
-
Enter the Fill-In Data Label. This label will prompt the user as to the type of information being entered when the Wizard is executed on a visit.
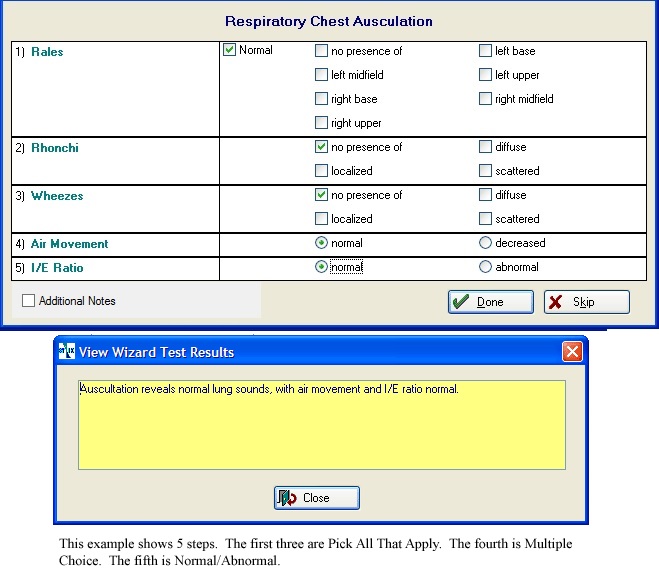
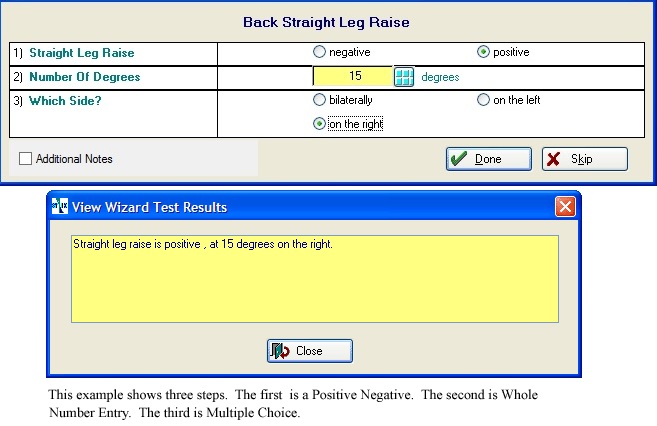
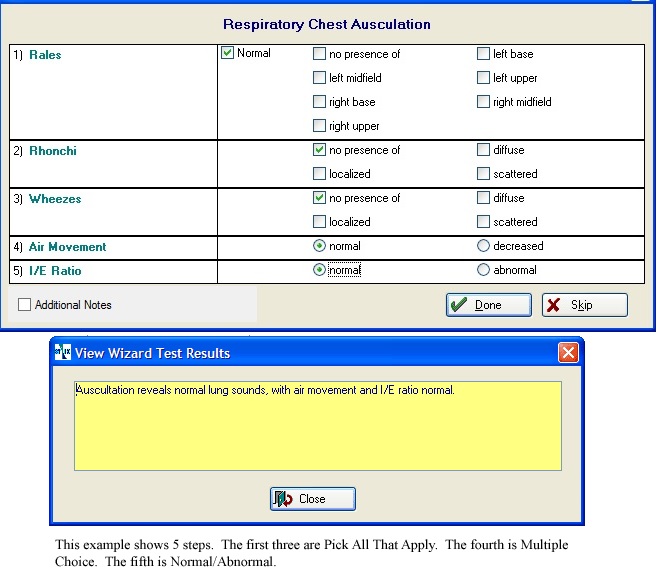
This is how a single multiple choice step looks when the Wizard is executed.
"Patella" is the Fill-In Data Label.

-
Enter the appropriate information under Standard Fill-in Information. The choices displayed in the area will vary depending on the Fill-In Data Type. Each type is discussed in detail in the section below on Standard Wizard Fill-In Data Types. The routine items in this area are:
-
Start With This Standard Text before Auto-fill Item: Most Fill-In Data Types will allow you to optionally enter text to be inserted in the charting note at the beginning of whatever is entered for Standard Fill-in Information. For example, for an Age type, you might enter the text "Age:" in front of the actual numeric age. A space will automatically be inserted between the two.
-
Item Type: This is where you enter specialized setup information specific to the Fill-In Data Type, such as creating the list of choices for a Multiple Choice step. This is not required for all types.
-
Finish with this Text After Auto-Fill Item: Most Fill-In Data Types optionally allow you to enter text to appear after the specialized part of the step. A space will automatically be added between the multiple choice selection and this. You do need to include punctuation at the end of the sentence.
-
-
Several additional options are available for some Fill-In Date Types:
-
-
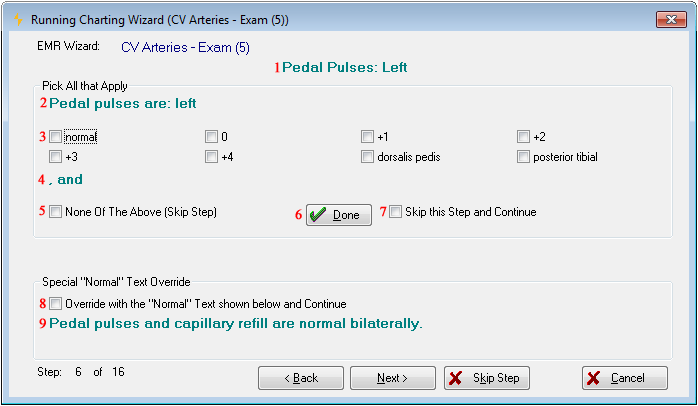
Selection of "Normal" result will override Standard Text: When this box is checked, aNormalcheckboxappears to the left of the entry choices for this step when the Wizard executes. If that box is checked, any selections made to the right will be ignored and instead, Net Health Employee Health and Occupational Medicine will insert the alternative text entered in the text box. Check the box, then enter the text.
Checking Normal here generates this text: "Patella mobile and without tenderness."
-
-
Exit Wizard Execution on Selection of Normal: This is only enabled if you check the box above. When checked, if the user selects "Normal" for this step, the Wizardcanbe exited by clickingDone, and following steps that are normally required will be skipped. (It doesnotautomatically exit the Wizard.)
-
-
Optional: Allow this Step to be Skipped: If checked, then the user will not be required to enter any information for this step. If not checked, the Wizard cannot be exited until the step is entered. When the Wizard is executed, required steps are flagged with a red asterisk.
-
-
Exit Wizard Execution if Step is Skipped: This is only enabled if you are allowing a step to be skipped. When checked, if all required steps before this step have been entered, the user can click Done to exit the Wizard instead of making an entry for this step, and following steps that are normally requiredcanbe skipped. (It doesnotautomatically exit the Wizard.)
-
-
-
Click OK when done.
-
Back on the [Set Up EMR Charting Wizard] window, change the order of a step by highlighting it, then using the
 buttons to move it up or down to its correct location.
 -
To remove a step, highlight it and click Delete. When asked if you really want to delete it, click Yes.
|
|
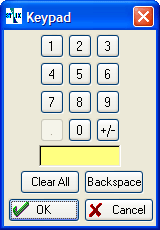
All data types that require entry of numbers or dates will display a keypad icon
|

Multi-Step Wizard Fill-In Data Types
-
Standard Text

To enter a Standard Text step:
-
Click the drop-down arrow beside Fill-In Data Type and select Standard Text.
-
Enter a Fill-In Date Label (required). This label is displayed in the Description column on the [Set Up EMR Charting Wizard] window. If you do NOT enter Standard Fill-In Information, this will be used as the text which this wizard inserts into the charting note.
-
Enter Standard Fill-In Information (optional). If you enter text here, it will be the text the wizard inserts into the charting noteinsteadof the Fill-In Data Label.
-
-
Optimal Text
Optional Text is set up just like Standard Text.
When the wizard is invoked, optional text is displayed like this:

If the user checks Include, the text is inserted.
-
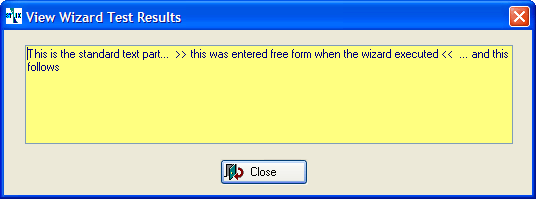
Free Form text Entry
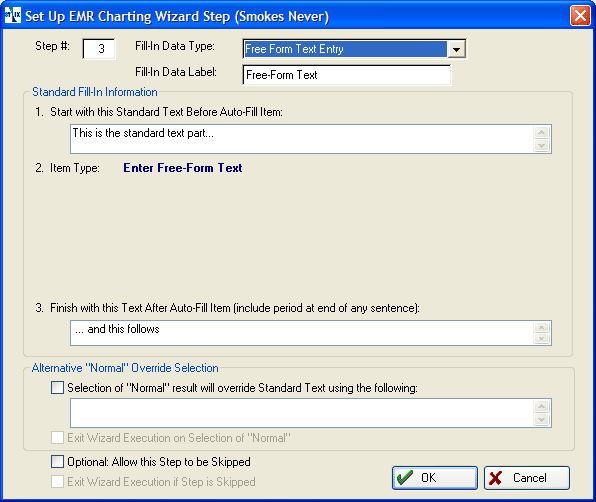
Free form text allows the provider to type in as much text as is needed. As with most types, the wizard can optionally insert standard text in front of the free form text. It can also optionally insert additional text following the free-form text.
Here is the note that would be generated by the setup screen above:
-
Brief Fill-in-the-blank
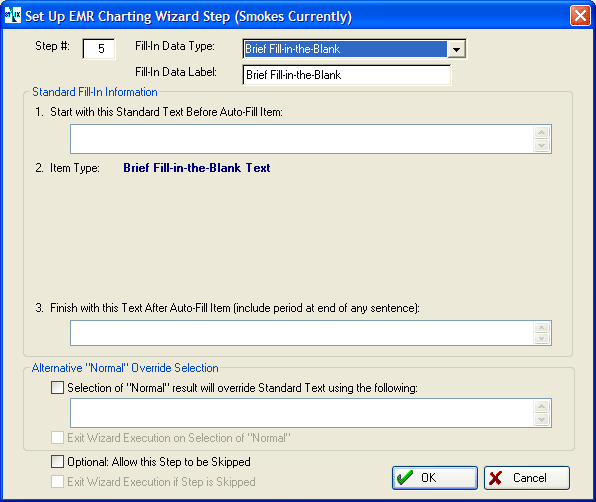
Brief Fill-in-the-Blank text works the same way as Free-Form Text, except that the text which the provider can add is limited to 16 characters. As with most types, the wizard can optionally insert standard text in front of the free form text. It can also optionally insert additional text following the free-form text.
When the wizard executes, a check-box is included called Add Additional Free Text Notes. Checking this allows the provider to enter as much text as needed, just in case the "brief" space turns out to be too short on occasion.
-
Multiple Choice-PickOne

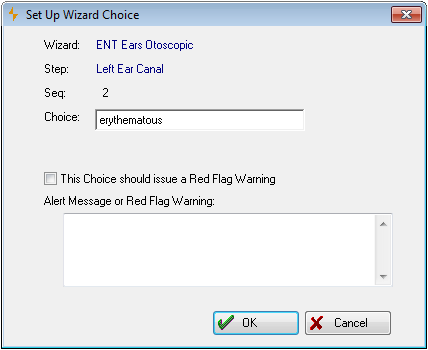
To set up a Multiple Choice-Pick One step you need to create a list of choices:
-
Click AddorChange to display the [Set Up Wizard Choices] window.
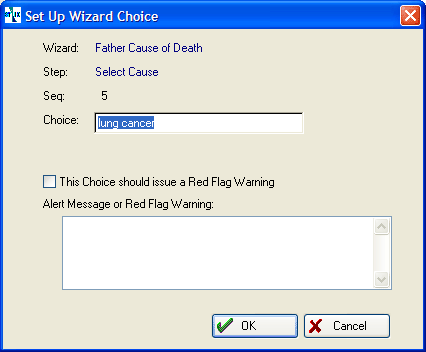
-
Enter the Choice.
-
Optionally, check This Choice should issue a Red Flag Warning. This will result in a message being displayed when the provider makes this choice.
-
Optionally, Wizards for some Template Elements allow you to enter additional items:
-
Assessment Wizards can carry an ICD-9 code which will automatically be added to the visit when the step is selected.
-
Results, Procedures, and Orders Wizards can carry an Auto-Charge medical activity which will be added to the visit.
-
-
If you checked the box in step c., then type in the text below Enter the Alert Message or Red Flag Warning. If the wizard is a history or exam element, the warning will always be informational only. An EMR Parameter on the AUTOMATION tab allows you to specify that for an MDM element, the warning display will offer the provider the option of cancelling the wizard.
-
Click OK.
-
Back on the window above, use the
arrows to arrange the order of the choices. To move a choice, highlight it, then click the appropriate arrow to move it to the desired position. -
Allow User to Directly Enter "Other" Selection has no function at this time, but will be used in the future.
-
-
One of Two Choices
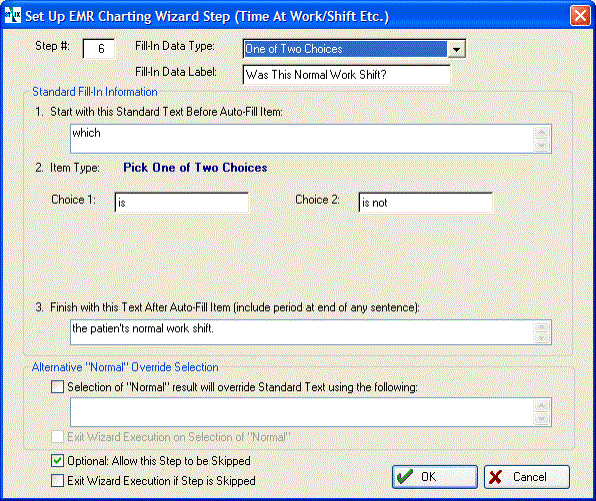
To set up a One of Two Choices step, you simply need to enter the two choices. When the Wizard executes, it looks like a multiple choice step, with just the two steps:

-
Pick All That Apply

To set up a Pick All that Apply step you need to create a list of choices:
-
Click AddorChange to display the [Set Up Wizard Choices] window.
-
Enter the Choice.
-
Optionally, check This Choice should issue a Red Flag Warning. This will result in a message being displayed when the provider makes this choice.
-
Optionally, Wizards for some Template Elements allow you to enter additional items:
-
Assessment Wizards can carry an ICD-9 code which will automatically be added to the visit when the step is selected.
-
Results, Procedures, and Orders Wizards can carry an Auto-Charge medical activity which will be added to the visit.
-
-
If you checked choice above, type in the text below Enter the Alert Message or Red Flag Warning. If the wizard is a history or exam element, the warning will always be informational only. An EMR Parameter on the AUTOMATION tab allows you to specify that for an MDM element, the warning display will offer the provider the option of cancelling the wizard.
-
Optionally, Wizards for some Template Elements allow you to enter additional items:
-
Assessment Wizards can carry an ICD-9 code which will automatically be added to the visit when the step is selected.
-
Results, Procedures, and Orders Wizards can carry an Auto-Charge medical activity which will be added to the visit.
-
-
-
Age Entry
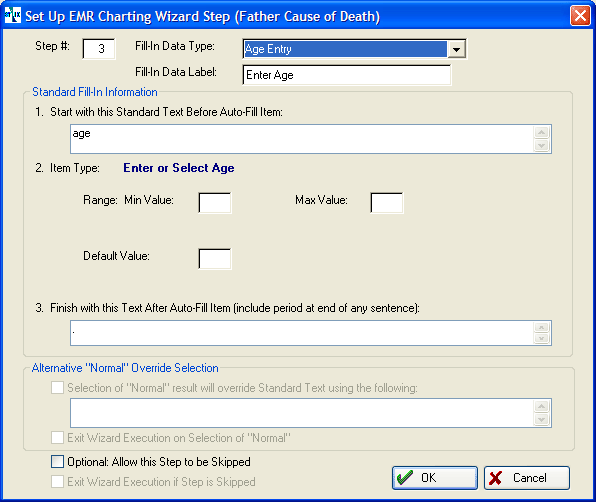
Creating an Age Entry step does not require any work beyond selecting the Fill-In Data Type and Fill-In Data Label. Optionally, you may enter minimum and maximum allowable values, and/or a Default Value.
-
Year Entry
Enter Year work in the same way as Enter Age, except that minimum and maximum values are not accepted.
-
Date Entry
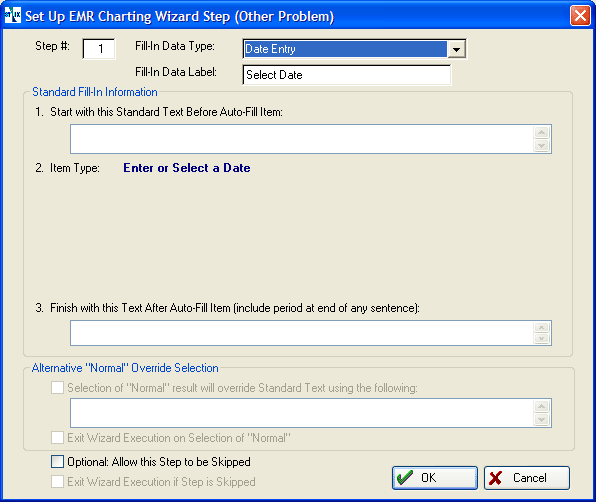
Creating a Date Entry step does not require any work beyond selecting the Fill-In Data Type and Fill-In Data Label.
-
Whole Number Entry
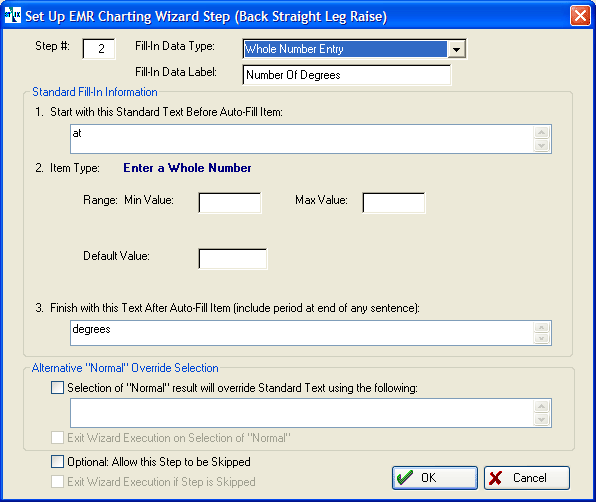
Creating an Whole Number Entry step does not require any work beyond selecting the Fill-In Data Type and Fill-In Data Label. Optionally, you may enter minimum and maximum allowable values, and/or a Default Value.
-
Decimal Number Entry
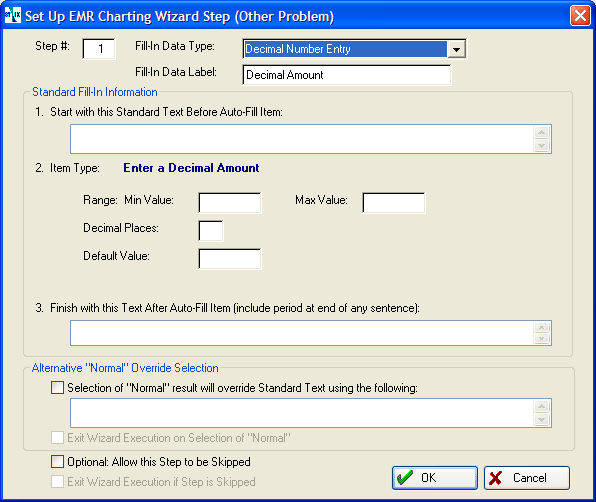
Decimal Number Entry step works the same as Whole Number Entry, with the addition of the ability to indicate the number of decimal places.
-
Percentage Entry
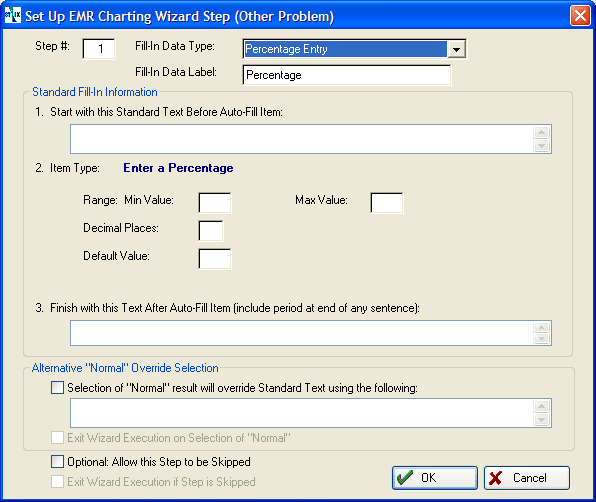
Percentage Entry works just like Decimal Number Entry.
-
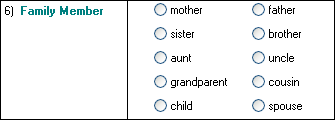
Family Member
Creation of a Family Member step requires no work beyond what is done for standard text. When the Wizard executes, it displays a predefined set of family relationships. This list cannot be changed by the user.
-
Health Status
Creation of a Health Status step requires no work beyond what is done for standard text. When the Wizard executes, it displays a predefined list which cannot be changed by the user.

-
Positive or Negative

-
Left or Right
Left or Right works the same as Positive or Negative.

-
Normal or Abnormal
Normal or Abnormal works the same as Positive or Negative.
-
Visit Diagnosis
This type of step can be used for Wizards associated with orders. If an order is entered on a visit with multiple diagnoses, this step allows the provider to select the diagnosis with which the current order is associated.
Specialty Wizards
The following links are to topics which discuss Specialty Wizards.