Set Up EMR System Parameters
For a list of terms specific to the EMR, see the EMR Glossary.
Summary
EMR Parameters determine how certain functions work in the software. They include a number of settings organized on 7 tabs. These parameters are set when your Net Health Employee Health and Occupational Medicine Provider Charting is originally configured, and are rarely changed thereafter. You should be familiar with them, however, since with time and experience you may want to fine tune your system.
Please note that a number of specialized terms are used in Provider Charting and in this documentation. Some of them, such as "HistoryofPresentIllness"(HPI) are in common use in the medical field. Others, such as "template element" were created to explain the workings of charting templates. To help you get familiar with the terms we have created an EMR Glossary. This glossary will be available as a link, seen above, from help topics discussing the EMR.
To reach the EMR Parameters screen:
-
On the Home Nav Bar click Setup/Admin.
-
Click the EMR Params button.
EMR Parameters Tabs
-
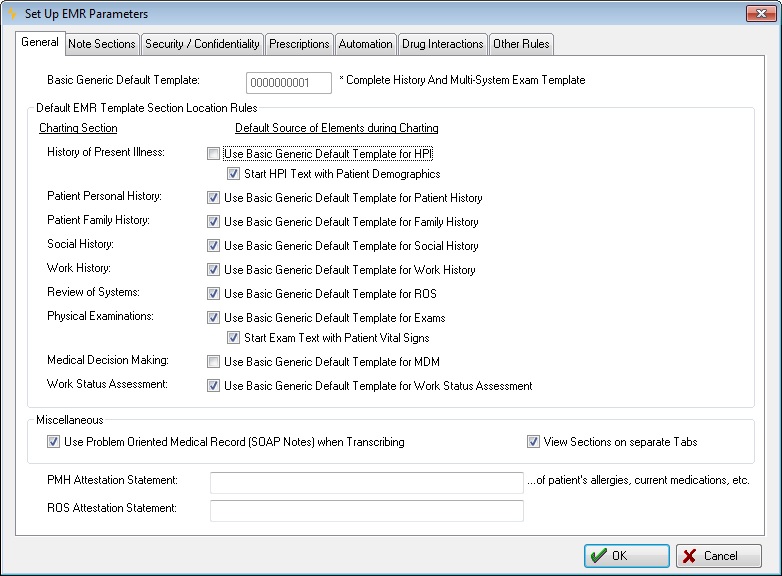
GENERAL tab
Set_Up_EMR_Parameters
-
Basic Generic Default Template: This indicates the template that will define the default options available for all new templates. It was set when your system was installed or upgraded, and cannot be changed. Careful setup of this template can save you a great deal of work later since there are sections of templates which will be the same for may or all types of visits. On each tab of the [Setup EMR Charting Tempate] window which collects charting information, there will be a check box similar to this:

When you check it, the same information collected on this tab of the Basic Generic Default Template will be collected for this template, and no further work is required to set up this tab of the new template. While you can check or uncheck the box for each tab on any template, the settings below determine which boxes are checked by default, that is, which tabs on new templates will be initially set to function exactly as the Basic Generic Default Template functions.
-
Use Basic Generic Default Template for...: Checking each of these 9 boxes will result in the related tab being set to use the Defaul Basic Template by default on all new templates. This can be changed when the Template is setup.
-
Start HPI Text with Patient Demographics: If checked, patient demographic information will be inserted at the beginning of the HPI section on all templates. Nothing else in the section will change. This is a global setting.
-
Start Exam Text with Patient Vital Signs: If checked, vital signs will be inserted at the beginning of the exam text section of the charting note when it is built. They are not seen on the EXAM tab. Nothing else in the section will change. This is a global setting.
-
Use Problem Oriented Medical Record (SOAP Notes) when Transcribing: If checked, the charting note generated by all charting templates will be in SOAP format. If not, it will be as one long charting note. While this is a global setting, it can be overridden for individual Templates in Charting Template setup.
-
View Sections on Different Tabs: This option is only available if you are using the SOAP notes format. If unchecked, the 4 sections of the SOAP note will be displayed on the screen simultaneously, one above the other in scrolling sub-windows. When checked, each SOAP section will be displayed in a different tab. It does not affect printing.
-
PMH Attestation Statement: The content of the PMH attestation messages may be customized and edited by each client.
-
ROS Attestation Statement: The content of the ROS attestation messages may be customized and edited by each client.
-
-
EMR NOTE SECTION tab
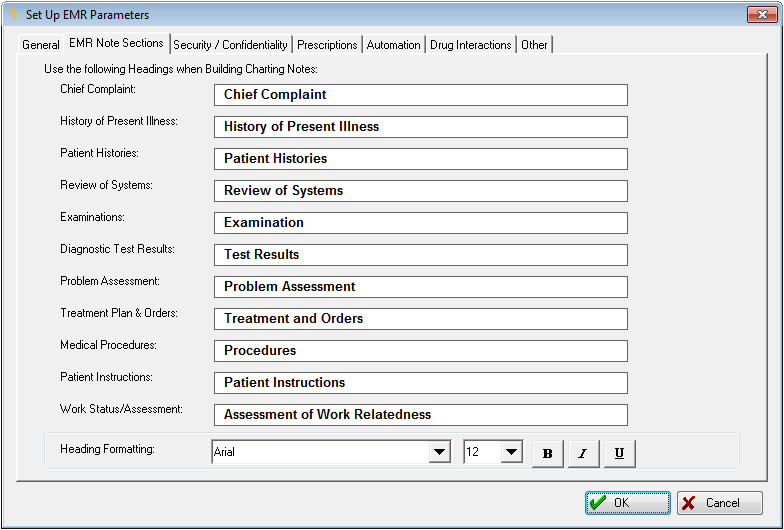
You may change the heading on the sections of the charting noted above.
The Heading Formatting section allows you to specify font, point size and text format for headings. See the topic on Rich Text Formatting to learn more.
-
SECURITY / CONFIDENTIAL tab
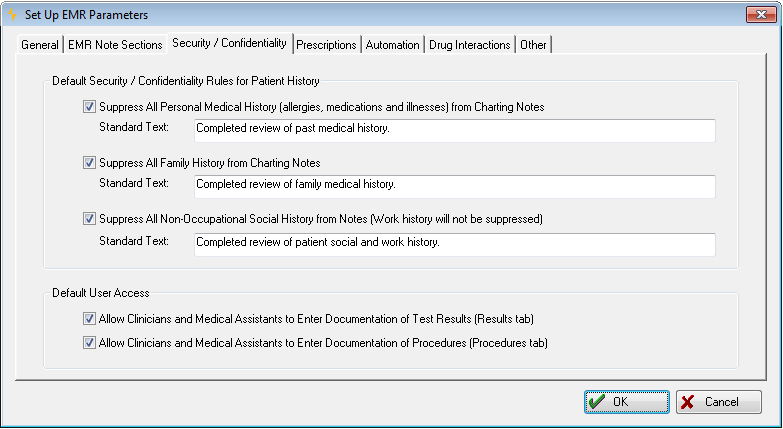
Default Security / Confidentiality Rules for Patient History: Each of these three check boxes, when checked, causes the indicated history to be suppressed when the charting note is generated. Instead, the indicatedStandard Textentered below each check box will be printed making clear that the history was collected. TheSuppress All Personal Past Historycheckbox applies to the allergies, medications, illnesses and surgery and hospitalization section elements. The information collected for suppressed elements does become part of the permanent record and it is included in E/M calculations. This information is typically not included on Workers' Comp charting notes because of privacy concerns. The intent of these controls is to allow you to collect history without violating privacy regulations.
These check boxes can be changed when individual templates are set up. If you do not check one of these boxes here, you still need to enter Standard Text to print if you check the related box on a specific template.

Default User Access: Any clinician user can be granted access to enter patient history HPI, PMH, ROS, and vital signs. You may optionally give clinicians access to enter documentation of test results and/or documentation of procedures.
-
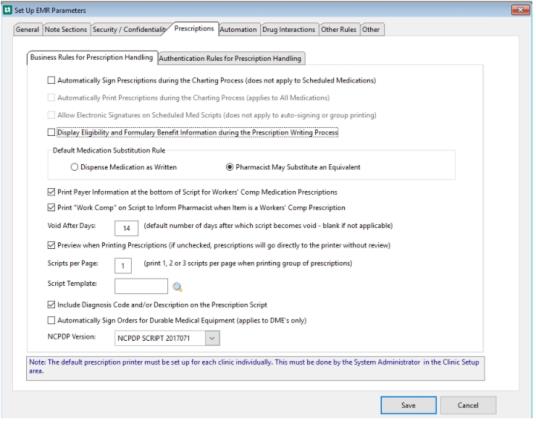
PRESCRIPTIONS tab- Business Rules for Prescription Handling
-
Automatically Sign Prescriptions during the Charting Process: Automatically adds the currently selected provider's electronic signature to a prescription.
-
Automatically Print Prescriptions during the Charting Process: Automatically sends the prescription to the printer when you click Done on the [Medication Order] window.
-
Allow Electronic Signatures on Scheduled Med Scripts: If checked, electronic signatures can be applied manually. If unchecked, prescriptions must be signed by hand.
-
Display Eligibility and Formulary Benefit Information during the Prescription Writing Process: Shows information about the patients prescription benefits to help physician select the most appropriate medication.
-
Default Medication as Written: One of the two messages shown will be checked on the prescription by default.
-
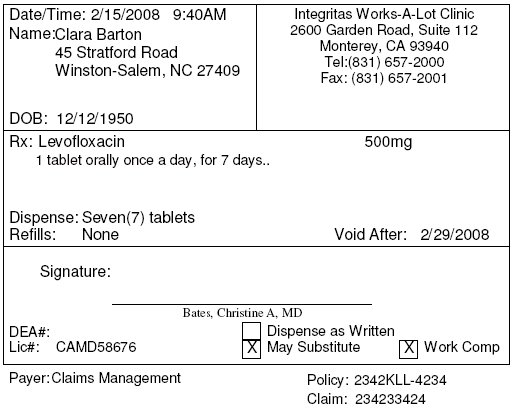
Print Payer Information at the bottom of Script for Workers' Comp Medication Prescriptions: Prints the payer name and address, the policy number and the claim number as a courtesy to the pharmacy. It is possible to put 1, 2, or 3 prescriptions on a single script. If 3 are being printed, there is insufficient room to include payer information.
-
Print "Work Comp" on script to inform Pharmacist when Item is a Workers' Comp Prescription: Does just that.
-
Void after Days: Enter the default number of days after which a script becomes void, which is used to calculate the Void After date printed on the script. This can be overwritten for individual scripts.
-
Preview when Printing Prescriptions: If checked, scripts are sent to the previewer by default. If not, they go straight to the printer. This can be overwritten for individual scripts.
-
Scripts per Page: When a medication is printed at the time when the Visit Order is entered, just that one prescription will print on a page. However, many clinics prefer to print scripts only after all prescriptions are ordered. When this is done, up to three prescriptions can be printed on a single script. This parameter controls the maximum number of scripts Net Health Employee Health and Occupational Medicine will print on a single page. This setting will depend on the format of your script and clinic preferences. It can be overwritten when scripts are printed.
-
Script Template: Net Health Employee Health and Occupational Medicine provides a standard script format. Since some states require specific formatting, you can also create a script template to use instead. If you have created a custom script format which you want used by default, select it here.
-
Include Diagnosis Description on Prescriptions: If this box is checked, when a prescription is associated with an ICD-10 on the problems list, the ICD-10 description will print on the prescription.
-
Automatically Sign Orders for Durable Medical Equipment: If this box is checked the system will automatically sign orders for DME's
- NCPDP Version: ONLY NET HEALTH TECHNICAL SERVICES SHOULD ALTER THIS PARAMETER
This dropdown will define the format used when sending electronic prescription thru Surescripts.- NCPDP SCRIPT 10.6: The NCPDP Script 10.6 will not be supported on 12/31/2021.
- NCPDP SCRIPT 2017071: The NCPDP SCRIPT 2017071 version took effect on 9/1/2021. This is the only supported version as of 12/31/2021.
-
You can set up a special printer which prints nothing but scripts. This is done in the Clinic Setup.
PRESCRIPTIONS tab- Authentication Rules for Prescription Handling
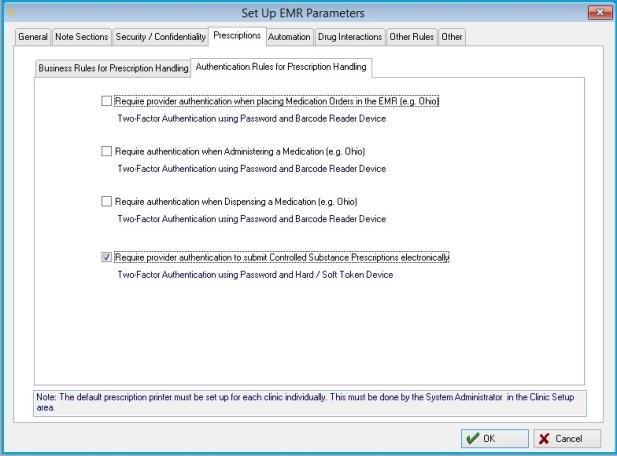
Require provider authentication when placing Medication Orders in the EMR: Will force the user to provide Two-Factor Authentication to create a Medication Order through the EMR.
Require provider authentication when Administering a Medication: Will force the user to provide Two-Factor Authentication when Administering a Medication. This flag is defaulted to unchecked.
Require provider authentication when Dispensing a Mediation: Will force the user to provide Two-Factor Authentication when Dispensing a Mediation. This flag is defaulted to unchecked.
Require provider authentication to submit a Controlled Substance Prescription Electronically: Will force the user to provide Two-Factor Authentication to submit a Controlled Substance electronically.
-
-
AUTOMATION tab
Set_Up_EMR_Parameters
-
Auto-pulling Charting from Previous Visits: To reduce the amount of entry work required on visits, you can have Net Health Employee Health and Occupational Medicine pull certain information from a previous visit. This includes HPI, PMH, ROS and diagnosis codes. You can select just the sections you want.
-
For: Auto-pulling can apply to Work Comp Follow-up visits only, or to all Private Practice and Work Comp visits.
-
Look Back: To reduce the likelihood of auto-pull getting out of date information, you can limit how far back it will look. This field only takes whole numbers. For example, you can specify 3 years if you only want to pull forward past information for established patients, but want to force complete re-entry for "new" patients.
-
Allow Automatic Charge and E/M Coding from EMR Charting Process: If checked, Net Health Employee Health and Occupational Medicine will allow the entry of a charge code on certain elements within Charting Wizards. When that wizard is invoked, it will automatically create the indicated charge record for the visit.
-
It might be that when you first begin using Net Health Employee Health and Occupational Medicine Provider Charting, you decide not to use auto-charge, but that later on, you do. This can be difficult for the simple reason that it is unlikely you can enter all the auto-charges in one sitting. That means you might have some Wizards that are adding charges, and others that are not, for the period of time it takes to get them all set up. You cannot finesse this problem by not checking the checkbox to allow automatic charging, because if it isn't checked, the option to add charges on Wizards is not available. For that reason, there is another checkbox to the right labeled Disable Pending Setup which is only available when the box above to allow auto-charges is checked. If you also check Disable Pending Setup, you will be able to add auto-charges to Wizards without them being implemented as the Wizards are used. Once you have set up all the auto-charges, uncheck this box to begin adding the charges on visits.
-
-
E/M Place Holder: Some clients create a dummy medical activity on protocols which gets selected from the protocol for each visit. This activity serves as a place holder until the final code is determined. When doing the final coding for a visit, that activity record is replaced with the actual E/M activity. If you enter the place holder activity here, Net Health Employee Health and Occupational Medicine will automatically replace the place holder with the correct E/M code.
-
Display Alert Messages and Red Flags and Allow User to Cancel Selections while Charting: When a Charting Wizard is created, an alert or red flag warning can optionally be entered. If this box is checked, when the wizard is invoked during charting, the alert or red flag warning will be displayed. If the wizard is a history or exam element, the warning will be informational only. If it is an MDM element, the warning display will offer the provider the option of cancelling the wizard.
-
Provide Real-time Alert Notifications to Providers that Guideline Recommendations are Available: If checked, the provider will be alerted to the fact that there are recommended guidelines or patient care plan items applicable to this patient. The check for guidelines occurs when the provider clicks the ORDERS tab in the Charting Workspace. If there are recommendations for this patient, the label on the related button(s) will display in red. If this parameter is not checked, the provider will only know about recommendations by clicking on the Guidelines and Patient Plan buttons.
-
-
DRUG INTERACTIONS tab
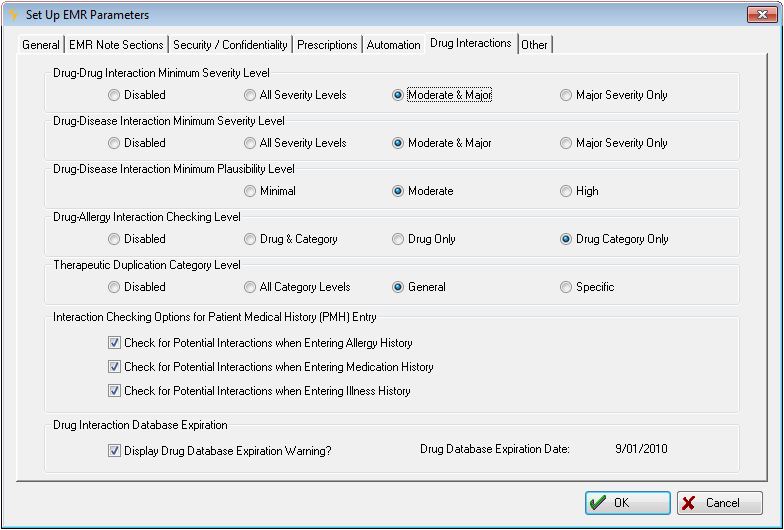
Drug-Drug Interaction Minimum Severity Level: Drug-Drug interactions are categorized at one of three levels of severity: minor, moderate, major. This parameter determines the severity of interactions that are reported. It is also possible to disable the drug interactions feature.
Drug-Disease Interaction Minimum Severity Level: As above for Drug-Disease interactions.
Drug-Disease Interaction Minimum Plausibility Level: The Drug-Disease Interaction feature looks at the plausibility of a problem arising as a result of a medication being prescribed given the patient's condition, as indicated by ICD-9 codes. Interactions are categorized at one of three levels: minimal, moderate, or high. This parameter determines the levels that will be reported. It is possible to disable this feature, also.
Drug-Allergy Interaction Checking Level: The Drug-Allergy interaction check can be set to look for interactions between the current drug and specific drug allergies, between the current drug and drug category allergies, or both. This check can also be disabled.
Therapeutic Duplication Category level: Therapeutic Duplication is when two drugs from the same therapeutic category are used at the same time by the same person. This review can be carried out at three levels: All Levels, General, and Specific, or, it can be disable altogether. General looks for duplication of the specific active ingredient. Generic looks for duplication at the functional level, such as Ibuprofen and Naproxen.
Check for Potential Interactions...
Three options let you control when potential interactions are reviewed. For each of these boxes checked, when a related item is entered on the visit, the drug interactions check will be run. For each box not checked, when a related item is entered, the interactions check will not be run. Whether a box is checked or not, when new medications are ordered, all potentially dangerous interactions will be checked in all areas.
-
Check for Potential Interactions when Entering Allergy History
-
Check for Potential Interactions when Entering Medication History
-
Check for Potential Interactions when Entering Illness History
Display Drug Database Expiration Warning?: Cerner Multum provides periodic updates to the database which includes drug interactions, patient leaflets, and drug information. The applicability of these updates vary. Net Health will receive the updates and extract those which apply to Net Health Employee Health and Occupational Medicine users. When an update needs to be applied at your site, Net Health will send an e-mail to your designated technical support contact notifying them of the availability of the update and providing instructions on downloading and installing it.
This parameter is designed to make sure you know to update your database in the even that the update notice gets lost or misdirected. If checked the expiration date of your drug database will be displayed beside the parameter. Also, when a medication is ordered a warning will be displayed at the bottom of the window:

If you see this notice, contact Net Health Technical Support for assistance in getting your database updated.
-
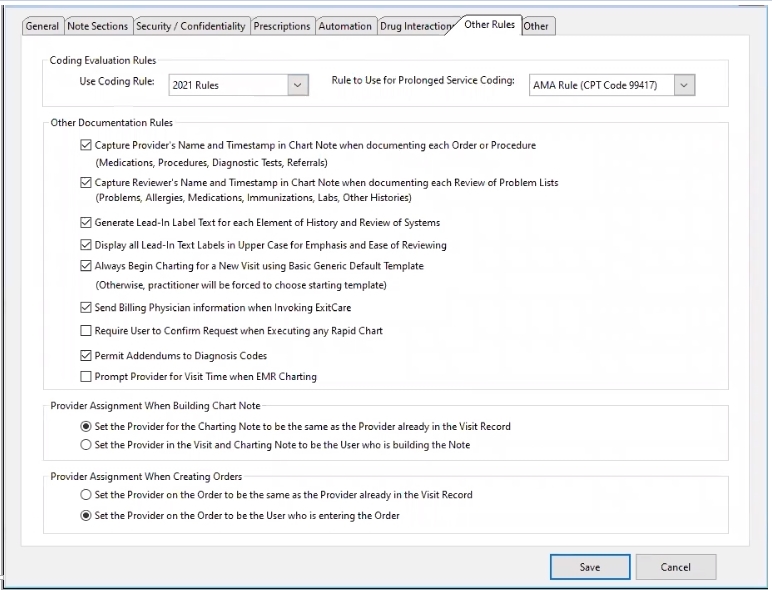
OTHER RULES tab
-
Coding Evaluation Rules: You have the option of determining the appropriate E/M code for a visit:
-
Documentation Results (will evaluate the visit according to all rules, and if the results are different, will use the highest code.
-
1995 Rules
-
1997 Rules
-
2021 Rules
-
-
Rule to use for Prolonged Service Coding: When the Use Coding Rule selection is 2021 Rules, this field will display and provide users with two options which will set the E/M coding rules across all insurance carriers; users cannot save the record until either the AMA or CMS option is specified. The field is blank by default.
-
AMA Rule (CPT code 99417)
-
CMS Rule (HCPCS Code)
-
-
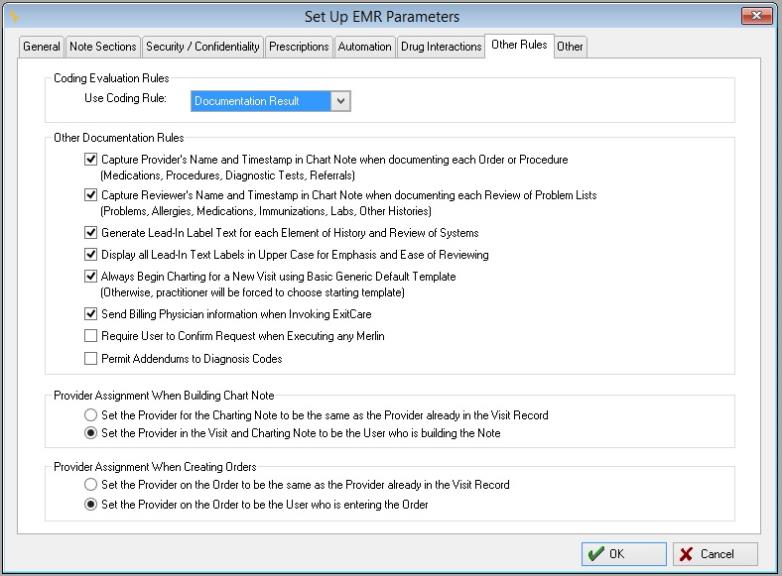
Capture Provider's Name and timestamp in Chart Note When Documenting Each Order or Procedure? (Medications, Procedures, Diagnostic Tests, Referrals): Orders and procedures are always documented in the charting note. If this box is checked, the physician's name and time stamp will be included.
-
Capture Reviewer's Name and timestamp in Chart Note When Documenting Each Review of Problems List? (Problems, Allergies, Medications, Immunizations, Labs, Other History): When you review a patient's problems list, you have the option of checking a box to document the review. If this parameter is checked, the physician's name and time stamp will be included with that documentation.
-
Generate Lead-In Label Text for each Element of History and Review of Systems: For these two tabs, a lead-in will automatically be added for each Element (button) documented:

-
Display All Lead-In Text Labels in Upper Case for Emphasis and Ease of Reviewing: Lead-in labels generated by the previous two parameters will be in upper case:

-
Always Begin Charting for a New Visit using Basic Default Template: If this is checked, when you enter the charting workspace for the first time, the Basic Default Template will be selected. If this is not checked, no template will be selected by default, requiring the user so select a template.
- Permit Addendum to Diagnosis Code Users must select the EMR Parameter option that will allow the Addendum to the Assessment Diagnosis codes to be turned on or turned off. By default, this parameter is turned off.
- Prompt Provider for Visit Time when EMR Charting: Check this box to have the system prompt you for Visit Time upon entering the EMR charting window when no time has been previously entered.
For more information regarding how to unlock the EMR Charting Workspace that will permit adding Addendums to the Diagnosis code, refer tot the chapter How to Build, Sign, Lock, and Addend a Charting Note
Other tab
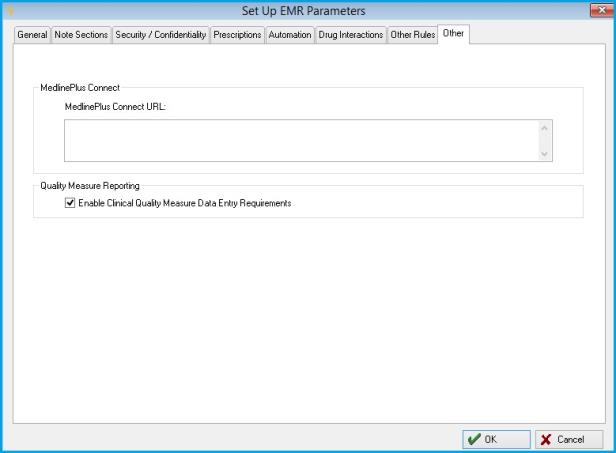
MedlinPlus Connect: Enter the URL for MedlinePlus Connect.
Quality Measure Reporting: Check this Box if you want to enter the Quality Measure data elements throughout the software.