How to Build, Sign, Lock, and Addend a Charting Note
Summary
Once a charting note is complete it can be built, which assembles the text from all the tabs into the note's final format. That format can be either a single long note or divided into the four SOAP sections. Once built, the note can be saved and if needed altered, or it can be signed electronically and locked. Once locked, no further changes can be made. If there is a need to add additional text to the visit, an addendum can be added which in turn is signed and locked. When creating an addendum, buttons are available for the Template Elements which are most likely to require an addendum. These buttons provide the same options in an addendum that the do on the main chart, including the ability to run any Wizard. You can, of course, also directly enter text. There is no limit to the number of addenda that can be added to a visit.
When the note or an addendum is built it can be seen from the visit record and from the Patient Chart. It is seen on the [Enter Patient Visit] window by clicking the Review Note button which is only available after the note is built. This displays the same window that is seen from within the EMR, and the note can be signed and locked from this location. This process can be especially useful to a supervising physician who needs to co-sign a number of notes since it eliminates a step in the process. Once the note is signed the Review Note button changes to Addendum.
A Clinic System Parameter can be set to require that the visit be coded before it can be signed. When this option is selected, the Sign button is not available when the note is build. Instead there is a button to Code E/M. This button performs in the same way as the button of the same name on the Menu Bar. The process of coding the visit is described in the topic on the Menu Bar. Once the visit is coded from either location the Sign button becomes available.
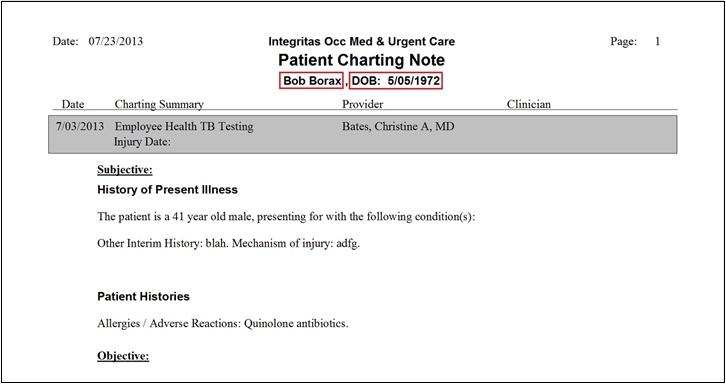
The software complies with the CLIA rule that charting notes have two unique identifiers. Charting notes list the patient name in the header as well as the patient's birthdate so that both identifiers are printed as part of the charting note.
What Do You Want To Do?
Build and Sign the Note
-
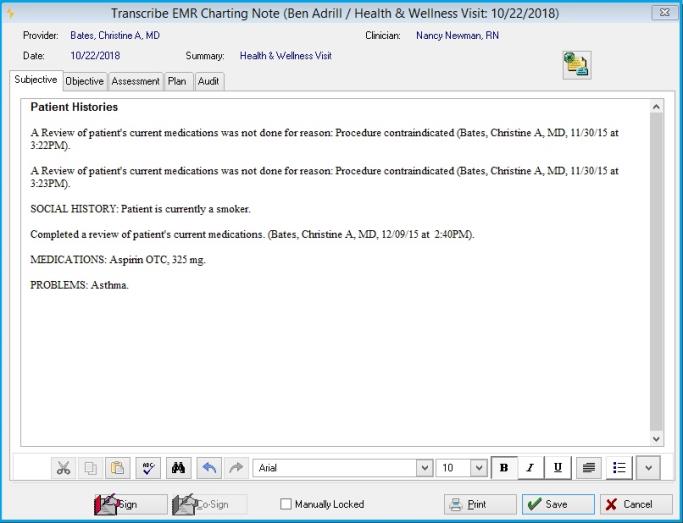
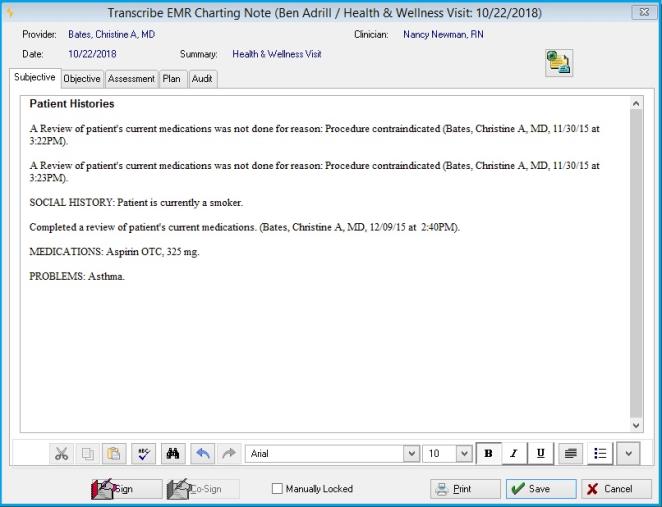
Click Build Note on the Menu Bar. Net Health Employee Health and Occupational Medicine will take the text from each tab of the [Generate Patient EMR Charting Note] window and compile it into a final charting note in the format selected for your system. (You can select free-form or SOAP notes with a setting in Clinic System Parameters.) The final note will be displayed in the [Transcribe EMR Charting Note] window. If you are using SOAP notes, this window will display the four sections of the note. By default, the four sections are show in the window at the same time, one above the other. An additional clinic parameter allows you to display each section of the note on an individual tab. The screen shot above is in that format. If not using SOAP notes, the charting note will be display entirely in the single window.
Each segment of the note (Chief Complaint, ROS, Exam, etc) has a heading within the note. You can change these headings on the EMR NOTE SECTIONS tab of EMR System Parameters. You can even change the formatting using rich text formatting controls.
-
Manual changes can be entered on the note at this point but it is not recommended. If you build the note again, manual changes will be lost. Changes should be made on the individual tabs for the charting template. If you do edit the note at this point you can enhance the formatting using the rich text formatting controls at the bottom.
-
You can send a message or assign a task to another Net Health Employee Health and Occupational Medicine user by clicking the Message icon
 in the upper right of the window.
 -
You can save or print the note at this point without locking it.
-
If the note is complete, and if your clinic uses electronic signatures, click the Sign button and enter your User Code and Password to attach your stored electronic signature to the visit. Signing the note will lock it from future changes. If a change is required, you can create an addendum as described below.
-
If your clinic is set up to allow co-signatures, the Co-Sign button will become available. The supervising physician can return to the note and sign it in the same manner. The ability to attach co-signatures is controlled with a parameter on the CHARTING/SIGNATURES tab of the [Clinic System Parameters] window.
-
You can lock the note without an electronic signature by checking the Manually Lock box.
-
Optionally, the note can be printed, once it is built, whether locked or not. The usualy options are available to e-mail or fax the note.
-
Click OK when done.
|
|
You can review the note at any time by clicking the Review button on the menu bar of the [Generate Patient EMR Charting Note] window. If it has been locked, at the bottom you will see stated in red "Record is Locked", and you will not be able to make changes. You can create an addendum as described below. |
Multi-User Access Prevention
If a user is either adding or editing a Charting Note in the EMR Workspace (including creating an Addendum), access is denied to a second user wanting to add or edit the same Charting Note with the following message:

If the Period of Time (in hours) before automatically unlocking a clinical record parameter is not set, this note will remain unavailable to other users until the originator releases (saves) the record or an administrator unlocks it. If the parameter has a numeric hour value and no activity for this record is occuring, then the system will unlock the Charting Note after that hour limit has been exceeded.
Review a Charting Note
Net Health Employee Health and Occupational Medicine includes the ability for one provider to co-sign charting notes generated by another. This can be done by reopening the charting note, but a faster way is to work from the [Patient Visits by Date] window where a visit is selected for charting. Instead of walking all the way back into the visit, highlight a visit and click Review. This will open the [Transcribe EMR Charting Note] window showing the note. From here, it can be co-signed as explained in the section below Build and Sign the Note. By default, the [Patient Visits by Date] window displays only visits for the current provider. Uncheck My Patients Only to see all visits for the day. To seen only visits for another specified provider, click the table icon![]() beside the Provider field, then search for and select the provider whose notes must be reviewed and cosigned.
beside the Provider field, then search for and select the provider whose notes must be reviewed and cosigned.
The supervising provider can annotate the note by clicking on the AUDIT tab and entering comments in the Physician Chart Review Annotations.
Net Health Employee Health and Occupational Medicine's EMR allows Multiple Vitals per Visit to Display in the Patient Charting Note:
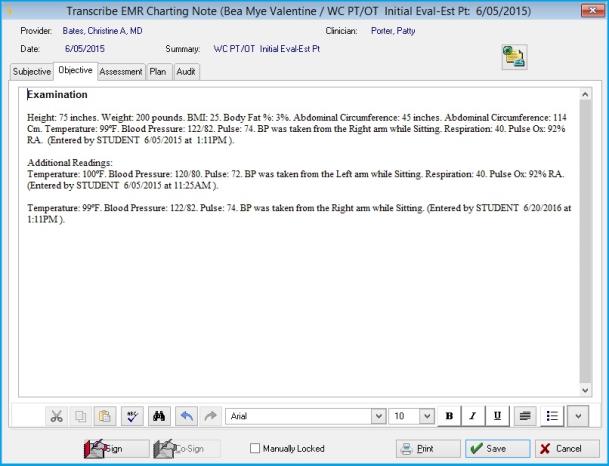
In Net Health Employee Health and Occupational Medicine, users have the ability to document more than one vital reading during a visit. The Charting Note will include all vital readings created for the visit.
The first line will populate from the Vitals record and include all of the entered fields. This includes:
- Height
- Weight
- BMI
- BMI Not Eligible & Reason (PQRS flag): If this flag and reason is documented then a separate line will print after the vitals record in the following format: "BMI not eligible due to populate with Reason description (Entered by user name, date & time)"
- Body Fat %
- Abdominal Circumference
- Head Circumference for patients under 36 months old
- Temperature
- Blood Pressure
- BP Not Eligible & Reason (PQRS flag): If this flag and reason is documented then a separate line will print after the vitals record in the following format: "BP not eligible due to populate with Reason description (Entered by user name, date & time)"
- Pulse Rate
- Which arm was used?
- Position when Read
- Respiration
- Pulse Oxy
- At the end of the line the following information will populate: "Entered by the Users name, date of and time of" (the Clinician or Provider field entered on the vitals will be used).
Additional Readings will Include:
- Temperature
- Blood Pressure
- Pulse
- Which arm was used?
- Position when Read
- Respiration
- Pulse Oxy
- At the end of the line the following information will populate: "Entered by the Users name, date of and time of" (the Clinician or Provider field entered on the vitals will be used).
There are a number of Charting Note formats that will display depending upon two EMR Parameters on the General tab:
EMR Parameter on the General tab of:

Results in:
EMR Parameter on the General tab of:

Results in:
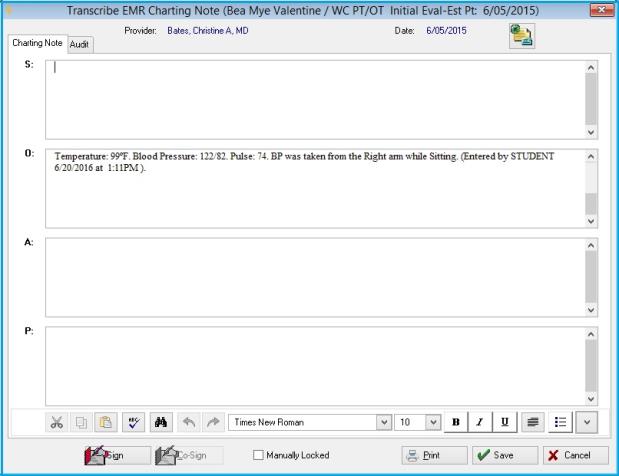
EMR Parameter on the General tab of:

Results in:
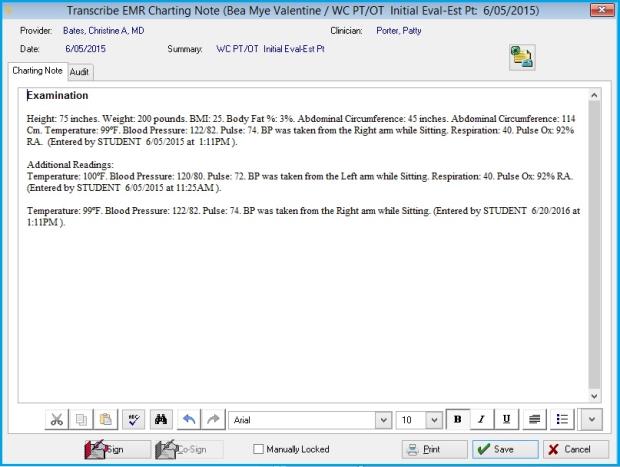
Add a Charting Note Addendum
-
Click the Addendum button on the menu bar of the [Generate Patient EMR Charting Note] window to display the [Visit Charting] window. This window shows the original charting note and any previous addenda.
-
You may change or view an existing addenda by highlighting it, then clicking Change. If the note or addendum has been locked, you will not be able to alter it.
-
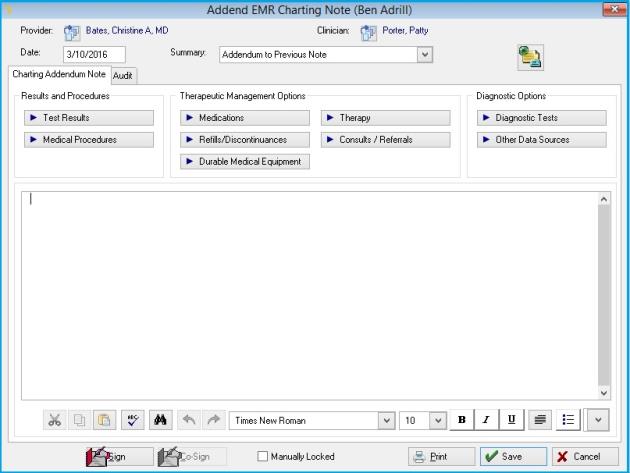
To add an addendum, click the Addend button to display the [Addend Charting Note] window.
-
-
Provider shows the name of the provider from the visit. Change this, if need by by clicking the table icon
 . Then, search for and select the correct provider.
 -
Optionally, change or add a clinician by clicking the table icon beside Clinician. Then, search for and select the correct clinician.
-
Enter the correct Summary by clicking the drop-down arrow beside it, then selecting your choice. This field will be used as the description anywhere charting notes are listed, so changing it from the default is a good idea.
-
You can enter text manually in this window, using the rich text formatting controls at the bottom.
-
The great majority of addenda are of predictable types. For your convenience in generating the addendum, Text Element buttons are included at the top of window from the Charting Template for the activities that most commonly require addenda. Clicking one of those buttons here will build the charting note just as it does when first creating the charting note.
-
When done, you can add an electronic signature, if your clinic uses that feature, by clicking Sign. Signing the addendum will lock it, preventing any future changes.
-
You may lock the note without adding an electronic signature by checking the box beside Manually Locked.
-
You may print the addendum by clicking Print.
-
Click Save when done.
Learn who did what
On the [Transcribe EMR Charting Note] window for a charting note or an addendum, click on the AUDIT tab to see a list of all of the providers and clinicians who contributed elements of the charting note, along with information about who added/changed/locked/signed/cosigned this note.
To Unlock Assessment Note for Coder to do Addendum to Diagnosis.
Net Health Employee Health and Occupational Medicine has the capability for the provider to add, change, or delete diagnosis codes after they have signed and locked the medical Charting Note. This feature will allow the provider to create an addendum for the Assessment section of the original Charting Note, within the EMR Charting Workspace, and to also update the Visit with the appropriate diagnosis coding related to those updates.
Rules for unlocking the workspace:
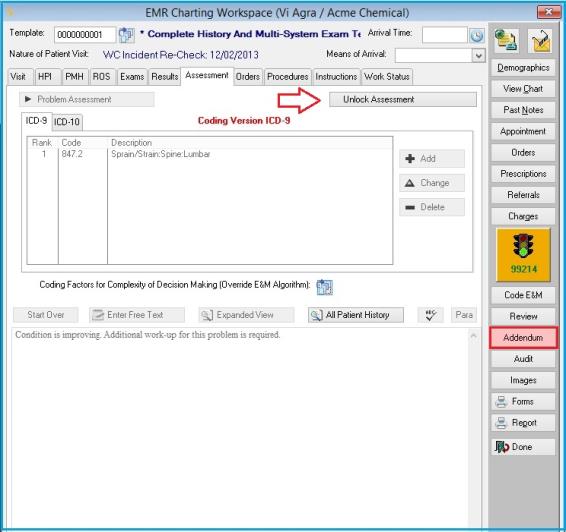
Once in the EMR Charting, users will need to go to the Assessment tab.
The Addendum button on the right side will turn red to alert the user that there are addendum charting notes already attached to this Visit.
An Unlock Assessment button will display to the user if BOTH the following criteria are met:
- The EMR Parameter is turned on to allow addendums to Diagnosis codes.
- A user account that has a provider attached will be the only users that will have the rights to unlock the Assessment EMR Charting Workspace for a Signed and Locked Note.
- Visit charting is either locked and/or signed.
When the user clicks on this button the following will occur to the window:
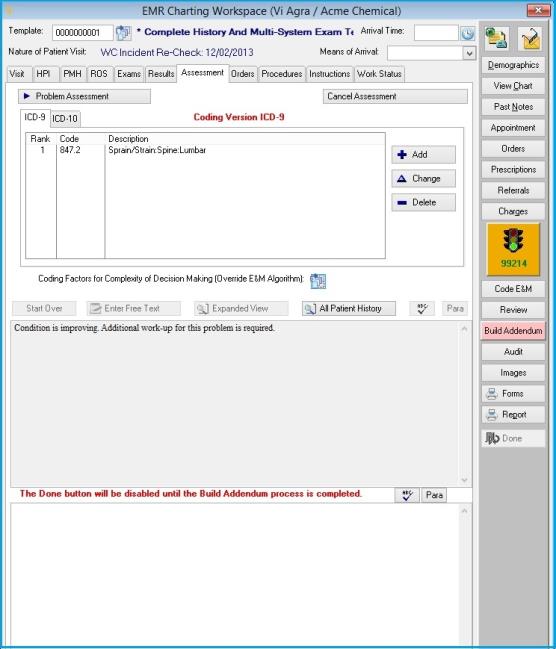
The top section for Assessment entry including the Add, Change, and Delete buttons will become active and no longer disabled. The Reassess Existing Diagnosis & Additional Encounter Diagnosis buttons will continue to be disabled.
The next section will display the original note that was generated for the Assessment, no editing of this data will be allowed and it will be locked. A scroll bar allows the user to read all of the data in this section.
The All Patient History button remains active.
The third section will be an Addendum Assessment Note workspace where all the changes made to the ICD codes will populate the data for the Addendum Note. There is a red note that displays below this section: The Build Addendum functions must be done before the user will have access to click the Done button on this window.
The Addendum button on the right side panel becomes relabeled to read Build Addendum. The Done button is disabled and users will not be allowed out of this window until the Addendum Note is built.
Entry of Addendum Assessment:
The top section for Assessment entry will be opened and allows the user to do the entry as though the charting workspace was never locked. This allows the user to do additions, changes and deletions of ICD codes and run the required assessment wizards to create the charting text for the Addendum Note. Net Health Employee Health and Occupational Medicine maintains the patient’s history of this charting note.
Users may Add ICD codes, Change an ICD code or Delete an ICD code.
New or Change ICD code
After a code is selected in the top section of the window, the Assessment wizard functionality will run and display the Assessment and Diagnosis window for entry. After the data is entered and the window is closed, the Addendum Note will be populated in the Addendum Assessment Note workspace section at the bottom. If the user is making a change to an existing diagnosis, they should also enter an additional note to describe the reason for the change.
Delete of an ICD code
In order to delete an ICD code, the user will remove the code from the top section of the Assessment by using the Delete button. The Assessment and Diagnosis window will not display for entry. The Addendum Note will automatically populate with the ICD code and diagnosis description with additional verbiage that this diagnosis is no longer valid and has been deleted as an addendum.
Cancel Button
This button is essentially an undo function for whatever was entered before the record was saved.
Problem list display
If an ICD code was deleted as part of the Addendum, it will also be deleted from the Problem List.
Build Addendum Note:
Once you have finished documenting the changes to the Assessment, click on the Build Addendum button to the right. A new Charting Note record will be created. Changes made to the diagnoses must flow to the visit. The following window will display:
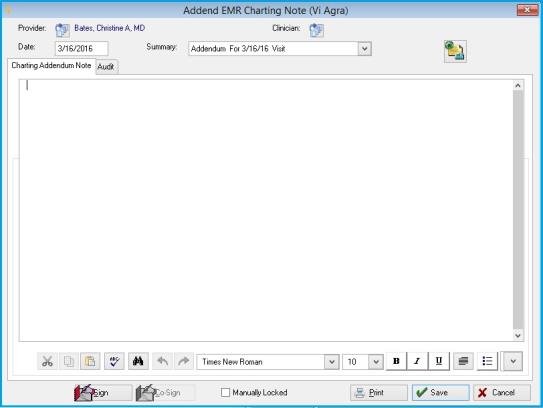
When users are in the above window, they will have the ability to:
- Do spell check of the data displayed on this window.
- Click the Sign button, populate their signature and lock the note.
- Click the Print button to print the displayed Charting Note.
The Addend EMR Charting Note window will not display the buttons at the top, as it does for other type Addendums. (Test Results, Medical Procedures, Medications, Refills/ discontinuances, Durable Medical Equipment, Therapy, Consults/Referrals, Diagnostic Tests, Other Data Sources)
Provider: This field will be populated with the Provider attached to the logged in user.
Date: This field will be populated with today’s date
Clinician: will not be prepopulated.
Summary: Net Health Employee Health and Occupational Medicine will provide the drop down list of Addendum selections for the user to select the appropriate one for this note. The default selection will be Addendum. After the selection of the drop down, the system will populate the Summary field with the selection plus the verbiage “for mm/dd/yy visitâ€. Once the note is signed and locked, this field must be disabled so that it cannot be changed.
Charting Addendum Note tab: This field will be populated with the data that was in the Addendum to Note workspace.
Click the Cancel button to return to the EMR Charting Workspace and not save the Charting Note record that was created. If this occurs the user will be returned to the EMR Charting Workspace and it will not be disabled. It will still be available to the user to make additional changes.
Click the OK button to save the Charting Note in the database. The user will be returned to the following window that displays a list of the Addendum Charting Notes attached to the current Visit.
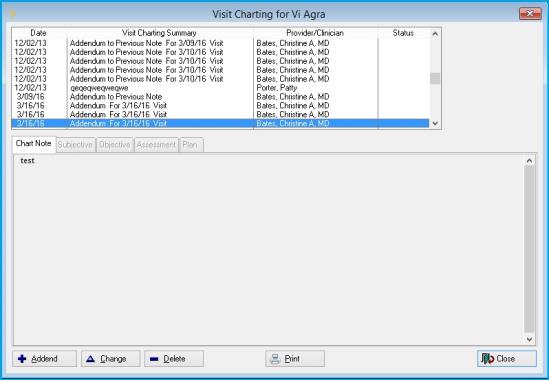
This browse list will display only the charting notes that are addendums.
A view at the bottom of this window will display the details of the charting note for the item highlighted in the top portion of the window. This will allow the user to read each of the addendums quickly without having to open the record to read the note.
Clicking the Close button, will return users to EMR Charting Workspace and the following will occur: The Assessment tab will display as it did before the user started the addendum (fields disabled). The Addendum Assessment Note section will no longer display. If users wants to view what was recorded for that note, they will need to go to the Addendum button and review the created Charting Note from there.
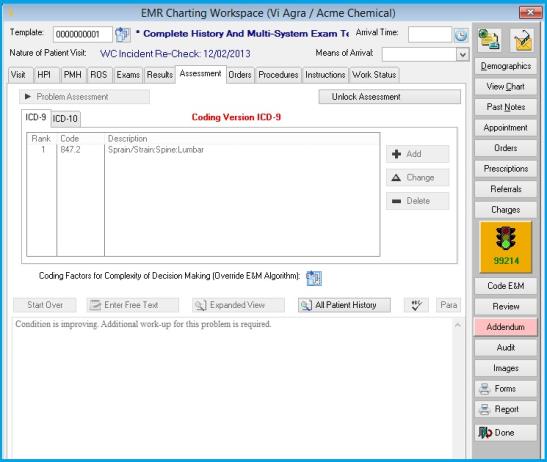
- The Build Addendum button will be changed back to be titled Addendum and the button will function it normally does.
- The Done button will be enabled for the user to exit from the EMR Charting workspace for this visit.
- The New ICD codes will be updated and added to the problems list.
- The corresponding Visit and Incident records will be updated and saved with the ICD code changes.
Enter Patient Visit
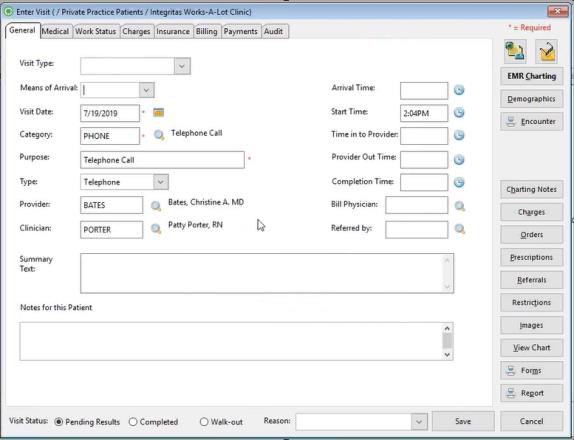
- The Reason field has a drop down list for the Billing Coder to alert a Provider that a correction is needed for the Assessment; specifically, for Addendum’s it is "Assessment Addendum Required."
- When the Visit Status field is changed to Completed the system will keep the Reason field displayed on the window with the last reason that was selected.
- This reason will display on the Patient Visit by Date after the Visit record is closed. It will only display on this browse window if the Visit Status is Pending Results. Net Health Employee Health and Occupational Medicine will not display this reason on the Patient Visit by Date browse window if the Visit Status is Completed or Walk-Out.