Accessing Net Health Employee Health and Occupational Medicine Provider Charting
Summary
There are multiple routes to the Provider Charting workspace. The easiest method for regular use through the day is via the Clinic Whiteboard. Only patients currently in the clinic are displayed on the Whiteboard making it easy to find the patient you want. Visits can also be located by looking at all visits for a date range or by looking up by patient name or ID.
From the Clinic Whiteboard
-
On the Home Nav Bar, click Whiteboard. to display the [Clinic Activity Whiteboard] window.
-
Locate the patient in an exam room or a waiting room.
-
Right click the patient.
-
On the pop-up menu, click EMR Charting to move directly to the charting workspace, aka the [Generate Patient EMR Charting Note] window.
From the Navigation Bar
-
In the EMR Charting section of the Home Nav Bar, click Chart by Patient or Chart by Date. Do NOT go to Visits by Patient or Visits by Date in the Visits section. EMR Charting is not accessible from the [Enter Patient Visit] window when reached from those starting points. Follow these instructions to locate a visit by looking up the patient:
-
Click Chart by Patient on the Home Nav Bar.
-
Enter all or part of a patient name or identification number, and click Search Patient List.
-
On the [Select Patient] window, search for and select the patient.
-
On the [Patient Visits] window, highlight the visit you want to open and click Change. This will open the [Enter Patient Visit] window.
-
-
Follow these instructions to locate a visit by date:
-
Click Chart by Date on the Nav Bar.
-
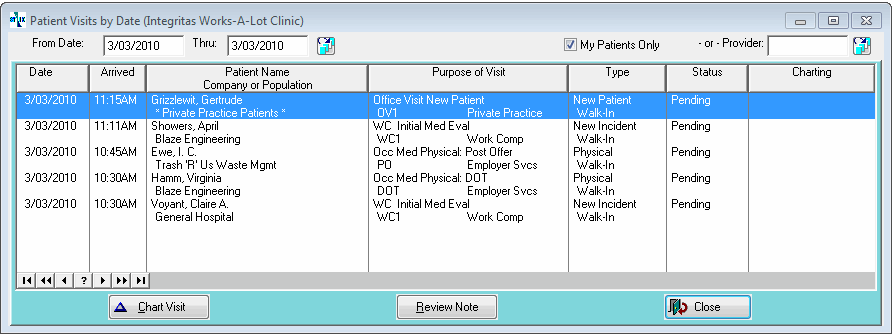
The [Patient Visits by Date] window will display all visits logged today. Optionally, select a different date or date range.

-
By default, the [Patient Visits by Date] window displays visits in reverse chronological order, that is, the most recent will be at the top of the list. Optionally, click a column header such as Patient Name to change the sort order.
-
Only your visits show by default.
-
Uncheck My Patients Only to show all visits for today.
-
To show only visits for another provider, click the table icon
 beside Provider. Search for and select the desired provider.
 -
Highlight the visit to open, and either double-click or click Chart Visit.
-
Use the movement controls to scroll through the list to find the visit you want.
-
Click Change to open the [Enter Patient Visit] window.
-
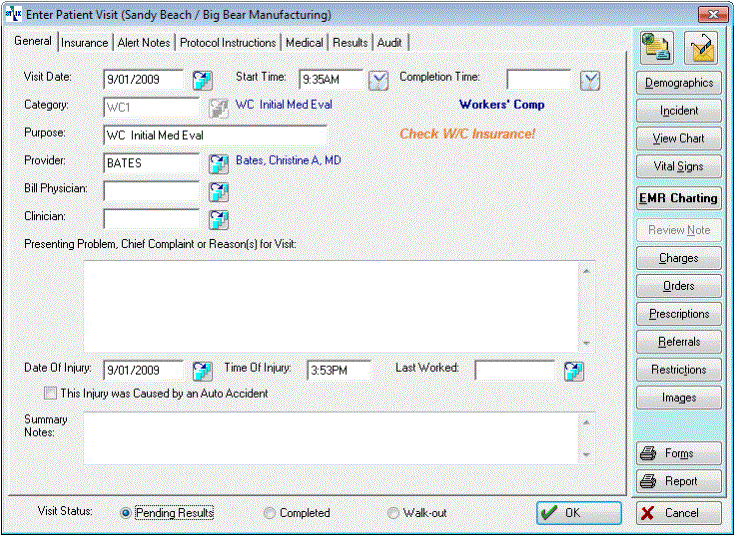
This will take you to the [Enter Patient Visit] window. It is quite similar, but not identical, to the [Enter Visit] window accessed by other routes. Read about the differences below.
-
-
On the [Enter Patient Visit] window click theEMR Chartingbutton on the right. This will display the [Generate EMR Patient Charting Note] window.
|
|
Only one person can access this work space at a time for the same visit. For this reason, clinicians working with provider orders should access orders from the [Enter Patient Visit]. Entering the charting workspace might prevent the provider from finishing charting the visit. |
Reviewing Completed Charting Notes by Supervising Provider
If you review and co-sign charting notes generated by other providers, you do not need to follow all the steps to open the charting workspace. Instead,
-
Click Chart by Date on the Nav Bar.
-
The [Patient Visits by Date] window will display all visits logged today. Optionally, select a different date or date range.

-
Uncheck the My Patient Visits Only checkbox. This will display all visits for the indicated date range for all providers.
-
Optionally, to see a list of visits charted by a single provider, click the table icon beside Provider and select that provider.
-
Locate and highlight the first visit you need to review.
-
Visits which display a status in the Charting column of "Signed/Locked" can be opened and co-signed.
-
Visits which display a status in the Charting column of "Draft/Saved" can be opened and signed. (Note: The charting note can only be modified by this route by typing free text, which is not recommended.)
-
Visits with any other status must be opened by entering the charting workspace as described above.
-
-
Click the Review Note button at the bottom of the window. This will open a window with the final charting note for the visit.
-
After reviewing, click Sign or Co-Sign.
-
Enter your user name and password.
-
Click OK.
The [Enter Patient Visit] Window
To reach the EMR to generate a patient charting note from the [Patient Visits by Date] or [Patient Visits] windows, you must pass through the [Enter Patient Visit] window. While very similar to the [Enter Visit] window reached from other points in the program (Home Nav Bar, Patient Chart, etc), it is not identical. The changes provide access to some features which are of interest to clinical staff, and remove some features that are not.

The additional buttons are:
-
Vital Signs: View the patient's history of vital signs.
-
EMR Charting button: This button take you to the [Generate Patient EMR Charting Note] window.
-
Review button: This button only becomes enabled when the note has been built. Once enabled, it displays the same screen as is seen from within EMR Charting where the note can be built again, signed, or co-signed. Once the note is signed and locked, this button changes to Addendum.
-
Addendum button: Once signed or locked, a charting note cannot be altered. Since available information sometimes changes, you can create an addendum, essentially a second charting note attached to the same visit. This button allows you to do that. This feature also accessible from the EMR. You can find a discussion on it in the topic EMR Menu Bar. This button is grayed out refers to part of a screen that cannot be used because it is inactive or otherwise not accessible. This part of the screen appears slightly gray. until the charting note is locked.
-
Prescriptions button: Displays all prescriptions for this visit. Read more in the topic on Prescriptions.
-
Vital Signs button: View/edit vital signs for this visit.
Several fields are displayed here which are not shown on the standard [Enter Visit] window, such as Date of Injury and Last Worked.
Several tabs and buttons from the [Enter Visit] window are not included on the [Enter Patient Visit] window. These missing features are part of front desk and administrative activities, such as the BILLING tab, the Correct Entity button, and the Correct Incident button. Case Management is also not found on this screen.