System Security Management Overview
Summary
The security system is designed to combine a high degree of security with the flexibility you need to configure the system according to policies at your facility. All security functions, such as establishing security parameters, setting up user access rights, reviewing and purging audit logs, and supporting users who encounter problems (such as forgetting their personal passwords) are controlled in a separate executable program, Admin.exe, for added protection. Only a user who has been give Security Administrator rights can make changes to any of the security features. A designated System Administrator has the ability to make changes to certain non-security system parameters.
Two frequently used security features, User Code Setup and Security Admin Parameters, can also be accessed from the main program by clicking Setup/Admin on the Home Nav Bar, then Admin / Security.

The application is designed to provide a safe, secure tracking of confidential patient information, adhering fully to the HIPAA Standards for Security and Privacy. To facilitate this, the program provides the ability for the Security Administrator to establish a robust set of system level security settings, or "parameters", discussed below.
Security Administrator
The Security Administrator is the user who is accountable for establishing the global security settings, setting up User Accounts and monitoring audit logs. To be a Security Administrator requires a special access level to be set in the User Account record.
Each client should have two or more people designated as Security Administrators for the application. Ideally, someone should be available to handle security related problems or questions whenever the application is being used.
User Access Rights
The application gives you the ability to establish individual user access codes (a.k.a. user code, user ID) with password protection. To log in to the system, you must have a user ID and a password, established initially by the Security Administrator. The security program allows you to restrict or allow access to various parts of the software, depending on the user's job, the number of staff employed by the organization, and the organization's procedures. These rights are controlled in the individual User Code Account record.
Password Security
The program provides the Security Administrator with the ability to control the level of password protection in the system. Six rules govern how the application will handle user account passwords and login access. They control the length and composition required, reuse and expiration period for passwords, along with the number of unsuccessful login attempts before the user account is suspended. Establishing these rules is discussed below in the section Set Up Security Parameters.
Audit History
The program provides all audit functions required by the HIPAA Security Standard. You have control over the level of detail stored in the audit history. Most facilities will track all additions, changes, and deletions of Protected Health Information (PHI). You may also track reports of PHI, and viewing of PHI. Your Security Administrator establishes auditing settings according to your facility standards.
Timed Automatic Log Off
The program will log off any user who hasn't used the open program in more than X minutes, where X is defined by the security administrator.
Login Control
The system can be set to suspend a user account after X unsuccessful login attempts, where X is defined by the security administrator. To prevent unauthorized logins, it is also possible to limit the hours when each user can log in to the program. A user access audit log lets you review every login and logout by a user.
Scheduling a User Account's Access
The program provides a unique capability for the Security Administrator to allow certain users specific times during the week at which they are allowed to log into the system. For example, a user could be allowed entry only Monday-Friday, from 8:00 am to 6:00 pm. This could be used to afford extra protection from users gaining access outside of their normal work schedule, such as logging into the system at night or on weekends. This does not force the user to log out if logged in at the end of the scheduled period.
Scheduling user access is done on the System Access tab and the Access Schedule sub-tab when you set up a user account.
Export PHI
The program allows you to export data from many places in the application. Types of extracts include ASCII or Excel report files, document images, graphical images, and patient continuity of care document (CCD) files. All of these files contain Protected Health Information (PHI) and as such, by law must be encrypted before they can be saved onto any form of portable media such as a thumb drive, CD-RW, etc.
When files are exported, they are placed in a protected folder. The Secure File Encryption Manager allows you to encrypt the files and move them to a less secure location.
Security Administrator Functions
-
Set Up Security Parameters
Only users with System Administrator and Security Administrator rights have access to this function.
On the Home Nav Bar
-
Select Setup/Admin
-
Select Admin / Security
-
Select the Security Admin Parameters to display the Administer Security System Settings window.
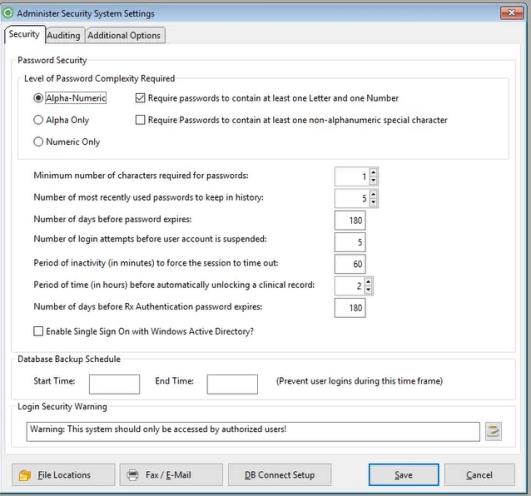
Security Tab
-
Level of Password Complexity Required:
-
Alpha-Numeric
-
Require password to contain at least one Letter and one Number checkbox
-
Alpha Only
-
Require Password to contain at least one non-alphanumeric special character checkbox
-
Numeric Only
-
-
Minimum number of characters required for passwords:
-
This governs password strength. A good rule is to require at least six or eight characters in a password. A user will be able to create a password with a length anywhere between this minimum number of characters to 30 characters.
-
-
Number of most recently used passwords to keep in history:
-
This is referred to as the password re-usability rule. It can be set from zero to 5. When non-zero (e.g. 5), the system will save a rolling list of the N (e.g. 5) most recently used passwords, and will not allow a user to reuse any of those passwords. Whenever a user changes his or her password, the software will prevent the reuse of any passwords on this list, and will force the user to select a different password.
-
-
Number of days before password expires:
-
This parameter governs the frequency with which each user must change his or her password. This can be set from zero to 255 days. If non-zero, when that number of days has passed since the last password change, the user will be required to change his or her password on the next login.
-
-
Number of login attempts before user account is suspended:
-
This is a special rule to prevent repeated attempts by an unauthorized person to gain access through a person's user account. If that number of attempts is exceed, the account will be suspended (deactivated) until the Security Administrator re-enables it.
-
-
Period of inactivity (in minutes) to force the session to time out:
-
This sets the number of minutes after which, if no mouse clicks or key strokes are entered at a workstation during a session, that workstation will "time out" by closing any active program windows and logging the user out. Special provisions have been made to allow lengthy reports to complete, so that those reports will not be interrupted by a time out.
-
- Period of Time (in hours) before automatically unlocking a clinical record:
- Administrators may use this parameter to set the number of hours (up to 24) that the system will lock a clinical record. This value will govern a period of time before the system automatically allow another user to access a record that appears to be in progress, but in reality it is not. This is not set by default it is blank (which is disabled) until a value is entered.
- Number of days before RX Authentication password expires:
- This is the number of days a Provider has before their Electronic Prescribing two-factor authentication password expires. the default is the "Number of Days before Password Expires". Each time a prescribing provider user changes their Rx Authentication password, the expiration date for that new password will be calculated from the date the new password is created, using the number of days defined in this parameter.
-
Enable Single Sign On with Window Active Directory?:
-
Check this box to allow users to use Single Sign On.
-
-
Database Backup Schedule.
-
Enter Start Time
-
Enter End Time
-
Entering time in these fields will prevent user logins during this time frame
-
-
-
Login Security Warning
-
The statement entered here is displayed on the Login window as standard language. Users may opt to enter a customized version by either entering it in the space allotted or, for longer messages, click the icon to the right of the field. The following window will display:

-
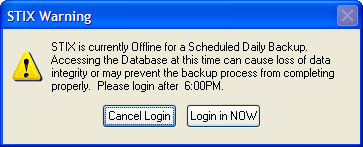
If a user tries to log in during this time period, the following message will appear:
-
If access to the program at this time is vital, it will be allowed if the user clicks Log in NOW.
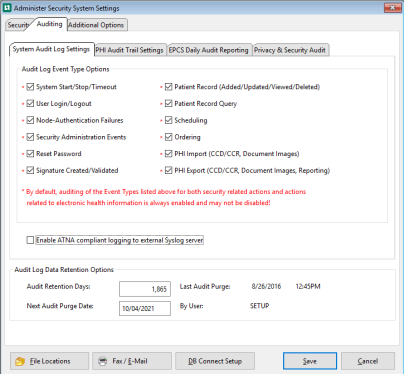
Auditing Tab
System Audit Log Settings Sub-tab
-
Audit Log Event Type Options Section
-
All items in this section are enabled and CANNOT be disabled. These are related to electronic health information and security actions performed within your application.
-
-
Enable ATNA (Audit Trail and Node Authentication) compliant logging to external Syslog server checkbox.
-
Audit Log Retention Option Section
-
Audit Retention Days
-
Enter the number of days you want to retain your audit log in this field
-
-
Next Audit Purge Date
-
Calculates out the date for the next data to be purged from the last date purged.
-
-
Last Audit Purge
-
The date of the and the time the purge was completed.
-
-
By User
-
The user that completed the purge
-
-
PHI Audit Trail Settings Sub-tab
-
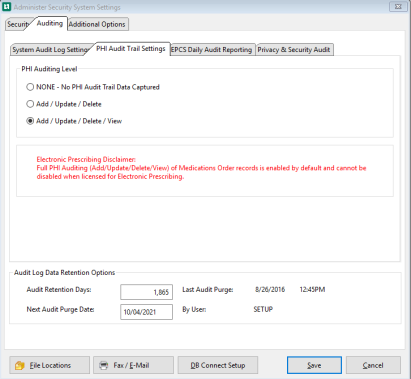
PHI Auditing Level - Only one level can be selected
-
NONE
-
No PHI Audit Trail Data Captured
-
-
Add / Update / Delete
-
Only Adds, Updates (Edits), and Deletes are captured
-
-
Add / Update / Delete / View
-
Adds views to the add, updates, and deletes.
-
-
Electronic Prescribing Disclaimer:
Full PHI Auditing (Add/Update/Delete/View) of Medications Order records is enabled by default and CANNOT be disabled when licensed for Electronic Prescribing.
EPCS Daily Audit Reporting Sub-tab
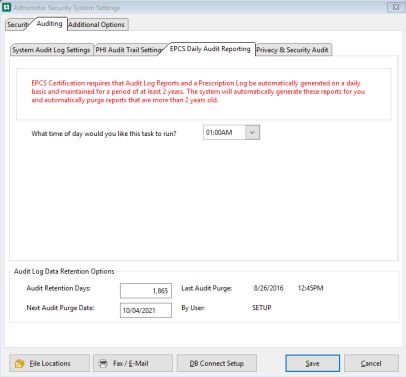
This tab only pertains to clients that are electronically submitting prescriptions.
EPCS Certification requires that Audit Log Report and a Prescription Log be automatically generated on a daily basis and maintained for a period of at least 2 years. The system will automatically generate these reports for you and automatically purge reports that are more than 2 years old.
The time these reports run will depend on the time selected.
-
What time of day would you like this task to run?
-
Enter the time using the drop-down.
-
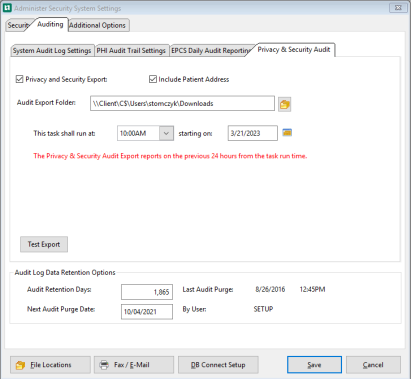
Privacy & Security Audit Sub-tab
-
Privacy and Security Export checkbox
-
Select this checkbox to create an export for the security information for the previous 24 hours
-
-
Include Patient Address checkbox
-
Includes the patient address 1, address 2, city, state, zip as discrete fields in the export file.
-
-
Audit Export Folder
-
Provide a secure folder to house this information.
-
-
This task shall run at:
-
Enter time using drop-down
-
-
starting on:
-
Use calendar icon to select a start date.
-
Test Export
Select this to test the export to make sure it is working correctly and is being sent to the correct folder.
Additional Options Tab
-
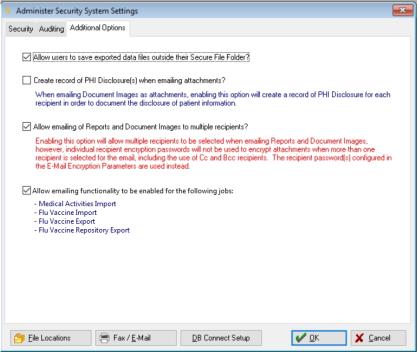
Allow users to save exported data files outside their Secure File Folder?:
-
Permits users to pick their own location for secure exported files other than the default secure path.
-
-
Create record of PHI Disclosure(s) when emailing attachments?:
-
Check this box to have the application create PHI disclosures when emailing attachments.
-
-
Allow emailing of Reports and Document Images to multiple recipients?
-
Check this box to allow the application to send report and image attachments to multiple recipients through E-mail.
-
-
Allow emailing functionality to be enabled for the following jobs:
-
Check this box to allow the software's email functionality for the following vaccine reports produced through the program's Automation Service:
-
Medical Activities Import
-
Flu Vaccine Import
-
Flu Vaccine Export
-
Flu Vaccine Repository Export
-
-
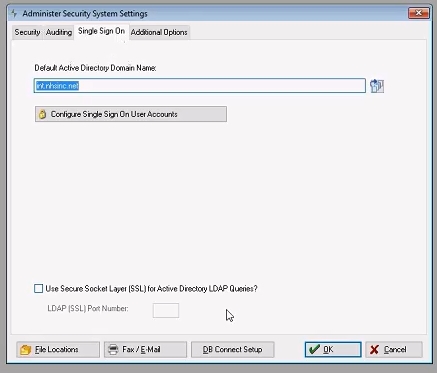
Single Sign On Tab
-
- Default Active Directory Domain Name:
- Enter the Domain Name needed to "talk" to the active directory.
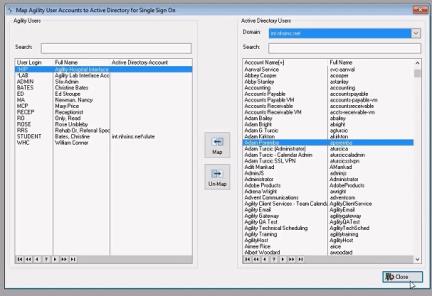
- Configure Single Sign-On:
- This window allows users to map their Net Health Employee Health and Occupational Medicine ID to a network ID.
- The Domain name is located at the top right panel. Users may use the search bar to locate the Net Health Employee Health and Occupational Medicine user on the left and the Network ID on the right. Click "Map" button to connect the two, click "Un-Map" to separate the two ID's. When you are finished,
- Use Secure Socket Layer (SSL) for Active Directory LDAP Queries?:
- Check this box to use SSL for Single Sign-On capabilities.
- Select Close
- LDAP (SSL) Port Number:
- Enter the SSL Port Number used for your network, "636" is the default. If the above checkbox to use SSL for the active directory is not checked, the port number selection is disabled.
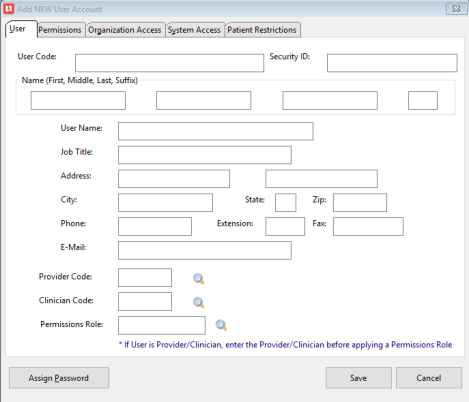
Set Up User Codes
-
Create Messaging Roles
To create these roles the user must be in the System and Security Administration module
-
From the Home Nav bar
-
Select Messaging Roles
-
The Set Up Messaging Roles window opens
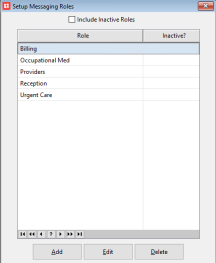
-
A list of existing Messaging Roles displays
-
To create a new Role
-
Select Add
-
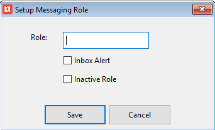
The Set Up Messaging Role pop-up window opens
-
Enter the name in Role field.
-
Check Inbox Alert to have the task / message icon on the toolbar turn green when that user's role has an unread task or message.
-
Check Inactive Role to prevent an existing Role from being used in the future. While the role will continue to show on the Set Up Messaging Roles window, it will not be available for use when setting up user codes.
-
To remove a Messaging Role, highlight it and select Delete.
-
You can only delete Roles which are not assigned to any users.
-
-
Click Save.
-