Remote Employer Module Setup
Summary
The Remote Employer module enables your employer clients to access data about their employees via the Internet. Two versions of the program are available. One version requires Citrix The Citrix Access Platform is used by many larger enterprises to provide scatterd office sites with secure, well-managed access to centrally located computer systems. . If your organization already uses Citrix, this may be the best option for you. You will need to have a Citrix license for each employer who dials in. Citrix licenses run about $150/year for a pack of 5 licenses.
The second version runs on the web without Citrix. Your database must be on a web server like any other information available on the Internet.
Most organizations, particularly hospitals, have policies regarding security and what they will or won't allow, so be sure to check with your IT department prior to selecting the version you want to run. The license fee to use either version is the same.
Set Up Remote Employer Client
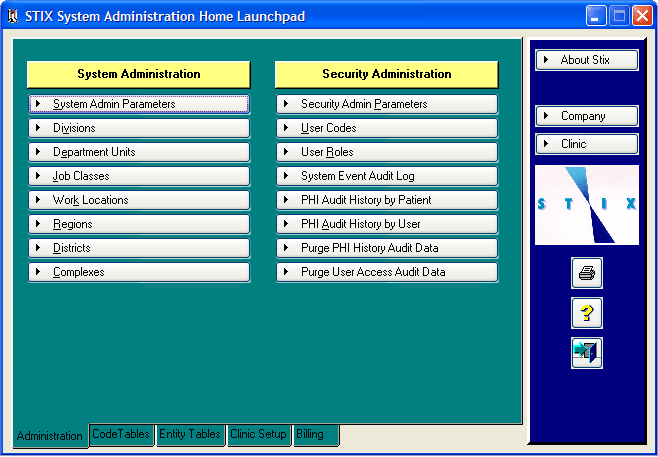
The logon security for this module involves both a Client Organization logon and an individual user logon. The client organization logon and master code, and all individual user codes for users within your client organization, are set up in the Admin.exe program. From the Launch Pad in that program, click the Remote Employer Access button. The button accesses the [Employer Lookup] window. Once an employer is selected or added, information on the employer is entered on the [Enter Remote Employer] window.


Note that when you add a company in the [Select Client Employer] window, you are adding the employer to the list of remote employers who have access to the software. Therefore, you must complete the information on the screen above; it will not be filled from your list of employers in the database.
You must add the information in this window because many employers will have more than one location (more than one Net Health Employee Health and Occupational Medicine Company). Think of the record you are entering in the window above as a kind of "parent" remote employer: in a subsequent screen, you will select the Companies that belong to this "parent". In some cases, this will be a single company and in others, multiple companies.
To complete the master remote employer setup:
-
SET CLIENT ACCESS CONFIGURATION
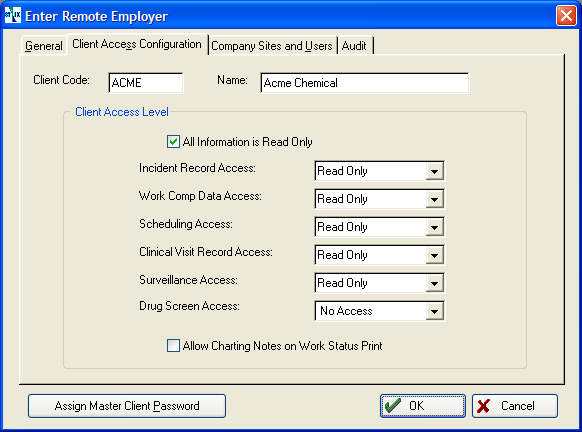
Click the CLIENT ACCESS CONFIGURATION tab.

If you want the employer to have read only access to all the options, check the All Information is Read Only box. That's all you need to do.
If you check the All Information is Read Only box, the default options for this remote employer will be read only, and the employer will have access to every element listed above.
If you want to restrict access to certain functions, UNCHECK the All Information is Read Only box, and click the down arrow to the right of each option and select the choice you want.
Note that only the Incident record access includes the option to add or change data. The idea here is that the employer could set up the incident while the employee is on his or her way to your clinic. (If this occurs, however, your front desk person, when prompted by the software to add an incident record, would need to say NO, and select the incident entered by the employer). The employer could also use the software to track incidents that do not require a visit to your clinic.
Each of the other elements offers either Read Only or No Access.
Click the Assign Master Client Password button at the bottom and enter a password. The Remote Employer Module has one administrative user "built in" for each client. The user code for that user is "client adm". A user who is logged in with that user code and the master client password is able to enter additional users for that client.
-
ADD COMPANY SITES
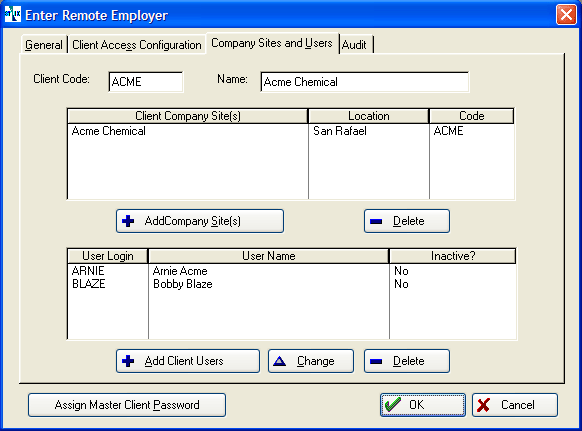
Click the COMPANY SITES AND USERS tab. In this window, you will add one or more employer locations, as explained above, as well as all the users from the remote employer who will access the data in the software.

To add sites to this employer, click the Add Company Sites button in the middle left of the screen above. The [Set Companies for This Site] window is displayed.

Using the slider bar in the center of the screen, find in the left pane, the company you want to add. Once highlighted, double click the company, or click the right arrow in the center of the screen to add it to the list of companies on the right. (These are companies that "belong" to the remote employer whose record you are setting up). When you have added all the companies, click the Close button.
Note that when you add a company to the [Selected Client Companies] pane on the right of the screen, the company will still show up on the left pane. If you want to remove a company from the right pane, the program will prompt you, "Are you sure you want to delete this Company?" If you select Yes, you are only deleting the company from the list of companies that "belong" to this remote employer. You are not deleting the company from the database. Note as well that if you delete the company from the right pane, it still is listed on the left.
-
ADD REMOTE EMPLOYER USERS
To add remote employer users for this employer (who would be employees in the client organization), click the Add Client Users button. Then, click the FUNCTIONAL ACCESS tab. Note this looks just like the window shown above on the CLIENT ACCESS CONFIGURATION tab where you set the maximum levels of access available to this client. Here, however, you are doing the same thing for an individual user within the Client organization.
Individual users cannot have more detailed access than is set up for the client. For example, if you have set the client organization to have No Access to a particular item, none of the users will be able to access that item. If you set up the client for Read Only access to a particular item, however, each individual user could be set up with either Read Only access or No Access to the same item.
Click the Assign Password button in the lower left corner and assign this user a password. You will need to instruct each user to change their password during their first logon. When they log in to the Remote Employer Module, instruct them to click the ADMINISTRATION tab and change the password.
Click the ORGANIZATION ACCESS tab. Here, you are establishing which client companies (i.e. locations) this user can access. If the employer has only one location, these choices will be grayed out and inaccessible.
Restrict User to Company enables the user to see the records of only that company (location).
Exclude User from Company enables the user to see records of all locations except the one specified here.
Default Login Company sets the company (location) to which this user is logged in each time they log on to view records remotely. (If they want to see other locations, they will need to select the Company, as explained below).
When you are finished adding users for this Remote Employer, click OK to close the window, then Close to exit to the Main Menu of the Net Health Employee Health and Occupational Medicine System Admin program.
|
|
If you are using the Web based version of the Remote Employer Access Module, you can allow the client master user to set up the other users for that client. This reduces your work load. Since you set the maximum access level for the client in each functional area, it in no way reduces your security. |