How to Set Up Medication Wizards
Certain steps are common to all Wizards, multi-step and specialty. They are not discussed here. If you have not already, read the topic How to Set Up Wizards.
Summary
Medication Wizards are used for two Template Elements, Current Medications on the PMH tab and Medications (new) on the ORDERS tab. Don't confuse the two. While there are functional similarities between the two, they server very different purposes. (Note: Also related are medication allergy Wizards.)

There are three types of medication Specialty Wizards:
Specific Medication: When selected from a template, it adds that specific med to the visit. Use this for meds which are selected with great frequency, such as Ibuprofen. Doing so eliminates the need to search for and select from an additional list.
Medication Category: This displays all meds which have been set up with the related Medication Class. These are convenient in that selecting that class for a new medication automatically adds the med to that Wizard with out any additional work by the user.
Pick Medication from List: This allows you to create custom lists of medications for any purpose. Use them to organize your medications in the way you find most efficient. Here are some examples:
-
Lists of favorites for individual providers.
-
One common use is to have separate Wizards for meds dispensed in-house or administered by the provider. These Wizards can be set up to automatically drop charges on the visit.
-
You might decide that the several analgesic Medication Category Wizards are cumbersome and create a list of meds which includes the most often used from all categories. You could, in fact, divide that list in to one for pain meds and another for pain with inflammation, etc.
-
Special purpose lists such as pediatrics, eye, or ear, each of which includes meds from all classes which are appropriate to the particular application.
Since this is an important point in setting up Net Health Employee Health and Occupational Medicine for maximum efficiency, let's repeat: You can create Pick Medication from List Wizards for any purpose you wish.
Free Text Entry and Standard Text Wizards can also be created on the two medications Template Elements.
Medication Orders have a field labeled Dispensing By, which determines how certain aspects of the order get handled. The choices are:
-
-
Prescription will create a Prescription record on the visit.
-
OTC will create an Order record.
-
Dispense In-House will create an Order record, and can be used to add charges to the visit. When this is selected, a field labeled NCD will appear where you can enter an NCD code.
-
Provider Administered will create an Order record, and can be used to add charges to the visit.
-
These same Dispensing By options can are set up in the individual Medication Codes record. If not set on the Wizard, the default value on the selected med code will be used.
Auto-Charge
For Medication Orders Wizards, when the Wizard Type is Specific Medication or Pick Medication from List, and Dispensing By is Dispensed In-House or Provider Administered, charges can be automatically added to the visit. This is done by using the Auto-Charge feature to link a medical activity to the Wizard or a medication choice on the Wizard. When the Wizard executes, the appropriate charge will be added to the visit.
|
|
To set medications for auto-charging, there must be a medical activity code record already existing for that medication. Furthermore, a related CPT code record is required, since that is where the charge is actually carried. Managing medical activity and CPT code setup is generally done by the clinic administrative staff. |
When the auto-charge box is checked during Wizard setup, an additional checkbox becomes available labeled Charge Patient Directly. If checked, when the charge is added to the visit, the patient will be bill regardless of the default payer for the visit.
It is not possible to enter a quantity with auto-charge, so careful setup of medical activities is required for accurate billing. Typically, a Dispense In-House item will be a container with a standard quantity which is given to the patient during discharge for later consumption. A medical activity needs to be created for that container with the price for the entire quantity (i.e. 1 bottle with 30 Ibuprofen.) On the other hand, a provider administered item will typically be a single dose given to the patient while in the clinic. Therefore, a medical activity is needed for the single dose with the price of a single dose. If one med could be dispensed in house or administered in the exam room, two medical activities would be needed, one for each purpose.
No known medications
Special Wizards can be created that indicate the patient has No Known Medications. This Wizard does two things that most Wizards cannot do: The information it collects is displayed on the RISK FACTORS tab of the Patient Demographics window and it is displayed above the Medications Problems List in the charting workspace. This Wizard does not add items to the Problems List. When a medication is entered on a later visit, the related message will be removed. (Note: Wizards can also be created with these two abilities for allergies and for an active or chronic problems .)
No Known Medication Wizard Setup
-
To set up a No Known Medications type specialty wizard, navigate to the [Select EMR Charting Wizard] window for Current Medications.
-
Click Add to display the [Set Up EMR Charting Wizard] form window.
-
Click Entry Type and select Standard Text.
-
Enter the Wizard Name.
-
Enter the text to be inserted in the charting note in the Use This Standard Text field.
-
For a No Known Medications Wizard check this box:

-
Click OK when done.
Set up medication Wizards
Here is how to enter each of the three types of medication Wizards:
-
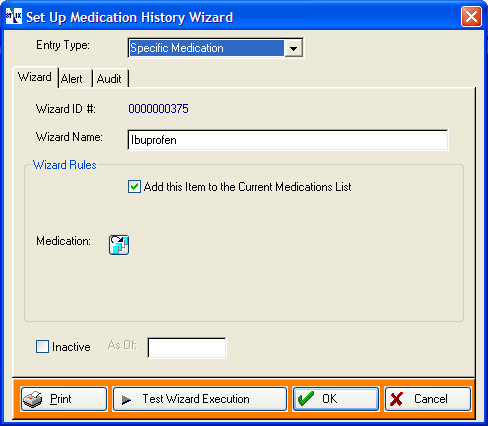
Specific Medication
Use this type step when you know the exact medication to use. To create a Specific Medication Wizard:
-
Enter the Wizard Name.
-
Select Specific Medication for the Entry Type.
-
Check Add this Item to the Current Medications List if you want that option available.
-
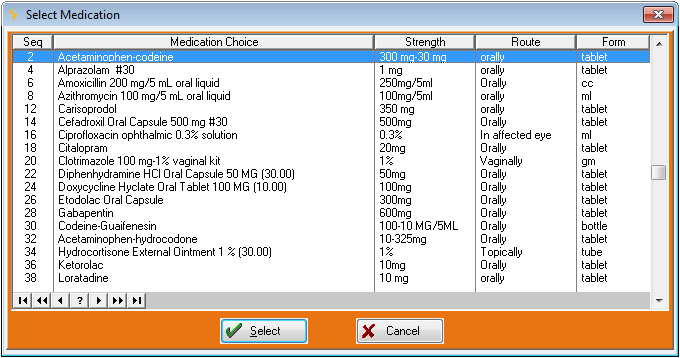
Click the table icon beside Medication to display the standard [Select Medication] window, which is a list of all meds in your Net Health Employee Health and Occupational Medicine medications database.
-
Search for and select the medication you want.
-
Depending on how they were originally selected from the Multum database, some meds allow you to change the strength at this point. If there is a Med Product button beside the Med Strength field, you amy optionally click it and select a different dosage.
-
If this is a Medication ORDERS Wizard (rather than a Current Medications Wizard on the PMH tab), optionally enter default information:
-
Select the Dispensing By from the drop-down list.
-
If appropriate, change the MDM Risk Level.
-
Indicate whether you want this to be added to the Medications Problems List by default.
-
If this is a Dispense In-House or Provider Administered med, optionally check Auto-Charge to automatically add a charge to the visit. If checked, then click the table icon beside the field and search for and select the medical activity to be added.
-
If Auto-Charge has been checked, then an additional checkbox opens labeled Charge Patient Directly. When this is selected on a visit, the charge will have an override to bill the patient directly.
-
Optionally, on the MED DEFAULTS tab, override the dispensing and sig information in the Medication Codes record for this med.

If you only want to change one field, you must still use them all. Net Health Employee Health and Occupational Medicine either uses this information OR the information in the Medication Codes record--it will not take some information from one source and the rest from the other.
-
-
Click OK when done.
-
-
Medication Category
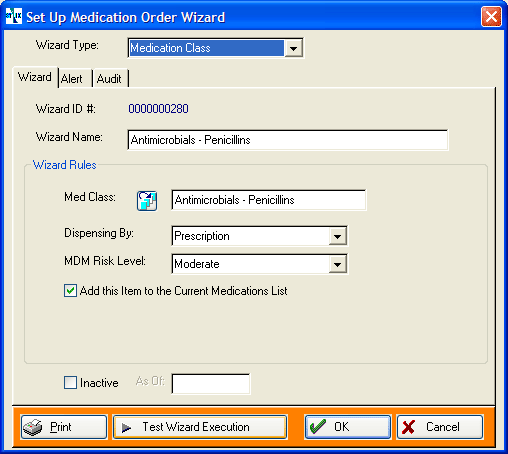
To set up a Medication Class Wizard:
-
Select Medication Class for the Entry Type.
-
Click the table icon
 beside Med Class to display the [Select Medication Class] window.
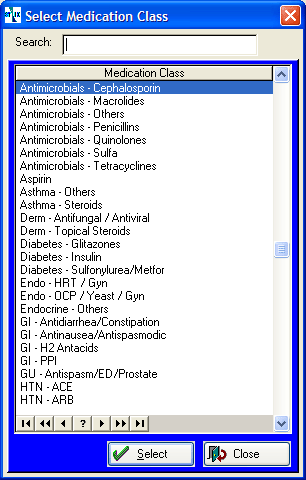
-
Search for and select the medication class.
-
For medication ORDERS Wizards:
-
Click the drop-down arrow beside Dispensing By, and select the appropriate method. The topic on Prescriptions and Medications discusses the differences among the dispensing options.
-
Click the drop-down arrow beside MDM Risk Level, and make the appropriate selection. This is used in calculating the E/M level of the visit. Since risk can vary based on the patient's history and condition, this MDM Risk Level can be changed by the provider when charting the visit.
-
-
If you want this medication to be recorded on the patient's current medications list by default, click the checkbox beside Add this Item to the Current Medications List. The user can optionally uncheck a box when the Wizard executes which will prevent putting this on the Medications List.
-
Optionally, click the ALERT tab to enter an Alert or Red Flag Warning which will be displayed when this Wizard executes.
-
If you want to see how this step will work, click Test Wizard Execution.
-
Click OK when done.
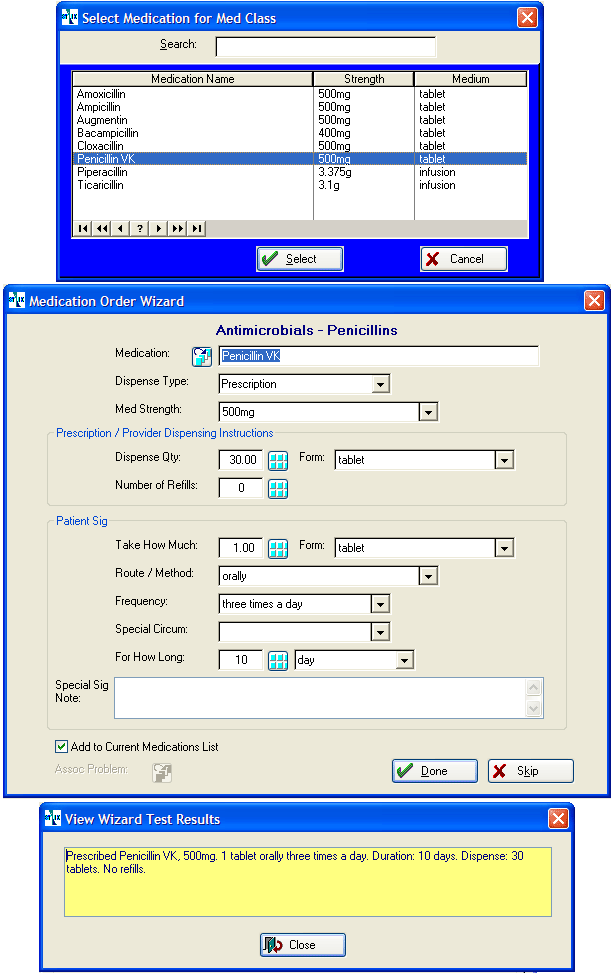
When the Wizard executes, the [Select Medication for Med Class] window will be displayed, showing a list of all medications for the class you indicated above. After the correct medication is selected, either the [Current Medications and Medication History] or the [Medication Order Wizard] window will be displayed. Here is an example of a medication order, including the text inserted in the charting note.
-
-
Pick Medication From List
There are two types of Medication from List Wizards, one that gets used for Current Medications on the PMH tab, and one that gets used for Medication Orders on the ORDERS tab.

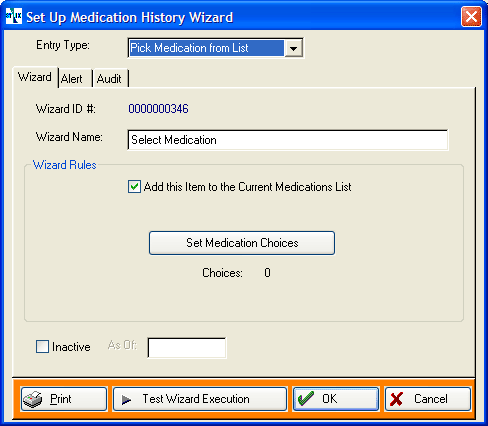
This type Wizard will display a custom list of medications for the user to select from. To enter a Pick Medication from List step:
-
Enter the Wizard Name.
-
Select Pick Medication from List for Entry Type.
-
Check Add this Item to the Current Medications List if you want that option available. The user will have the option of unchecking a box that will prevent this being added to the list.
-
Enter the list of medications available to the user:
-
Click Set Medication Choices to display the [Wizard Step Choices] window. Empty initially, it will show the list of meds as you build it.
-
Click Add to display the standard [Select Medication] window, which is a list of all meds in the system.
-
Search for and select the medication you want.
-
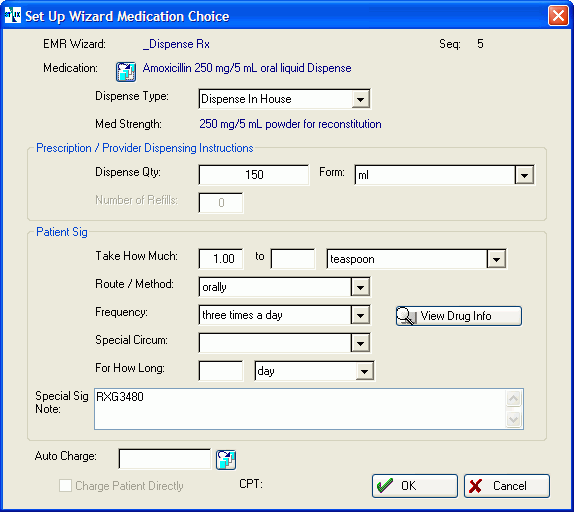
For a Medication Order Wizard:
-
Enter Dispense Type. (Note: If this field is set to Dispense In-House, a field for an NDC code will appear. If you use MD Scripts for an in-house ordering system, enter the NDC code use by that system.)
-
Some medications allow you to change the dosage at this point. If there is a Med Product button beside the Med Strength, you may optionally click it and choose a different dosage for this Wizard.
-
Enter Dispensing Instructions and Patient Sig.
-
Optionally, if the Dispense Type is Dispense In-House or Provider Administered, enter a charge to be added to the visit by clicking the table icon beside the Auto-Charge button in the bottom left of the window. Then, search for and select the medical activity.
-
-
On the [Set Up Wizard Choice] window, you can change the label displayed or enter an Alert or Red Flag Warning which will be displayed when that medication is selected..
-
Click OK.
-
Repeat steps b. through e. until you have the full list.
-
To change an item, highlight it and click Change. This will display the [Set Up Wizard Choice] window where you can change the label displayed or enter an Alert or Red Flag Warning.
-
Optionally, use the
 buttons to arrange the list in the order you want.
 -
Optionally, for a Medications Order Wizard, enter the Medical Decision Risk Factor used in E/M calculations, if appropriate.
-
Click Close when done.
-
-
Optionally, click the ALERT tab to enter an Alert or Red Flag Warning which will be displayed when this Wizard executes..
-
If you want to see how this step will work, click Test Wizard Execution.
-
Click OK when done.
-
|
|
Read the topic on Managing Prescriptions and Medications to learn more about using the different types of Wizards to organize medication selection. |