Summary
The Surveillance Profile is the window that displays when you click the SURVEILLANCE tab in the Patient Chart. Its purpose is to display in categories all the services that you provide for your employees, as well as medical conditions and related items, so that you can easily look up information. The Profile provides a customizable list of medical activities; medical conditions including illnesses; wellness measures; labs data; and exposure history, including current job exposures (noise, blood, etc.).
The lists on each tab all work the same way: the latest information available on the employee is displayed on the first screen, with all details related to each item a double click away. Someone in your organization set up the surveillance profile when you first went live with your Net Health Employee Health and Occupational Medicine software, to display the items you administer most often. Each list is a template that enables you to standardize what you want to view for each employee. While it is seldom necessary to do so, you can easily alter the items that are displayed on each tab and/or you can change the position of the items in the list. For detailed instructions, see Altering the Surveillance Profiles.
Keep in mind that the Profiles display data for the items specified on each list. The data may be entered in a completely different part of the program, such as in a visit or incident record. If the item is on the profile, it will be displayed here without your having to enter it in two places!
How to access the Surveillance Profile from the Home NAV bar
-
On the Home Nav Bar CLINIC tab, click the Patient Chart button.
-
Search for and select the desired employee.
-
Click the SURVEILLANCE tab in the Patient Chart.
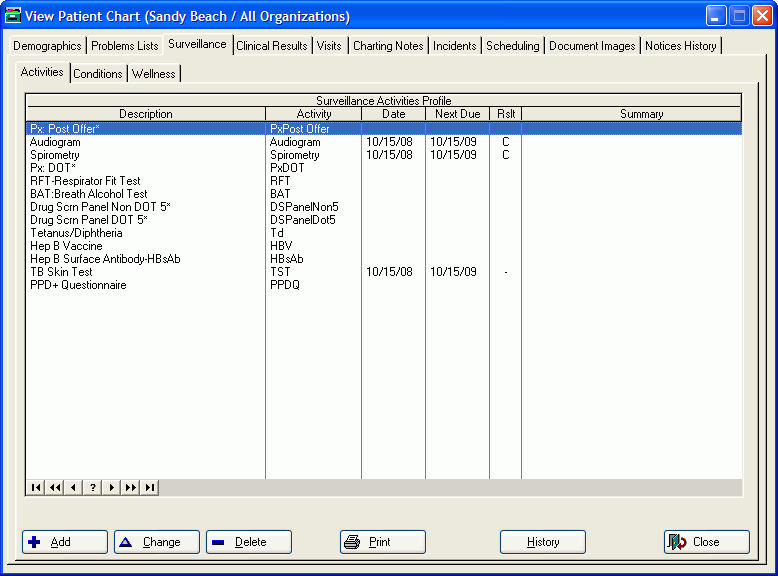
View a Sample Surveillance Profile

The Universal, Company and Job/Location Profiles
You may set up and use three different Surveillance Profiles: the Universal Surveillance Profile, the Company Surveillance Profile, and the Job/Location Surveillance Profile. The purpose of the different profiles is to enable you to distinguish different groups in your organization, and display different items on the profiles for each group.
If you basically track the same or almost the same things for everyone, you will do fine with just a single Universal Profile; you don't need to take the time to set up anything else.
If you have different jobs or locations that require special surveillance -- such as everyone who works in a particularly hazardous job or work area -- a job or location profile may be useful.
![]() To have a profile for a Company or Job/Location, you must be able to distinguish the company or job or location in the Employee Demographic record, which is fed from your Human Resources system. If your HR system can identify the particular company, job or location, then this will work well for you. Each time you run the Employee Demographics upload, the program will update the records with this information. If your HR system cannot identify all the people who work in a particular company, job or location, it is highly unlikely that you will be able to do so reliably without having to manually enter the location into the Employee's demographic record. Of course, if surveillance for a particular group is important, you may elect to do this.
To have a profile for a Company or Job/Location, you must be able to distinguish the company or job or location in the Employee Demographic record, which is fed from your Human Resources system. If your HR system can identify the particular company, job or location, then this will work well for you. Each time you run the Employee Demographics upload, the program will update the records with this information. If your HR system cannot identify all the people who work in a particular company, job or location, it is highly unlikely that you will be able to do so reliably without having to manually enter the location into the Employee's demographic record. Of course, if surveillance for a particular group is important, you may elect to do this.
When to Use Which Type of Profile
|
PROFILE |
Use this type of Profile when... |
|
Universal |
This is what is typically used on occupational health clinics. It provides the activities which you want to know the status of in a glance. It should have the most common activities you do for clients for which the current status is particularly important, such as drug screens, Hep B vaccine and titer, TB Skin Test, etc. If you are only going to use one type of Profile, it will be the Universal Profile. |
|
Company |
If you have a company which wants to track different activities, you can create a special Company Profiles. |
|
Job/Location |
You have multiple jobs or departments for which you are tracking data, AND the data tracked varies by job or department. If the data tracked is the same for all jobs/locations, you do not need to set up any Job/Location Profiles. |
Each of the tabs in the Surveillance Profile displays different information, but each tab works the same way: the latest information on file for the employee displays in the window. Where applicable, clicking the HISTORY button accesses any previous administrations or instances of a highlighted item. Each window also includes relevant codes (such as TB skin test), the code description (TST - TB Skin Test), a relevant date (e.g. administration or reading), the specified result code User-definable code that indicates the status of a particular medical activity. For example, a result code of 1 may indicate the first dose of a multi-dose immunzation, or it may indicate a PPD was placed but not yet read. and, in the case of activities, the Next Due Date. The ACTIVITIES, CONDITIONS AND WELLNESS tabs also include a Summary column that displays a short user-entered note.
The paragraphs below briefly describe each of the windows and provide links to more detail about them.
ACTIVITIES tab:
This tab provides a single place where you can view key information about the status of each service you offer or track for your employees. It's the most commonly referenced window in the Surveillance Profile, which is why it is the first one displayed. For more information, see Surveillance Profile Activities Tab.
CONDITIONS tab:
This tab displays the latest information related to infectious diseases and other medical conditions. Here is where you could look up whether an employee was immune or susceptible to a particular disease, or whether they have a medical condition, such as diabetes, that might need to be managed by them.
When properly set up, titers from the ACTIVITIES tab of the profile can automatically update the illnesses in the CONDITIONS tab, thereby saving you having to enter essentially the same information twice. Information from these illnesses and titers is used to generate lists of susceptibility during the threat of an outbreak. For more information, see Surveillance Profile Conditions Tab.
WELLNESS tab:
This tab displays a list of "wellness measures", such as weight, cholesterol, BP, etc. If your organization administers a formalized Wellness Program, this tab can be very useful. If you simply want to track one or two measures, such as BP and Smoking, for example, you could just as easily include these items on the Activities tab, so as to avoid the additional mouse click required to access the Wellness tab. The wellness measures are a type of medical activity. For more information, see Surveillance Profile Wellness Tab.
How to print a single Medical Activity
The program has the ability to selectively print any medical activity result, based upon a date range. Selecting a single date will cause a single result to print, while selecting a range of dates will include all results for that time period.
-
Open the patient's chart.
-
Click the SURVEILLANCE tab.
-
Highlight the activity.
-
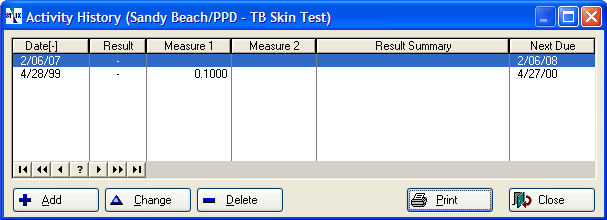
Click History to display the [Activity History] window:

-
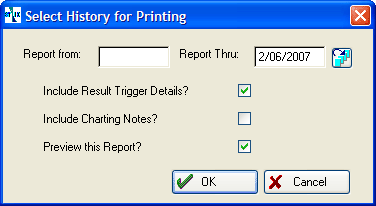
Click Print to display the [Select History for Printing] window.

-
Enter the From and Report Thru dates.
-
Check Include Result Trigger Entry Details to print Dosing details Dosage, units (e.g. cc's), drug company, lot number, expiration date, injection site .
-
Check Include Charting Notes to include notes entered directly on the medical activity. (It is unlikely you ever do this. If you have a lab interface which has returned results for this activity, you might have charting notes created by the interface.)
-
If you check Print Preview, you will preview the report, and then have an opportunity to send it to the printer. If you don't check it, the report will go directly to the printer.
-
Click OK. the program will list every instance of this medical activity in the indicated date range.