Surveillance Profile: Activities Tab
Please read the Surveillance Profile Overview if you haven't already done so. If you want to know how to set up a Profile from scratch, see Surveillance Profile Set Up.

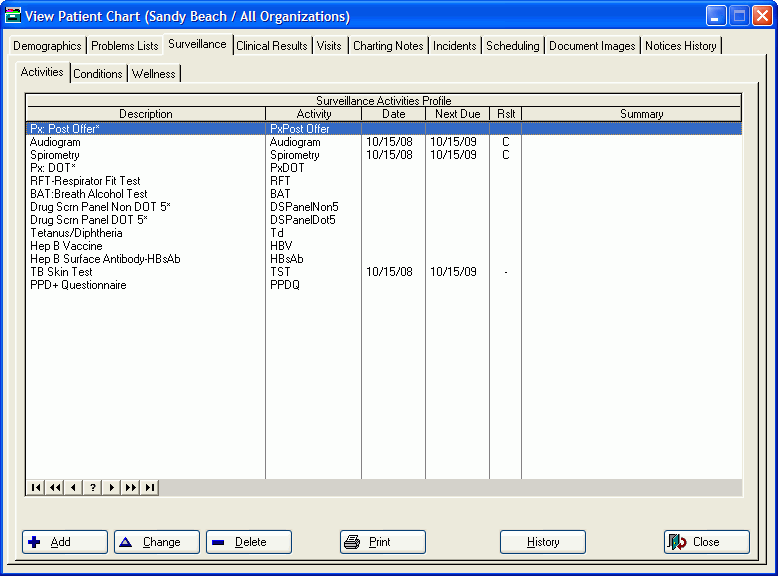
The window shown above provides a single place where you can view key information about the status of each service you offer or track for your employees. It is the most commonly referenced window in the Surveillance Profile, which is why it is the first one displayed.
The first column displays the medical activity code related to the service, and the second column displays the associated code description. The third column displays the latest date that each service was administered. If this column is blank, it means that you have no data in the software about this item for the selected employee. The next column (Rslt) displays for each activity, its corresponding Result Code. Finally, the right-most column displays the Next Due Date Date the employee is due for a particular medical activity .
The list itself cannot be changed from the [Surveillance Activities Profile] pane of the [Employee Chart] window; it is changed in the System Setup part of the software. If you would like to change the items that display on this Activities profile, see Altering the Surveillance Profile. You must have access to setting up codes and protocols to be able to work with setting up the Surveillance Profile. See User Access Rights Defined for more information on access rights.
How to document a new administration of one of the items in the profile.
-
Highlight the item and click the Add button, or press Alt-A on your keyboard. Depending on some parameters set up in the system, you may or may not get some screens prompting you to log a visit.
-
If you do NOT want to log a visit, click Cancel, then click Yes. Skip to Step 2.
-
If you DO want to log a visit:
-
-
Click Log A New Walk In Visit.
-
Search for and select the appropriate Visit Category A classification of visit types for purposes of (a) tracking utilization of your department; (b) determining what screens and buttons to display in the visit record; and (c) defining treatment protocols for physicals. If you are part of an Occupational Health Clinic that is using STIX for billing, the Visit Category also determines how the visit will be billed then press the TAB key.
-
Click OK and go to Step 2.
-
-
If you want to search the schedule or add the item to an existing visit, follow the screen prompts to do so.
-
-
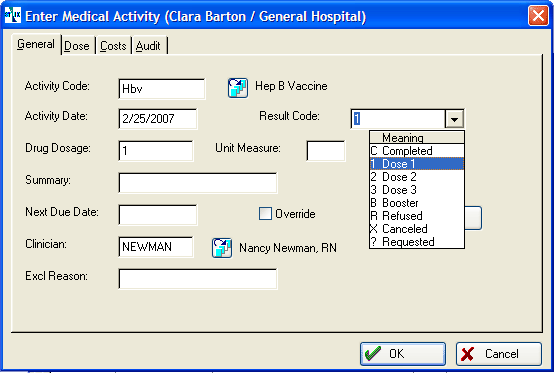
The following window opens:

-
(Note that in this screen shot, the code meanings are displayed because the down arrow to the right of the Result Code field was clicked prior to taking the shot.)
Enter the appropriate data. Depending on the item you are documenting, you may be prompted to enter additional information, such as dosage and lot number.
-
ClickOK.
How to View History
To see all the previous administrations of any item (i.e. its history):
-
Click the desired item to select it
-
Click the History button. The [Activity History (Employee Name/Activity Name)] window opens.
-
On the [Activity History] window, if you want to see additional detail, double click the item you want to review.
-
When you are finished reviewing the item, click OKthenCloseto return to the Profile.