Patient Chart: Clinical Results Tab
Summary
The CLINICAL RESULTS tab of shows all activities entered on visits for the patient. If the All Orgs box on the right of the window is checked, you will see activities from visits of all types (Employer Services, Workers' Comp, Private Practice) and from all employers. If it is not checked, you will see only activity from a single employer or for Private Practice. The title bar of the window shows either the current company name, "Private Practice" or "All Organizations".
The tab is divided into 6 sub-tabs. The All Activity sub-tab shows every medical activity on every visit by this patient. The other 5 show just a single activity or category of activity:

Print all Activity History
Select the print button to create the Patient Medical Activity History report.
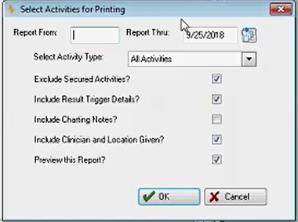
- Report From and Thru:Enter the date range for the report.
- Select Activity Type: Select the Activity Type from the drop down menu choices. You may limit the activity type with your selection, "All Activities" is the default.
- Include Result Trigger Details?: Select this option to have the report list the Result Trigger Details.
- Include Charge Notes?: Select this option to include Charge Notes in the report.
- Include Clinician and Location Given?:Select this option to list the clinician's first, middle, and last name, suffix, and the location that the medical activity was given for every medical activity on the Patient Medical Activity History Report. If nothing is entered on the medical activity for clinician or location given, then these fields will appear blank after"Clinician" and "Location Given" on the report.
- Preview this Report?: Select this option to preview the report prior to printing.
Select the Activity type and choose what you want to include / exclude. To see the report before printing, check the preview box. Click OK
Each of these sub-tabs has a layout that shows details for the specific type of activity. For instance, the VITAL SIGNS sub-tab has columns for height, weight, pulse, etc. If there are at least two vital signs records for the patient, they can be graphed.

A trend report can be displayed for audiograms and pulmonary function tests.
Activity on these windows is displayed in reverse chronological order, making it easy to see changes over time.
The LABS tab
This tab is completely different from the other tabs. We call it the Labs Matrix Profile and it works in the same way as the Surveillance Profile. That is, instead of a listing of all lab activities from all visits for this patient, it has a predefined list of labs. For each one, the profile shows the date and result of the most recent test. For a typical patient, many if not most of the activities will show no results at all, but you will still see the entire list. Read The Labs Matrix Profile to learn more.
The list of labs on this tab is controlled by the user. Read Lab Matrix Profile Setup to learn more.
Data Entry on the CLINICAL RESULTS tab
While the primary purpose of this tab is for viewing activity, it is possible to do some data entry. From this window, you can:
-
Enter historical medical activity information for an employee (such as their status for childhood diseases) for which a visit will not be logged;
-
Enter lab results for specimens taken during a visit (or from outside providers);
-
Generate a report listing all activities, or a subset of medical activities and results for the employee, such as might be requested for an immunizations record.
![]() This tab only provides access to medical activity data. If the data were entered as part of logging a visit, the visit record is not visible from this window, but could be viewed on the VISITS tab of the patient chart.
This tab only provides access to medical activity data. If the data were entered as part of logging a visit, the visit record is not visible from this window, but could be viewed on the VISITS tab of the patient chart.
The columns of the CLINICAL RESULTS tab are explained below:
|
Column |
What's in the column |
|
Date |
Date activity was requested or performed (you can tell by looking at the result code). |
|
Activity |
Medical activity |
|
Rslt |
The result code entered for the activity |
|
Result Summary |
Content of the Summary field of the visit record |
|
Next Due |
According to the rules that your organization set up in the software, this is the date the activity should next be administered |
![]() When you add data to this CLINICAL RESULTS tab, the sequence of screens that opens depends on two variables:
When you add data to this CLINICAL RESULTS tab, the sequence of screens that opens depends on two variables:
-
Whether or not your system parameters Options selected in the System Setup part of STIX that determine how certain functions operate in the software. are set to require visit logging; and
-
Whether or not you want to log a visit.
Based on these two variables, the procedures defined below encounter one or more of the following three screens. The screens are displayed below so that you can (a) read them carefully and (b) know what screen or prompt is being referenced in the procedures that follow. (If you try the instructions in the program, what seems complicated in writing will become clear, and you will see how your system is set up!)
-
If your system parameters are set to require visit logging, you will see these screens when you add a medical activity to the CLINICAL RESULTS tab:
-
-
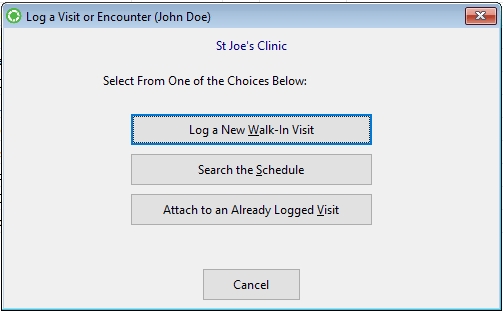
This is the Log a Visit or EncounterPrompt:
-
-
-
If you click the Log A New Walk-In Visit button, the abbreviated Enter Visit window is displayed, followed by the [Enter Medical Activity] window.

-
If you click the Search the Schedule button, the [Employee Scheduling] window is displayed. This window lists all scheduled appointments for the employee whose chart you are working in. Once you select the desired appointment (to log a visit), the abbreviated [Visit Entry] window is displayed, followed by the [Enter Medical Activity] window.
-
If you click the Attach to an Already Logged Visit button, the [Employee Visits] window is displayed. This window lists all previously logged visits for the employee whose chart you are working in. Once you select the desired visit (to which you will add the medical activity), the [Enter Medical Activity] window is displayed.
![]() Note that each of the selections above leads you to the [Enter Medical Activity] window eventually! This is the window into which you will enter the details of the medical activity that is the subject of these procedures!
Note that each of the selections above leads you to the [Enter Medical Activity] window eventually! This is the window into which you will enter the details of the medical activity that is the subject of these procedures!
-
If you click Cancel, the warning below appears.
- This is the Log A VisitWarning
-
If you click Yes, the [Enter Medical Activity] window opens, and a visit is logged
-
If you click No, you are returned to the CLINICAL RESULTS tab, where you started.
-
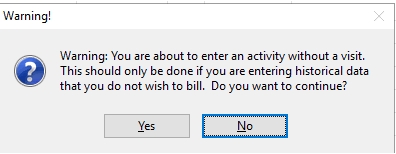
If your system parameters are set to not require visit logging, when you attempt to add a medical activity to the CLINICAL RESULTS tab, you will see the question below:
-
-
This is the Log A VisitQuestion:
-
-
If you click Yes, the [Log Visit or Encounter] prompt will be displayed, and the subsequent choices will follow those outlined above.
-
If you clickNo, the [Enter Medical Activity] window will open.
When you should log a visit
The principle to follow is to have your database reflect what happened in reality:
-
You should ALWAYS log a visit if the employee came into the clinic.
-
If you are entering results for a test that was administered to the employee at a previous visit, you should add a NEW activity with the date that you received the results, and include the appropriate result code. You should NOT log a visit for the date you received the results, since the employee did not come into the clinic.
-
If the employee DID come into the clinic, as would be the case with a TB skin test reading, for example, you WOULD log a visit with the appropriate TB skin test result code, so that your Visits Log and Visits Analysis Report is correct.
What do you want to do?
Record a new medical activity
In Occupational Health and Urgent Care clinics, adding activities from this point is virtually never done.
-
Click the Add button.
-
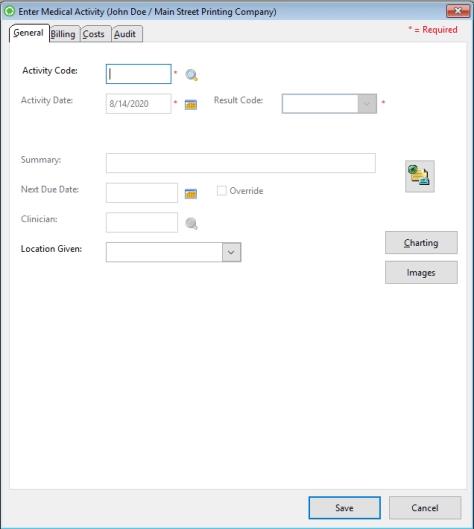
Follow the subsequent screens, as above, until you reach the [Enter Medical Activity] window.
-
Either enter the code for the medical activity you want (e.g. TB skin test), OR click the icon to the right of the Activity Code field, and find the desired medical activity on the table.
-
Press the TAB key.
-
Enter the Activity Date, if needed.
-
Enter the result code OR click the down arrow to the right of the Result Code field, and select the appropriate code.
-
Complete additional fields as needed.
-
Click OK to close the window and return to the CLINICAL RESULTS tab.
Change a medical activity
![]() If you follow the principle of having the database reflect what happened in reality, the only time you would change a medical activity result code would be if the original result code that was entered was incorrect!
If you follow the principle of having the database reflect what happened in reality, the only time you would change a medical activity result code would be if the original result code that was entered was incorrect!
-
From the CLINICAL RESULTS tab, highlight the activity.
-
Click the Change button.
-
Make all necessary modifications.
-
Click OK.
Delete a medical activity
![]() Use Delete only if the activity was entered in error! If the activity has changed in some way, use the Change function to update it.
Use Delete only if the activity was entered in error! If the activity has changed in some way, use the Change function to update it.
-
From the CLINICAL RESULTS tab, highlight the activity.
-
Click the Delete button.
-
Click OK.
-
From the CLINICAL RESULTS tab, highlight the activity.
-
Click the Change button.
-
Make all necessary modifications.
-
Click OK.
Correct an Entity
In order to correct a Medical Activity that was entered on the Wrong Patient's Chart, the Audit tab has a Correct Entity button:
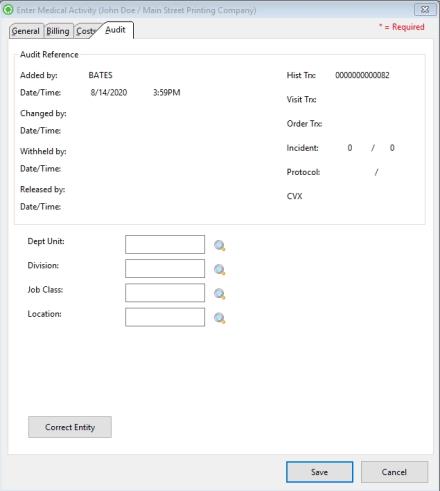
The Correct Entity button is only available if the Medical Activity is NOT related to a Visit. (If the Medical Activity is related to a Visit, the Correct Entity button on the Visit Entry Window should be used instead).
When users clicks on the Correct Entity button, a window will display,
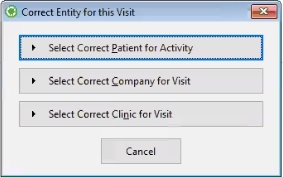
Users have the option to choose correct Clinic, Company, or Patient/Employee for the Activity. The user will be prompted with a warning that they are about to change all associated records. Select Yes to process your change; No will effectively cancel your request.
Print a Medical Activity History report
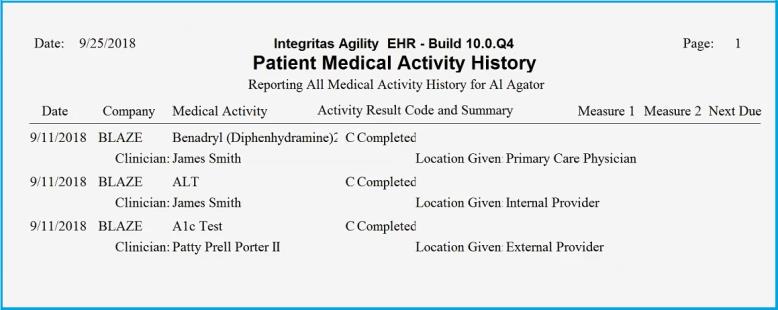
This function allows you to generate a report of all or a subset of the medical activities on the list. The Employee Medical Activity History report presents the results of all medical activities. This report could be used to give an employee his or her immunization history, for example. For each activity on the report, the report identifies:
Date activity was administered.
The type of medical activity.
The activity result code and summary (if one was added).
Relevant measures, if added (e.g. blood pressure reading).
The Next Due date, if you have set up the software to repeat the activity routinely.
To print the report, follow these steps:
-
From the CLINICAL RESULTS tab, click the Print button.
-
Enter Report From and Report Thru dates.
-
Click the drop down arrow and highlight one of the following activity types to print (these categories come from the medical activity setup screen, and represent the categories into which all medical activities are classified. A medical activity can be only one of these types).
-
-
All Activities
-
Screens and Tests
-
Vaccines and Meds
-
Physicals and Assessments
-
Health and Wellness
-
Misc Med
-
Administrative
-
-
Check all relevant boxes.
-
-
Exclude Secured Activities? If a medical activity has been set up as requiring HIV Access or Drug Screen Access, it will be excluded from the printed list if this checkbox is checked.
-
Include Result Trigger Details? If you want to include the dosing details Dosage, units (e.g. cc's), drug company, lot number, expiration date, injection site , check this box.
-
Include Charting Notes? Check this box if you wish to include the charting note, if one was written and entered into the [Enter Medical Activity] window.
-
Preview this report? If you check this box, you will preview the report, and then have an opportunity to send it to the printer. If you don't check it, the report will go directly to the printer.
-
-
Click the OK button. The report either goes directly to the printer, or displays in preview mode, depending on your selection above.
View a Trend report for Audiograms or Pulmonary function tests
-
Click Trend.
-
On the pop-up window, enter the date range and variables for the report.
-
Click OK.
Graph vital signs
Set up the Labs Matrix Profile
To print a single medical activity, such as the most recent TB skin test result, see the Surveillance Profile topic.