Documenting Vision Testing
If you haven't already done so, please read Clinical Results Overview, Patient Check-Out Overview, Visit Activities Overview, and Set Up Trigger Entry for Vision Testing before continuing! Also, read How to Change Vision System Parameters.
Summary
This topic addresses how to document the full details of vision testing. If you administer vision tests, but you either do not document any results, or you document only the final result of the test, then this topic is not for you! The Vision Test medical activity requires special setup to enable the entry of detailed results.
Steps to Document Vision Testing
-
Reopen the visit record.
To reopen a visit from the Home Nav Bar:
-
Click Visits by Employee on the Home Nav Bar.
-
If you did not just schedule a follow-up appointment, search for and select the Employee.
-
If you did just scheduled an appointment, the same employee will be displayed on the window Select Employee. Click OK.
-
To reopen a visit from the Appointment Calendar.
-
Click Today's Scheduling.
-
Find the patient and double-click to open the visit.
- OR -
-
Find the patient on the calendar.
-
Double click to open the visit
-
-
Click the Charges button on the right side of the [Enter Visit] screen.
-
Highlight the Vision Test and click Change.
-
Select the RESULTS tab.
-
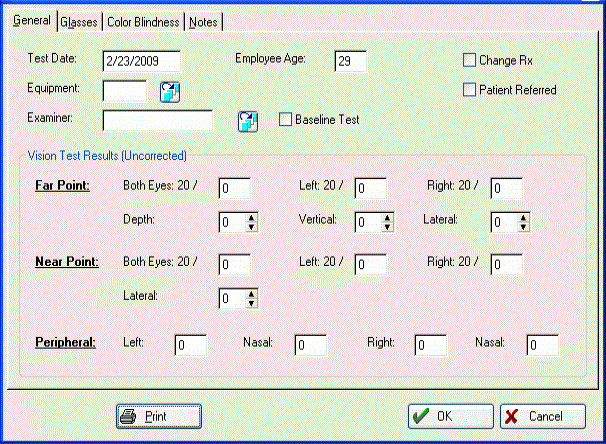
Click the down arrow to the right of the Result Code field and select the appropriate result code, or click the Test Info button. The GENERAL Tab of the [Enter Vision Test] window will be displayed.

-
Confirm the Date, and enter the patient Age.
-
Click the table icon
 beside the Equipment field and select the one used for this test.
 -
Select the Examiner from the field drop-down box.
-
If this is a Baseline, check that box.
-
Enter the detailed test responses.
-
The Near Point entries indicate the distance at which the test was taken. This number is a default entered in Vision System Parameters.
-
-
If this test was for corrected vision, click the GLASSES tab, check the appropriate box, and enter the results for the corrected vision test.

-
If you conducted a color blind test, click the COLOR BLINDNESS tab and make the appropriate entries.

-
The defaut entries on this tab can be set in Vision System Parameters.
-
-
Click Print to generate a Vision Test Results form.
-
The Print button has additional options to Fax, Email, or create a PDF. When the Print button is selected, the top right of the software window will display the new options. Further information about how to create a PDF for a special report can found at Printing Reports to PDF. Further information about how to create an Email or Fax for a special report can be found at Faxing and Emailing Reports .
-
Click OK when done.