Set Up Billing System Parameters
Summary
System Parameters determine how certain functions work in the software. They include a number of parameters organized on tabs. There is also a button to allow you to set up faxing and e-mail directly from within the software.
To reach the Billing System Parameters screen:
-
On the Home Nav Bar
-
Select Setup/Admin.
-
Select Billing Setup.
-
Select Billing System Parameters
Billing System Parameters Tabs
General tab
The first tab, labeled General, provides several settings that govern the behavior of the program for invoicing and payment collection. This tab controls how the Billing Program operates when more than one treatment site or clinic is being processed. You also set up your identification numbers and global remittance address.
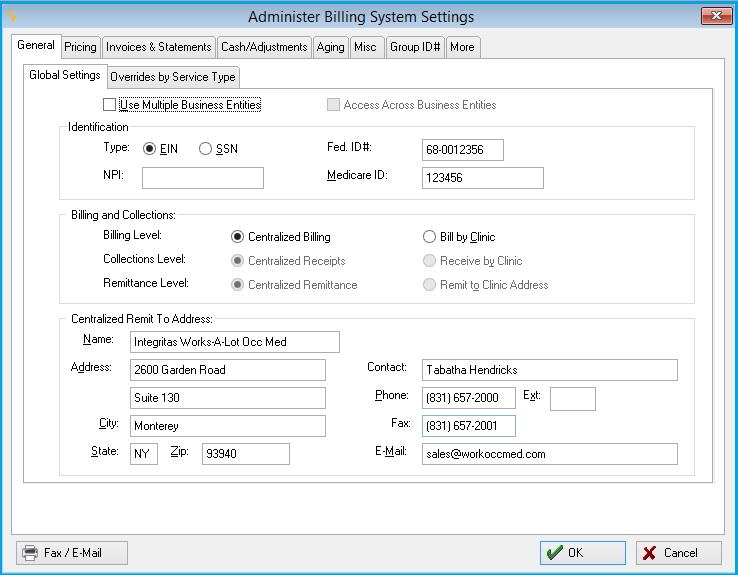
Global Settings Sub Tab
Identification section
The first section of this tab allows you to enter a tax identification number and Medicare ID number / UPIN. If you are doing centralized billing, the Tax ID number will be used on your employer and patient invoices, and it will appear on insurance billing forms, provided you have not entered a different Federal ID number in your clinic record. (If you have entered a Federal ID number in the clinic record, that number will always be used.)
-
Type: You can have the Tax ID number print in either the federal Employer ID Number (EIN) format or the Social Security Number (SSN) format. This number will print in box 25 of the CMS-1500 or box 5 of the UB-04. Indicate your choice here.
-
Fed ID #: Enter the actual ID number.
Since 2007, all providers have been required by HIPAA to use the National Provider Identifier (NPI) on health care claims. This is where you enter the organizational NPI for your clinic or organization. (You can enter provider-specific NPI's when you set up each individual provider record as well.)
-
NPI: Enter your National Provider Identifier.
-
Medicare ID: Enter your Medicare ID, if needed.
The Medicare ID number or UPIN is used in two situations. First, if you are printing a CMS for a Medicare patient, it will print in box 33 of the CMS 1500 for those claims. Second, if you are using UB-04 bills with centralized billing, and you have chosen to print the Medicare ID number in box 51 as the provider identification, this number will print on the bills. The only exception will be if there is a Medicare ID or UPIN set in the clinic record or provider / physician record. A clinic, provider or physician Medicare ID or UPIN will always override this number when printing bills.
A note about CMS-1500 identification numbers! The program produces the CMS-1500 for Workers Comp, Private Carrier Group Health, Medicare and Medicaid types of billing. Because of the differences required for printing various identification numbers on the different types of CMS bills, the provider and group identifications that print in boxes 33 and 17a, and column 24K come from the individual provider and referral physician records.
The primary physician identification number for box 33 should be set up as the PIN number in the individual Provider record, the Medicare ID should be set up in the UPIN field in the Provider record, and the Medicaid ID should be set up in the Medicaid ID field for the Provider. The Tax ID number in this parameter record only affects box 25, and the Medicare ID number is not used on the CMS-1500.
Billing and Collections Section
The second section has three parameters that control centralized versus decentralized billing and collections. The first governs invoicing. The next two parameters in this group govern the collections process. While closely related, these are two distinctly different parameters.
-
Billing Level:Governs invoicing. If you are billing for multiple treatment sites, you must decide whether you will be generating invoices centrally or on a clinic by clinic basis. Centralized billing means that employers will receive invoices for contract services on a single invoice, combining services from all treatment locations. "Centralized" does not necessarily refer to a physical location. To Bill by Clinic means that each clinic will always produce its own set of invoices separately.
Because of the nature of insurance billing, insurance bills will be generated individually by visit, regardless of this parameter setting. However, invoice batches will always be created separately if you elect to bill by clinic. If you elect to bill by clinic, you may enter separate federal identification numbers for each clinic, and these will print on the invoices.
-
Collections Level: Controls how cash receipts are to be batched. Collecting by clinic forces you to create separate Cash Receipts / Payment batches for each clinic-only open invoices for the currently selected clinic will be available to select. You would do this normally if checks are being received in separate locations, if you have separate lock boxes, etc.
-
Remittance Level: Tells the program what address to print on the bills. If you remit by clinic, then the individual clinic address will print in the remittance portion of the bill. Otherwise, the global remittance address will be used (see below).
If you set the Billing Level to centralized, the program will automatically set the collections and remittance parameters to be centralized also. However, it is perfectly acceptable to elect to bill by clinic and collect / remit centrally, and it is possible to bill and collect by clinic with a central remittance address. (This last option may not be feasible in practice, however.)
Centralized Remit To Address Section
The last section of the General tab in the System Parameters setup allows you to type in the centralized remittance address to print on your bills and statements. These will print in the appropriate places, depending upon the type of invoice or statement. For employer billing, direct patient billing or monthly statements, the remittance address will print at the top of the form, positioned to line up with standard window envelopes. For insurance billing, it will print in the appropriate box. (For example, on the CMS 1500, this will be box 33.) the program will ignore this address if you are remitting by clinic.
Overrides by Service Type Sub Tab
The program provides the option to enter separate remittance addresses for each of the types of billing, Employer Services, Workers' Comp, and Private Practice / Urgent Care.
Employer Services Sub Tab
Enter the remittance address for all invoices and statements sent for Employer Services. If this is to over ride the Global setting check the box next to "Always use this Remittance Address for Employer Services Invoices and Statements.
Work Comp Sub Tab
Enter the remittance address for all invoices and statements sent for Workers' Comp Services. If this is to over ride the Global setting check the box next to "Always use this Remittance Address for Workers' Comp Invoices and Statements.
Private Practice Sub Tab
Enter the remittance address for all invoices and statements sent for Private Practice Services. If this is to over ride the Global setting check the box next to "Always use this Remittance Address for Private Practice Invoices and Statements.
Business Entity Options
If your organization is licensed for multiple business entities, you will have a slightly different set of options. You must first check the box labeled Use Multiple Business Entities. If you want to allow consolidated reporting across all business entities, check the next box, Access Across Business Entities. Finally, instead of Centralized versus Clinic billing, receipts and remittance, you have the option of billing, cash receipts and remittance either by Entity or by Clinic.
Centralized billing, collections and remittance is the way most organizations handle billing and A/R, unless they manage separate billing offices or separate lock boxes for remittance. If you have separate billing offices or lock boxes, and you are not licensed for multiple business entities, you should set the billing option to be handled by clinic. Likewise, if you have separate lock boxes or remittance addresses for each clinic site, you should set collections and remittance options to be by clinic.
Remit To Address
Pricing tab
Pricing method and fee schedules
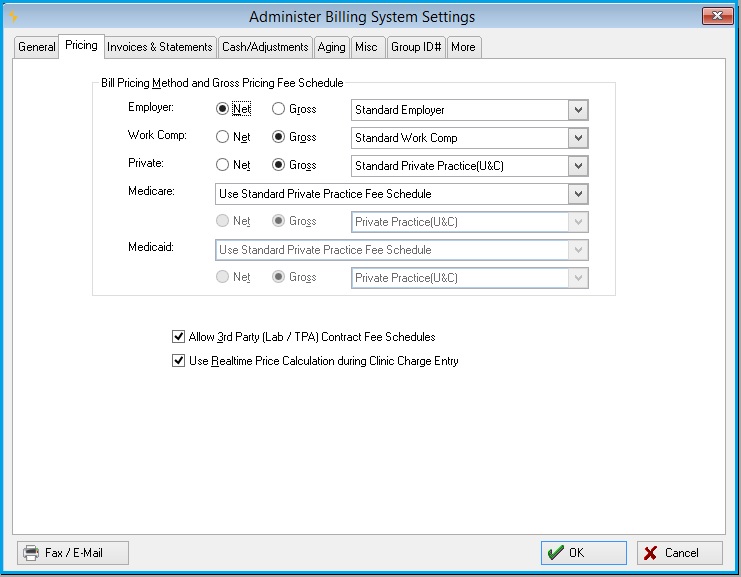
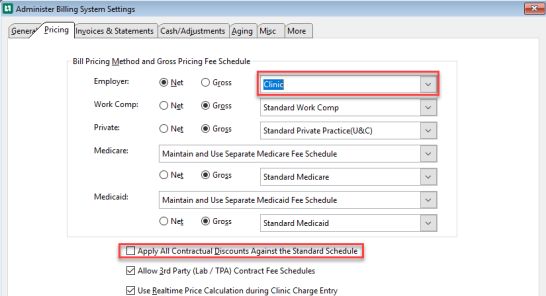
The Pricing tab of the Billing System Parameters window is where you specify gross or net pricing, and which fee schedule to use, for each general type of service - Employer Paid services, Workers Comp services, and Private Practice.
-
Employer: Net pricing is typically used for employers. When selected, discounted prices show in the invoice instead of standard fees.
-
There are two choices for Fee Schedule:
-
-
Workers' Comp: Gross pricing is typically used for Workers' Comp invoices. Standard fees show on the invoice, even when the account has been set up for discounts.
-
There are three choices for Fee Schedule:
-
-
Private: Gross pricing is typically used for Private Practice invoices.
-
There are three choices for Fee Schedule:
-
-
Medicare: If you bill Medicare, there are two ways to handle the fee schedule.
-
There are two choices for Fee Schedules:
-
Maintain and Use Separate Medicare Fee Schedule - This allows you to create and maintain a Medicare Fee Schedule. When this is selected the Standard Fee Schedule will display and additional tab Medicare. This also allows the choice of billing at Net or Gross.
-
If the Maintain and Use Separate Medicare Fee Schedule is selected from the drop down below this selection you will need to select one of the following:
-
Standard Medicare
-
Clinic
-
Employer
-
Private Practice (U&C)
-
-
Use Standard Private Practice Fee Schedule - Use the Private Practice fee schedule, but create a Medicare billing account with override fees. This does not allows the choice of billing at Net or Gross.
-
If Use Standard Private Practice Fee Schedule is checked the drop down below is grayed out.
-
-
-
Medicaid: If you bill Medicaid, there are two ways to handle the fee schedule.
-
There are two choices for Fee Schedules:
-
Maintain and Use Separate Medicaid Fee Schedule - This allows you to create and maintain a Medicare Fee Schedule. When this is selected the Standard Fee Schedule will display and additional tab Medicare. This also allows the choice of billing at Net or Gross.
-
If the Maintain and Use Separate Medicaid Fee Schedule is selected from the drop down below this selection you will need to select one of the following:
-
Standard Medicaid
-
Standard Medicare
-
Private Practice (U&C)
-
Clinic
-
Business Entity
-
-
If Use Standard Private Practice Fee Schedule is checked the drop down below is grayed out.
-
-
Click the drop-down arrow and make your choice for the fee schedule you will be using.
Also on this tab are the following check boxes:
-
Allow Third Party (Lab / TPA) Contract Fee Schedules: If checked, an additional button labeled Contract Fee Schedules will appear on the BILLING SETUP sub-tab of the Setup/Admin. Read more about contract fee schedules.
-
Use Realtime Pricing Calculations during Clinic Charge Entry: The parameter determines which fee is used for a visit if the fee for that item has been changed between when the activity was added to the visit and when the charges are processed. Read Real Time Price Calculation to learn more.
If this parameter is checked: the program will AUTOMATICALLY calculate charges, (the equivalent of clicking the Calc Charges button) as activities are completed on the visit. The Charge Processing procedure will not make any changes to the prices already calculated.
If this parameter is not checked: the fees will not be calculated until the charges are processed, as in previous versions unless the Calc Charges button is clicked. In this case, the charges on the various fee schedules and billing account discounts at the time of charge processing will be used for the visit.
Entity and Clinic Pricing
If you have selected an entity or clinic fee schedule for Employer Services, an additional choice will be displayed:
This is generally used in clinics associated with hospitals which on the one hand want to use a single fee schedule for all services, but on the other hand, still want to give standard discounts to employers. If this is done, the "list" price will be the fee in the clinic or entity fee schedule. The fee entered in the standard employer fee schedule, that is, the fee seen in the medical activity record, will be considered a discount fee.
Invoices & Statements tab
Insurance Bills Sub-tab
The Insurance Bills sub-tab of the Invoices & Statements tab provides several options relating to the physical production and control of invoices.
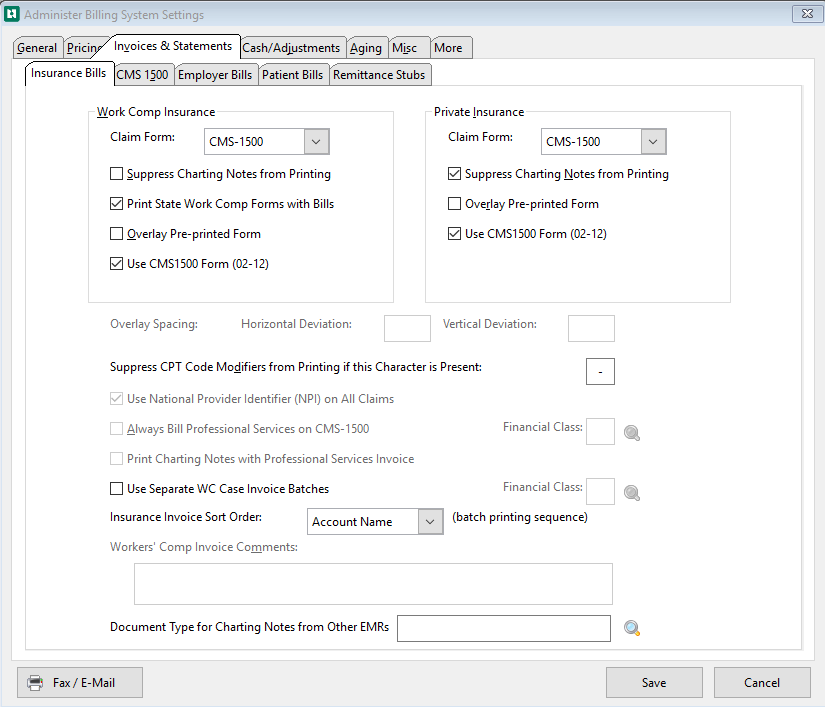
The program provides standard business invoice forms when billing employers or patients directly. However, the program provides several options for different types of forms for Workers Comp and private or group health insurance billing. The first two parameters allow you to select the standard invoice form to be used for Workers Comp, and the second does the same for Private Practice insurance billing.
Work Comp Insurance
For Workers' Comp there are two choices for invoice form, CMS 1500 and the UB-04.
There are four options that can be assigned to the Work Comp Insurance section.
-
Suppress Charting Notes from Printing:
-
rt of Injury submitted with the Workers' Comp invoice. Checking this box will do just that.
-
Overlay Pre-printed Form:
-
If you want the software to print the entire Workers' Comp invoice form on blank paper, do not check this. If you want the software to insert the invoice information on a pre-printer form, check it. It is generally less expensive to have the program draw the forms for you.
-
However, certain private insurance, Medicare or Medicaid payers may require pre-printed forms for OCR scanning purposes. The disadvantage to overlay form printing is logistical, in that it requires a dedicated heavy-duty printer to be practical.
-
If you selected this option, under the Insurance sections you will need to define the Horizontal Deviation and Vertical Deviation for the Overlay Spacing needed to print these on your pre-printed form.

-
Use CMS-1500 Form (02-12):
-
This form is the current form from CMS.
Check all that apply to your organization.
Private Insurance
For Private Practice insurance invoices, there are two choices for invoice form, CMS 1500 and UB-04.
-
Suppress Charting Note from Printing:
By default, the software prints charting notes with insurance invoices. Check this to suppress printing charging notes on Private Practice invoices.
-
Overlay Pre-printed form:
If you want the software to print the entire Private Practice invoice form on blank paper, do not check this. If you want the software to insert the invoice information on a pre-printer form, check it.
If you selected this option, under the Insurance sections you will need to define the Horizontal Deviation and Vertical Deviation for the Overlay Spacing needed to print these on your pre-printed form.
-
Use CMS-1500 Form (02-12):
This form is the current form from CMS.
Below the Work Comp Insurance and Private Insurance sections are check boxes that:
-
Suppress CPT Code Modifiers from Printing if this Character is Present:
This parameter allows you to specify a character separator to use between the main 5-digit CPT code and an accompanying modifier, whenever you do not want the modifier to print on an insurance bill. For example, if you set this character to be a dash or hyphen (-), then whenever you set up a CPT code with a hyphen, the trailing modifier will not print. Otherwise, the entire code will print. This is useful for establishing unique CPT codes with your own modifiers for internal identification purposes.
-
A typical use for this feature is with the supplies CPT code, 99070. Dozens of activities use this same code. If you set Suppress CPT Code Modifier from Printing if this Character is Present to be "-", then you can assign supplies to use CPT codes 99070-AA, 99070-AB, ... ,99070-BA, ... ,99070-CA. For all of these, only "99070" will print on the Workers' Comp invoice form.
-
-
Use National Provider Identifier (NPI) on All Claims:
This checkbox provides the option to print the National Provider ID globally (i.e. for all insurance payer accounts). Many payers are not yet ready to accept the NPI. Therefore, the software allow you to specify for each billing account (on the Invoice Formatting tab of the Enter Billing Account window), whether or not to use the NPI. To set the provider identifier for a specific payer, you can enter an NPI Effective Date. the program will begin using the NPI for this account as of that date.
Professional Services option
If you are using the UB-04 as your standard Workers Comp invoice, the next three fields allow you to identify certain professional services and force those services to print on separate CMS-1500 forms. This is a fairly common requirement for hospital billing in certain states.
To accomplish this, you must designate a code (referred to as a "financial class") to be used to identify these types of services, and you must also set up a separate Billing Service type for these services, assigned to that financial class. When setting up the individual medical activity codes for these services, you then assign each medical activity to the professional services Billing Service type.
-
Always Bill Professional Services on CMS-1500 form:
If you need to split professional services in this manner, check this parameter and enter the financial class code that will be used to identify these services. Don't forget to set up the Billing Service type and Medical Activity codes to complete the process! The UB-92 must be selected above as your Workers' Comp invoice form for this checkbox to be available.
-
Financial Class:
Enter the financial class which designates professional services.
-
-
Print Charting Notes with Professional Services Invoice:
This option is only available if you have set up for billing professional services with the previous two options. The visit charting note will always print with the UB-04/92 form. If this box is checked, it will also print with the CMS 1500 form.
Workers' Comp Case Invoices
-
Use Separate WC Case Invoice Batches:
Check to enable the creation of Workers' Comp Case Invoices.
-
Financial Class:
Enter the Financial Class which designates WC Case Invoices. A Billing Service Type needs to be created with this Financial Class, and a visit category needs to be linked to that Billing Service Type.
-
Other Parameters
-
Insurance Invoice Sort Order:
This field is used to set the sort order of the invoices within a batch for insurance invoices. Click the drop down list to select Account Name, Account Code, Date of Service or Account Zip Code.
-
Workers' Comp Invoice Comments:
If you are using the UB-92 for Workers Comp invoices, or another state form that supports comments (the CMS 1500 does not), the next field allows you to enter comments to print in the comment section of your Workers Comp invoices.
-
Document Type for Charting Notes from Other EMRs:
Attach the document type associated with Provider Charting Notes created in another EMR system.
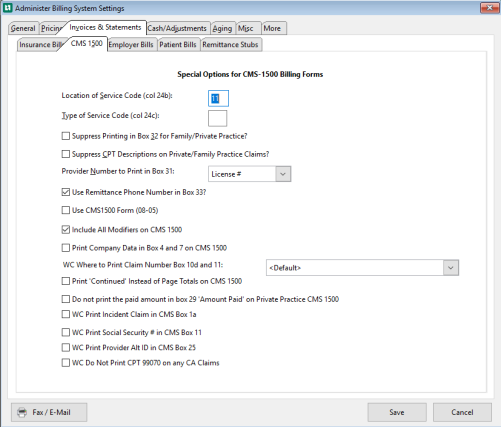
CMS 1500 Sub-tab (Special Options for CMS-1500 Billing Forms)
-
Location of Service Code (col 24b):
Type in the appropriate two-digit number to print in this column (typically 11 or 21). Note that you can override for individual billing accounts.
-
Type of service (col 24c):
Enter, if applicable.
-
Suppress Printing in Box 32 for Family/Private Practice?:
If not checked, the clinic address may print in that box.
-
Suppress CPT Descriptions on Private/Family Practice Invoices?:
This and the previous option are often required by private carriers.
-
Provider Number to Print in Box 31:
Allows you to designate which type of identifier, if any, you want to of your CMS 1500 form. (Box 31 is the lower left hand box where the provider name and address prints. Different states have different requirements for what is required to print there.)
-
Use Remittance Phone Number in Box 33:
If not checked the provider's phone number will be printed in Box 33.
-
Use New CMS 1500 Form: Only set the flag here if you want all claims to print on the new form, otherwise do the setup under each billing account.
-
Include All Modifiers on CMS 1500:
Include CPT code modifiers on the CMS 1500 invoice.
-
Print Company Data in Box 4 & 7 on CMS 1500:
Print company information in boxes 4 & 7 on the CMS 1500 invoice. When selected, box 6 will always have the "other" box checked and box 11a will be left blank on all WC claims.
-
WC Where to Print Claim Number box 10d and 11:
Some payers have been known to reject claims because of where the WC Claim # is printed on the CMS 1500 Invoice.
Select the drop down beside this field to select where to print the claim :
-
Default = Claim# in box 23.
-
Policy/Group # and Claims # in box 11.
-
Claim # only in box 11.
-
Policy/Group Number in box 11 and the Claim # in box 10d.
-
-
Print 'Continued' Instead of Page Totals on CMS1500:
Check the box to print 'CONTINUED' in boxes 28 and 30. Uncheck the box to total each page separately.
-
Do not print the paid amount in box 29 'Amount Paid' on Private Practice CMS 1500:
Some clinics never submit a claim showing a payment received due to a concern about how the payers will treat this. If this box is checked, all Private Practice claims will be submitted with the total charges and balance due (boxes 28 and 30) as the exact same amount. Box 29, 'Amount Paid', will always print zero for all payers.
-
WC Print Incident Claim in CMS box 1a:
If checked, the Incident will print in CMS form box 1a.
-
WC Print Social Security # in CMS box 11:
If checked, the patient Social Security # will print in CMS form box 11.
-
WC Print Provider Alt ID in CMS box 25:
If checked, the Provider Alt ID will print in CMS form box 25.
-
WC Do Not Print CPT 99070 on any CA Claims:
Any client in California can select this option so the CPT code of 99070 does not print on their claims.
UB04 / 92 Sub tab
This sub tab will only appear if the UB04 / 92 is selected on the Insurance Bills as the Claim Form types.
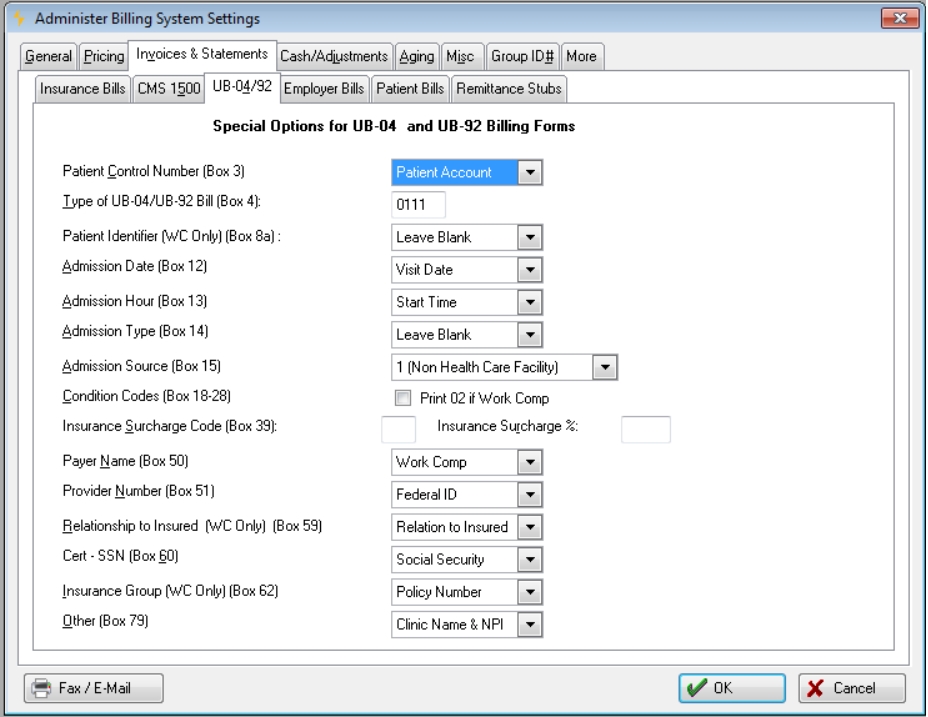
If you are using the UB-92 as one of your standard invoices, this tab provides several options for controlling what prints in certain boxes on the that form.
Patient Control Number (Box 3): The first option lets you choose what identifier will print in box 3 as the patient control number. This can be the Patient Account number (typical for most hospitals), the Social Security Number, or the invoice number.
Type of UB-92 Bill (Box 4): The second field allows you to set the code for the type of UB-92 bill. This will print in box 4 on that invoice form.
Patient Identifier (WC Only)(Box 8a): Enter Social Security Number or Leave Blank. Workers' Comp only.
Admission Date (Box 12): Enter Visit Date or Leave Blank.
Admission Hour (Box 13): Enter Start Time Hour (HH) or Leave blank.
Admission Type (Box 14)::Enter "3" Elective or Leave blank.
Admission Source (Box 15): Enter "1" (Non-Health Care Facility Point of Origin)
Condition Code (Box 18-28):
Insurance Surcharge Code (Box 39): The State of Massachusetts requires a surcharge percentage, known as an Uncompensated Care Charge (UCC), to be invoiced on all Workers Compensation invoices produced in hospital settings. This charge is formulated as a percentage of the net invoice, and is printed on the UB-92 in block 39. If you are subject to this surcharge, enter the revenue code to be printed in box 39, then the Surcharge Percentage. This is an unusual requirement and normally is left blank. If you are subject to this charge, in the current version of the program you must apply cash at the invoice level rather than the line item level, so that all charges will be cleared.
Payer Name (Box 50):Options are "Workers Comp", Carrier / Company Name, or Blank.
Provider Number (Box 51):: This allows you to choose what identification number will print in box 51 (Provider No). You can choose either to print the provider's Federal ID number or Medicare ID number in box 51.
Relationship to Insured (Box 59) for WC only: Options are valued based on Relationship to Insured. "08" Employee; "20" Employee
Cert - SSN (Box 60): You can choose to print the Social Security Number, Employee ID Number or the Claim Number located in the incident case record in box 60.
Insur Group No (Box 62) for WC onlyEnter Claim Number, Policy Number, or Leave blank.
Other (Box 79): Enter Clinic Name and NPI, or Leave blank.
When producing the UB04:
- Box 66 should be populated with a value of 0 if the UB-04 is being produced with ICD-10 codes.
- Box 66 should be populated with a value of 9 if the UB-04 is being produced with ICD-9 codes.
Employer Bills Sub-tab
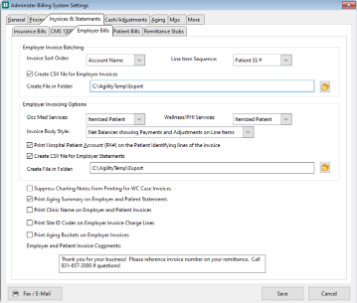
Employer Invoice Batching Section
Invoice Sort Order: This option is used to set the sort order of the invoices within a batch for employer invoices. Click the drop down list to select either zip code or in alphabetical order by either the Billing Account name or Account Code. After the conversion this field will automatically be set to alphabetical by Billing Account Name.
Employer Line Item Ordering: This field is used to set the sort order of the individual line item sequence for Employer Services invoices. Click the drop down list to select either by date of service, by patient last name, or by patient social.
Create CSV file for Employer Invoices: Select this checkbox to create a Common Delimited file (CSV) for Employer Invoices.
Create File in Folder: Enter the destination file location in this field. Users may select the folder icon to the right of the field to search their network for the desired location. If the create CSV file checkbox is selected and the destination is blank, the file(s) will be placed in the default folder selected on the Administrator Security System Settings window, File Locations.
Employer Invoicing Options
Occ Med Services: Choose Itemized patient or Aggregated.
Wellness/PHI Services: Choose Itemized patient or Aggregated.
Invoice Body Style: This offers four options:
-
Gross Charges showing Payment and Discount Totals at End: This option is available only if you have selected Net as the Pricing Method for Employer invoices. (This selection is made on the PRICING tab of the Billing System Parameters.) The gross price will print with each line item, and a single summary line will print showing all payments and all discount totals at the after all of the line items have printed.
-
Net Charges showing Payment and Adjustment Totals at End: Each line item will print the net charge (after calculated discounts), and a single line will print showing payments and discounts at the end.
-
Net Balances with payments, adjustments, and Paid Items Hidden: If checked, this will cause the software to print only open items, whenever reprinting Employer Service invoices. This is useful in assisting in collecting past due invoices for which employers have questions.
-
Net Charges showing Payments and Adjustments on Line Items: Each line item will print showing charge, payment, adjustment and discount (if applicable), with the net balance due. Both open and paid items will print.
Print Hospital Patient Account (PA#) on the Patient Identifying lines of the invoice: Only applicable for clients using the Hospital Registration (ADT) interface. When checked:
-
The program will print the Hospital Patient Account number on the invoice line items for employer invoices, as well as to sequence the line items by Hospital (Patient) Account.
-
If this box is checked, an option Hospital Account is added to the drop down list described in item 6 below.
-
The line items on the Employer Services invoice will be sorted by the patient's hospital account number.
-
Select this checkbox to create a Common Delimited file (CSV) for Employer Invoices.
Create CSV file for Employer Invoices: Select this checkbox to create a Common Delimited file (CSV) for Employer Invoices.
Create File in Folder: Enter the destination file location in this field. Users may select the folder icon to the right of the field to search their network for the desired location. If the create CSV file checkbox is selected and the destination is blank, the file(s) will be placed in the default folder selected on the Administrator Security System Settings window, File Locations.
Next Section
Suppress Charting Notes from Printing for WC Case Invoices: The new option is located under Patient Invoicing and Statement Options and is titled "Use Separate WC Case Invoice Batches". If the box is checked then the Charting Notes will not print after any WC Case Invoices. The default of this checkbox is that it is turned off (not selected).
Print Aging Summary on Employer and Patient Invoices: If checked, a box showing outstanding totals by aging group will be printed at the bottom of the invoice.
Print Clinic Name on Employer and Patient Services: Check this box to have the Clinic Name printed on the invoice.
Print Site ID Codes on Employer Invoice Charge Lines: Check this box print the Site ID code on the Employer invoices.
Print Aging Buckets on Employer Invoices:Check this box to print the Aging Bucket on your Employer Invoices. The default is unchecked.
Employer and Patient Invoice Comments: This allows you to enter standard notes to be printed at the bottom of your employer and direct patient bills. These can be changed periodically, according to what you want to communicate when billing.
Print Aging Summary on Employer and Patient Invoices, Print Clinic Name on Employer and Patient Services, and Employer and Patient Invoice Comments appear on both the Employer Bills and Patient Bills sub-tab. When data is entered into any of these three fields on one of those sub-tabs, it will hold true for the other sub-tab. They are the same fields appearing in two locations.
Patient Bills Sub tab
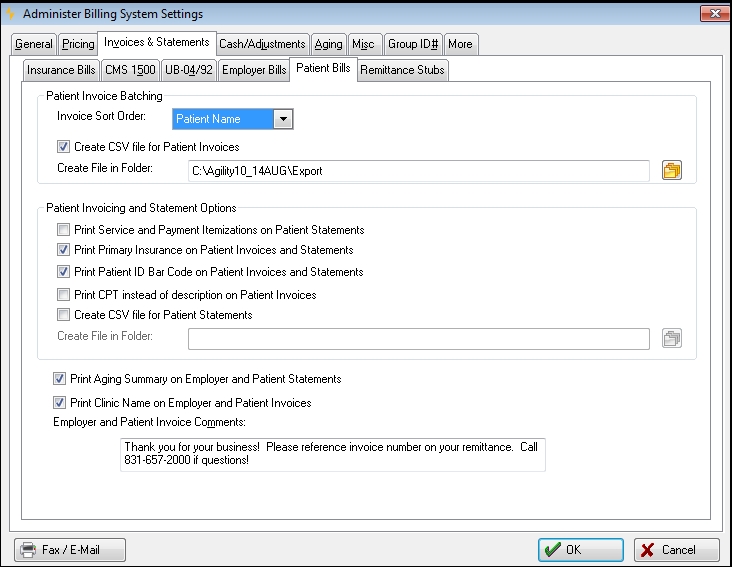
Patient Invoice Sort Order: This field is used to set the sort order of the invoices within a batch for patient invoices. Click the drop down list to select either date of service, zip code, or alphabetical order by patient's last name.
Create CSV file for Patient Invoices: Select this checkbox to create a Common Delimited file (CSV) for Patient Invoices.
Create File in Folder: Enter the destination file location in this field. Users may select the folder icon to the right of the field to search their network for the desired location. If the create CSV file checkbox is selected and the destination is blank, the file(s) will be placed in the default folder selected on the Administrator Security System Settings window, File Locations button.
Print Service and Payment Itemization on Patient Statements: The default version of the statement body for private practice patients contains a single line per open invoice. This is not what one traditionally sees on statements from most physician offices. What commonly appears on physician office statements is the status of all individual charges, applied payments, discounts and adjustments.
When this option is checked, patient statements will instead display one line for each charge, discount, payment and adjustment for all of the currently open invoices, sequenced by the date of service. Rebill reasons will also print if recorded from carriers who rejected, short-paid or zero-paid some items.
Print Primary Insurance on Patient Invoices and Statements: If checked, the patient's insurance information will print on rebilled patient invoices and statements after a carrier either partially pays or denies a claim.
Print Barcode on Selected Reports in Billing: Adds a barcode to the remittance stub. This barcode can be used to locate the correct patient record when payment is received by scanning it into the System Patient ID field on the Select Patient window.
Print CPT instead of description on Patient Invoices: Print the CPT code instead of the service description.
Create CSV file for Patient Statements: Select this checkbox to create a Common Delimited file (CSV) for Patient Statements under Reporting only.
Create File in Folder: Enter the destination file location in this field. Users may select the folder icon to the right of the field to search their network for the desired location or manually key the entire path . If the create CSV file checkbox is selected and the destination is blank, the file(s) will be placed in the default folder selected on the Administrator Security System Settings window, File Locations button.
Print Aging Summary on Employer and Patient Invoices: If checked, a box showing outstanding totals by aging group will be printed at the bottom of the invoice.
Print Clinic Name on Employer and Patient Services: Check this box to have the Clinic Name printed on the invoice.
Employer and Patient Invoice Comments: This allows you to enter standard notes to be printed at the bottom of your employer and direct patient bills. These can be changed periodically, according to what you want to communicate when billing.
Print Aging Summary on Employer and Patient Invoices, Print Clinic Name on Employer and Patient Services, and Employer and Patient Invoice Comments appear on both the Employer Bills and Patient Bills sub-tab. When data is entered into any of these three fields on one of those sub-tabs, it will hold true for the other sub-tab. They are the same fields appearing in two locations.
Remittance Stubs Sub Tab
The Remittance Stubs tab allows you to set the software to support payment by credit card, as well as have your employer and patient invoices print with a remittance stub. The first step is to specify whether the employer and/or patient invoices and/or statements should produce a tear-off stub. This stub can be either at the top or bottom of the invoice. This formatting is designed to allow invoices to be printed on paper with a horizontal perforation 3" from the top or the bottom allowing the user to tear off the section with the credit card information for mailing to the remittance address.
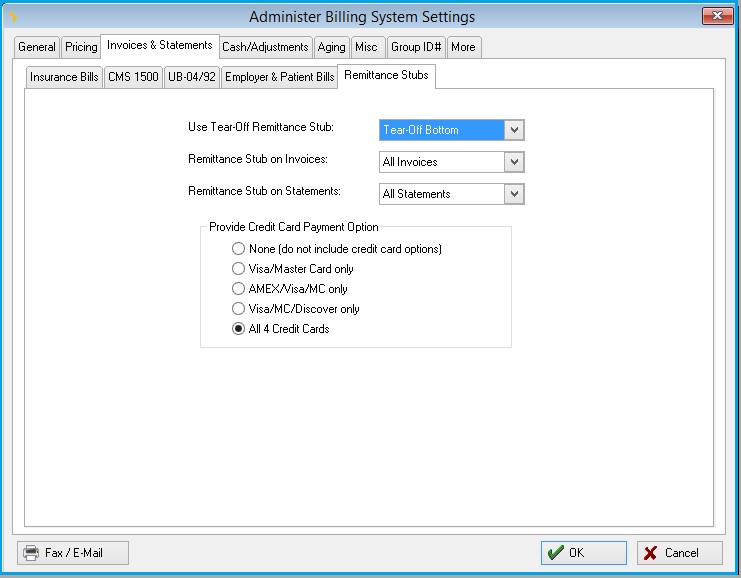
The second step is to specify whether credit card payments are allowed. The user can specify which combination of credit cards to accept.
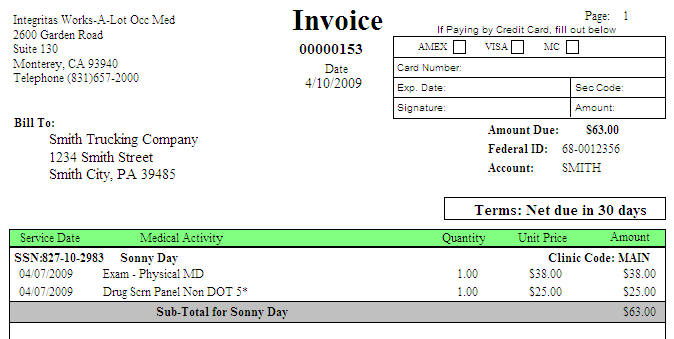
As an example, the above settings will produce the following type of invoice:
Set up invoices and/or statements for credit card payments
-
Make your choice for Tear-Off Remittance Stub: Tear-Off Top or Tear-Off Bottom. The entire feature can be disabled by selecting None.
-
Indicate which invoices to do this with by making a selection for Remittance Stub on Invoices: Patient Invoices, Employer Invoices, or All Invoices. Disable the tear-off stub on invoices by selecting No.
-
Indicate which statements to do this with by making a selection for Remittance Stub on Statements: Patient Statements, Employer Statements, or All Statements. Disable the tear-off stub on statements by selecting No.
-
For Provide Credit Card Payment Option, indicate the correct combination of credit cards accepted.
Cash / Adjustments Tab

The Cash / Adjustments tab of the Billing System Parameters window allows you to control how adjustments are accepted into the system. Adjustments are special transactions used to decrease or increase the balance of an open invoice.
-
Cash application style of work flow: Starting with Net Health Employee Health and Occupational Medicine Release 7, a new routine was added for applying payments to invoices across accounts. Some users liked it so much that we were asked to make it possible to use it all the time. To allow that, we added a checkbox labeled Always Use "Across Accounts" Style of Work Flow when Applying Payments. If you are a relatively new users, this has probably been checked since you began using Net Health Employee Health and Occupational Medicine . If it is not checked, we recommend that you check it, and try out the new routine for a while. Most people who have done so have preferred it. If you still like the old method better, there is no problem--just uncheck the box to return to the familiar style of applying cash.
-
Employer Discounts: The standard adjustment code to be used whenever discounts are carried in the A/R for Employer Services billing. If you have elected to use gross price billing, any calculated discounts will automatically be recorded on the adjustments journal and in the sales analysis reporting using these standard adjustment codes. This way, the user does not have to re-enter the adjustment code with each discount taken.
-
PPO / MCO Discounts: Functions like the previous parameter, but for insurance billing.
-
Disable Manual Adjustments During Cash Application: During the cash receipts and application process, your cash receipts clerks have the ability to adjust out the remaining balance of a particular invoice for which a partial payment has been made. If you check this option, they will not be able to make manual adjustments. This option is applicable to organization who have designated personnel to review open invoices before making adjustment decisions.
-
Maximum Adjustment The Max Adjustment Amount without Administrator Sign-off: This is a control mechanism the Billing Accounting Manager can set to prevent users from indiscriminately entering adjustments to invoices without your knowledge. This is a safety control mechanism to assist in your accounting controls. In practice, if a user wants to enter a larger amount than this, the Billing Program will open up a window requiring someone with Accounting Manager status to type in a user / password authorization.
This control only applies if you allow users to make adjustments. If you want to set up such a control, type in the maximum amount, or leave it blank if you do not want to prevent people from using their own judgment.
-
Capitation Adjustment Code: The last section on this tab allows you to designate an adjustment code to be used for automatic adjusting of invoices for capitation billing accounts. At the end of each accounting period, the Capitation Closing utility function will generate an adjustment to close out each open invoice during that period, for all Private Practice insurance carrier Billing Accounts that have been designated as Capitation Accounts. The capitation adjustment code will be used to capture these adjustments.
-
Always Apply Cash by Invoice: If this is not checked, applying cash to a Workers' Comp invoice will default to apply by line item. If it is checked, all types of invoice will default to apply by invoice.
-
Require Administrator Level Security Clearance to Change or Reduce Co-pay: When checked, if a user tries to reduce or clear altogether a co-payment from a clinic visit, after the Encounter Summary Receipt has been printed. An authorization window will pop up requiring the entry of a user code and password by either a System Administrator, Clinic Manager, or Accounting Manager. Otherwise, the change is prevented.
Note that this enhancement does NOT prevent a user from increasing the copay amount in the visit, if it was entered incorrectly to begin with.
Aging Tab

The Aging tab allows you to customize how aging reports are to be run. These parameters can be reset at any time, if you want to gain different views of your Accounts Receivable.
-
Default Aging Method: Select whether you want to age by the Invoice Date (the most common method), the Date of Service, or Invoice Due Date.
-
Aging Periods: Type in the Report Labels and number of From Days and To Days that you want to use for reporting each of the five aging periods. The To Days in the fifth (oldest) aging period is left blank to signify no limit to the age of the oldest invoices to be reported.
Misc tab
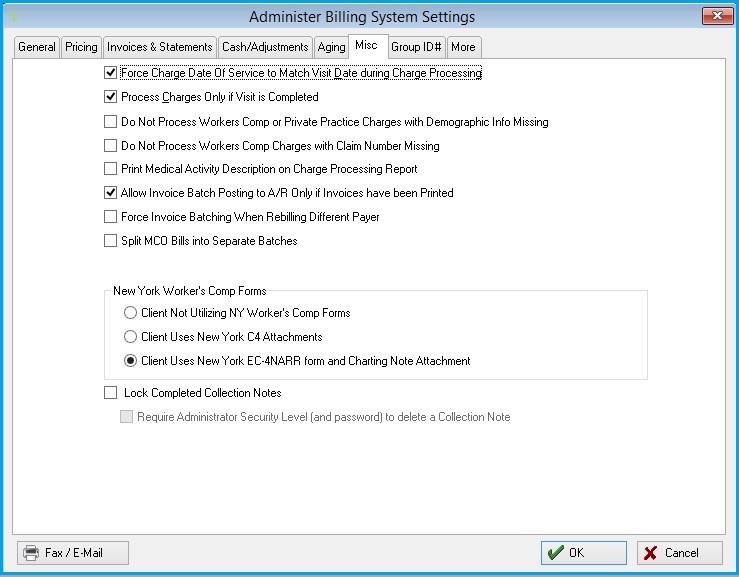
-
Force Charge Date of Service to Match Visit Date during Charge Processing: Select whether you want to force the dates of individual services to match the dates of the visits for which they were recorded in the Clinic program. From time to time your clinicians may enter individual services using a different date from the date of the visit. This can cause problems and confusion when you attempt to reconcile your activities by date of service. If you check this option, during the process the individual charge and billing transaction dates will be synchronized with the clinical visit date of service. This option is generally preferred, with one exceptional circumstance. If your organization must print multiple dates of services on a single CMS bill, such as for physical therapy services, then you should not check this option! If you do not have this kind of requirement, it is best to check this option to force your dates to match.
-
Process Charges Only if Visit is Completed: This allows you to prevent any charges from being processed for any visit that has not been physically marked as "completed" in the Clinic program. This can be used as a safeguard for those organizations who do not wish to bill for a visit if any of its charges have not been "resulted". When checked, clinical users must physically mark each visit as completed before its charges will be processed.
-
Print Medical Activity Description on Charge Processing Report: By default, the CPT Code Description is printed on the Charge Processing Report. If this box is checked, the Medical Activity Description will be printed instead.
-
Split MCO Invoices into Separate Batches: This allows the creation of separate invoice batches for a specific MCO. When this is selected, the [Create Invoices] window will display a box for selecting an MCO. If an MCO is selected, a separate invoice batch will be created for it.
-
Client Not utilizing NY Workers' Comp Forms: When selected, indicates client is not using New York Workers' Comp Forms.
-
Client Uses New York C4 Attachments: Selected for clients that are required to use a C4 attachment.
- Client Uses New York EC-4NARR form and Charting Note Attachment: Selected for clients that are required to use the EC-4NARR form.
Net Health Employee Health and Occupational Medicine will stop charges from processing with the following conditions:
Billing for Workers Comp or Private Practice and Demographic Information is missing.
Billing for Carrier Workers Comp and Claim Number is missing.
Parameters under the under the [Administer Billing System Settings] window, MISC tab are used:

The Charge Processing Error Report will consider the new options. If either option is turned on, then the system will not process charges based on the above conditions. Additionally, instead of showing as a warning on the Charge Processing Error Report, the system will show an error when either condition fails so that the user understands that the charges are not being processed.
More Tab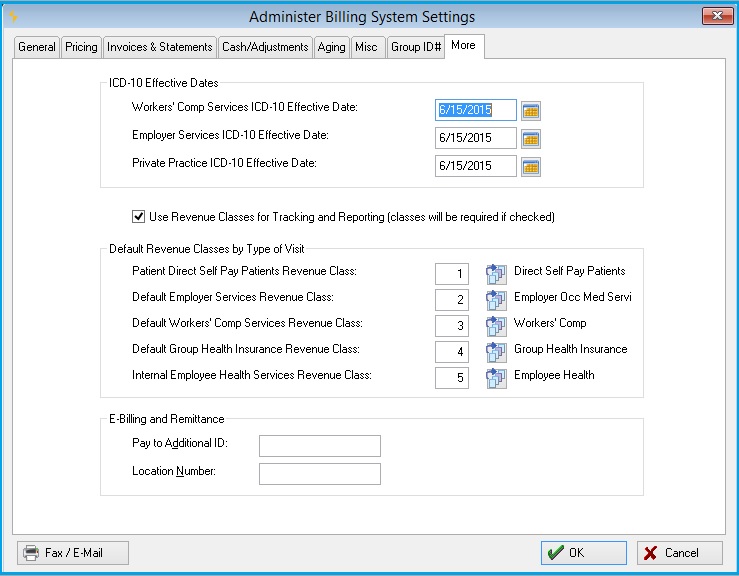
ICD-10 Effective Dates
This section allows the user to set effective dates for Workers' Comp, Employer and Private Practice Services separately. Use the calendar next to each on to select the appropriate date.
Default Revenue Classes by Type of Visit
This will only display if Use Revenue Classes for Tracking and Reporting (classes will be required if checked) is checked.
Taxing Visit Charges
The program can be set to calculate a tax amount and add it to the visit. This is done by creating a medical activity for this purpose which has its Activity Type set to Tax. Only one activity should be set for this. Then, enter these fields on this tab:
-
Excise Tax Rate: Enter the tax rate to be applied.
-
Excise Activity: Indicate the tax medical activity as described above.
This medical activity needs to be added to every visit which is taxed. When charges are processed, the program will calculate the amount of the tax and insert the amount as the charge for this activity.