Documenting Drug Screen Results
If you haven't already done so, please read Clinical Results Overview, Patient Check-Out Overview, and Visit Activities Overview before continuing!
If you administer drug screens, and you either do not document any results, or you document only the final result of the drug screen, then this topic is not for you!
Summary
This topic addresses how to document drug screens to include the drug test reason, the MRO results, and the outcome of individual substance testing. The program will capture all information needed to produce the DOT Quarterly Report for employers. Of course, how much of the full documentation you choose to complete is up to you.
Your drug screen panels must be properly set up for documentation to be accurate. Please read Setting Up to Manage Drug Screens prior to completing this current topic.
In addition to the DOT Quarterly Report, there are two reports that relate directly to drug testing. The Drug Testing Summary Report, similar to the DOT report, allows you to print totals for drug screen templates other than the DOT 5 panel. Optional selections allow you to target the report based on several factors. TheMRO CCF Review Rate Report shows the tests reviewed by the MRO and calculates the review rates.
Steps to Document A Drug Screen Panel
The explanation below explains the use of all fields on the window. Please note that how much data you enter at any one time depends on where you are in the documentation process (i.e. have you received results? Was the screen positive? Was MRO review completed yet? etc.)
Reopen the visit record.
To reopen a visit from the Home Nav Bar:
Click Visits by Patient.
If you did not just schedule a follow-up appointment, search for and select the Employee.
If you did just schedule an appointment, the same employee will be displayed on the window Select Employee. Click OK.
To reopen a visit from the Appointment Calendar.
Click Today's Scheduling.
Find the patient and double-click to open the visit.
- OR -
Find the patient on the calendar.
Double click to open the visit.
Click the Charges button on the right side of the [Enter Visit] screen.
Highlight the drug screen and click Change.
Select the RESULTS tab.
Click the down arrow to the right of the Result Code field and select the appropriate result code. The following window will be displayed. (The list of individual substances will vary depending on the specific drug panel).
If you are reviewing a drug panel that has already been entered, click theTest Info button to access this window.
-
Enter the detailed information on the collection of the drug screen:
-
-
Laboratory: Click the table icon to the right of the field, then search for and select the lab that completed the analysis.
- Collection Date and Time:Enter the date that the specimen was collected or use the calendar icon to choose the date. Enter the time that the specimen was collected or use the clock icon to choose the time.
NOTE: If the system has a Collection Date and a Collection Time on the Medical Activity, they will be populated on this window. If not, and the system has a Collection Date and a Collection Time on the Lab Order, they will populate the fields. If neither the Medical Activity or the Lab Order has the data, and the interfaced result has a Collection Date and a Collection Time on it, then they will populate the fields. If the data is not available from any of the above sources, you may enter it on this window. -
Date Sent to Lab: Enter just that.
-
CCF Number: Enter the chain of custody number.
-
Drug Test Reason:Select from the drop down list. This reason will be used on the DOT Quarterly Report. (You can change the default drug test reason in the Clinical System Parameters to save entry time.)
-
Collection Protocol: Click the drop down arrow beside this field and select the correct protocol.
-
DOT Category: IfJob Classeshave been entered for this company, clicking the table icon for this field will show the list. One can be selected for thistest. (Note:Job Classwill NOT be pulled from the patient's demographics record, nor will selecting aJob Classhere update the demographics record.) When the DOT Report is run, it can optionally group results byJob Class, each on a separate page. (Note: this field only available for DOT drug screens. This is indicated when the related Drug Screen Panel is set up.)
-
-
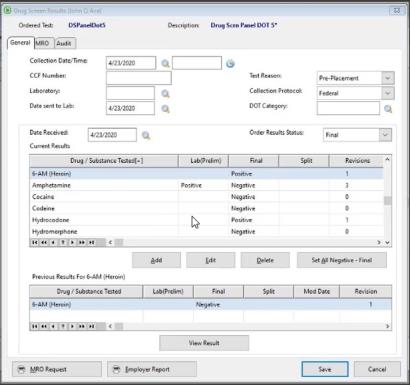
When results are returned from the lab, enter Date Received.
-
Set All Negative Final: Click this button to enter a final result of Negative for all substances that already show a negative Preliminary Result. If a substance has a positive Preliminary Result, the Final Result will need to be entered manually by following the same steps used for Preliminary Result except, of course, entering the result in the final field.
-
If results were returned from the lab via an interface, those results will be displayed in the Lab (Prelim) column. If not, enter preliminary results manually.
- Enter the Order Results Status.
Add, Change, Delete Results
When Drug Screen results are either received via interface or entered manually, the software has the ability to Add a new drug test or Change and Delete specific results.
ADD
To add a specific drug test, highlight the test in the center browse window and select Add. The following window will display:
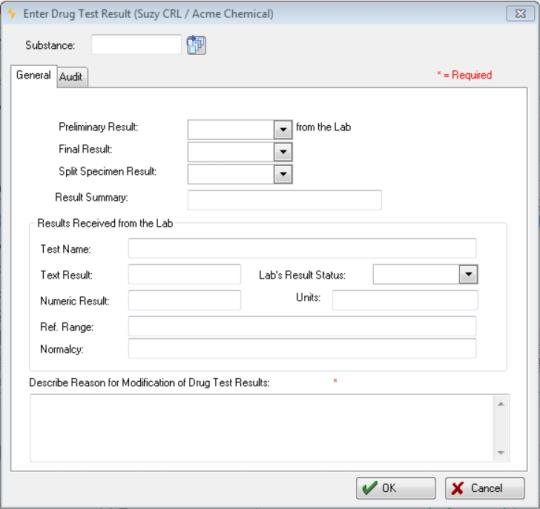
The Substance look-up at the top of the window allows users to select the new drug test via a list.
Enter the relevant information, click OK. The new drug test will appear on the center browse of the Drug Screen Results window with zero revisions.
CHANGE
To change a specific test result, highlight the test in the center browse window and select Change. The following window will display:
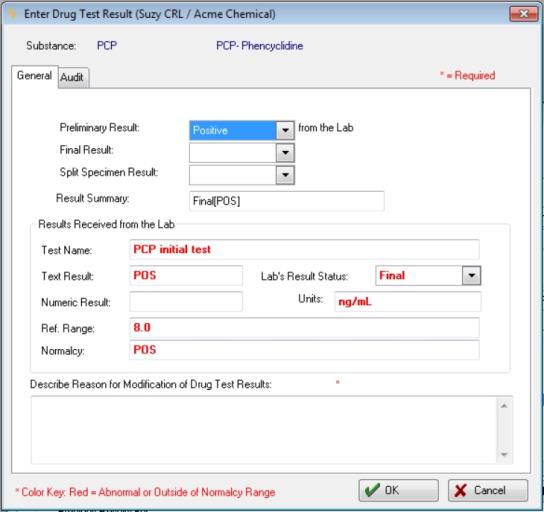
Notice there is no Substance look-up as this action is a change to an existing test result.
Enter the relevant information, including a required description of the change, and click OK. The changed drug test will appear on the center browse of the Drug Screen Results window with an increase in revisions. The change is also noted on the Previous Results for...browse on the Drug Screen Results window.
DELETE
To delete a specific test result, highlight the test in the center browse window and select Delete. A warning will display to confirm the action; select Yes to delete the test result.
For any test result that is updated, the Revision history is noted in a column titled "Revisions". This column contains the number of times the Drug Result was updated. To view the history, either double-click the Drug Result line or click the View Result button. Either of these actions will result in displaying the Enter Drug test Result window in view mode only.
-
Change One Result: For any result that was positive, highlight the substance and click this button to display the [Enter Drug Test Result] window. Click the drop-down arrow besidePreliminary Resultand make the appropriate selection. Then, clickOKto exit.
If you receive results via an electronic lab interface, all information will already be available. To manually enter results:
-
Depending upon the nature of the result, enter the numeric value and unit of measure (Measure and Units) and/or result summary description (Text Result).
-
Enter the Result Code (required, based upon the choices in your Medical Activity)
-
Optionally, enter Normalcy.
-
Enter Result Status.
-
When done, click OK to save that result.
If this is an updated Drug Result, Net Health Employee Health and Occupational Medicine will maintain a history of the Drug results which are available for subsequent viewing and reporting associated with this patient and test.
- If an updated result is entered, users will be required to enter a reason for the modification; this field is required. If this window is entered in view mode, users will be able to see the modification and reason, but not edit them.
- If the Drug result is from an in-bound interface for Drug Screen panels, the previous result will be retained and the new result will be saved as the current value. The modification reason will be the phrase "Updated results received on MM/DD/YYYY", where MM/DD/YYYY is the date the results were received. NOTE: Updated Drug Results received through an in-bound interface will have a slightly different window displayed when users want to view the results. This window (Enter Drug Test Result) will appear in view mode only for interfaced results.
As you enter and save, the results will be displayed on the [Drug Screen Results] window.
If a result is updated, the Revision history is noted in a column titled "Revisions". This column contains the number of times the Drug Result was updated. To view the history, either double-click the Drug Result line or click the View Result button. Either of these actions will result in displaying the Enter Drug test Result window in view mode only.
-
MRO
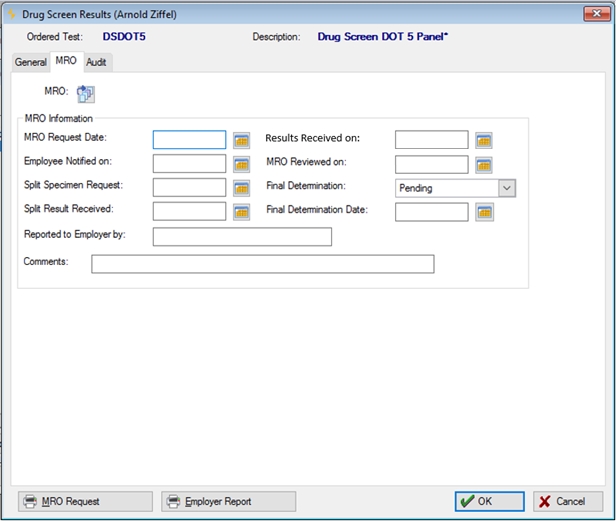
If this test is to be reviewed by an MRO, enter these fields:
- MRO: Click the table icon to the right of the MRO field, then search for and select the MRO. (The MRO must already be entered in the software as aProvider.)
-
MRO Request Date: Enter the date the MRO received information about the drug screen.
-
Employee Notified On: Enter the date the MRO was notified of the need to do the review.
- Results Received On: Enter the date that the test results were received by the MRO or use the calendar icon to choose the date.
-
MRO Reviewed On: Automatically entered when the MRO Request is generated. Can be changed manually.
- Final determination: Select the final determination from the dropdown menu.
- Final Determination Date:Enter the date for the final determination of this test or use the calendar icon to choose the date.
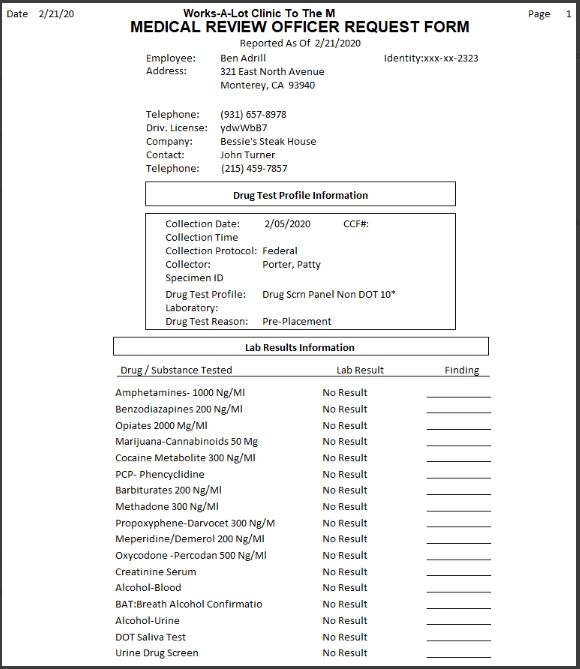
If you want to produce a report for the MRO to use in the medical review, confirm that the correct MRO has been selected above, then click the MRO Request button:
-
On the [Medical Review Officer Request] window, optionally, change the Report Title.
-
Today's date will be entered by default in Report Date. Override if appropriate.
-
Contact Name carries the name of the individual to contact at the employee's company. By default, it shows the company's main contact. Clicking the table icon beside the field displays the full list of contacts at that company. If appropriate, select a different one.
-
Optionally, attach an electronic signature by clicking the Sign button, and then entering the correct user code and password. (Note: If your clinic has not enabled this option on the CHARTING tab of Clinical System Parameters, this button will not appear.)
-
Optionally, indicate that the report should be faxed or e-mailed.
-
Click Print.
-
The program will automatically put the Report Date into the MRO Request Date field.
-
Click Print.
Example:
Once you receive the final result, click the down arrow to the right of the Final Determination field and select the result from the drop down list.
If the Employee requests a split specimen, enter the date in Split Specimen Requested.
Enter Split Result Received when the split result is returned.
Manually, enter the results of the split specimen test by highlighting the substance, then clicking Change One Result.
Enter the final result of the test in Final Determination.
Enter Comments, if needed.
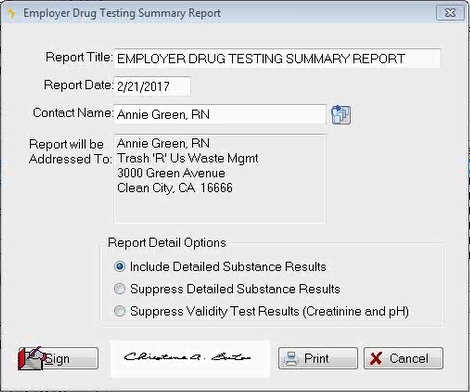
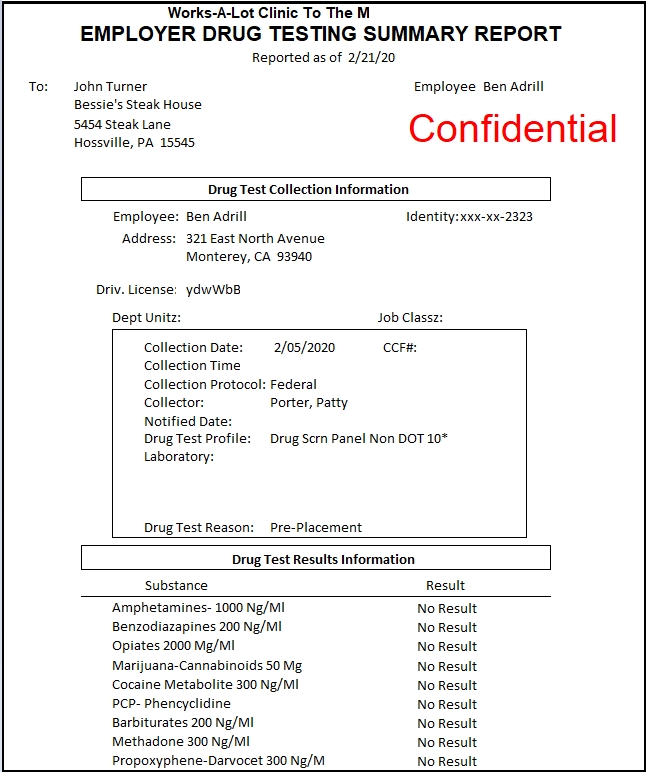
To produce a final report for the employer, click Employer Report.
-
By default, the main contact for the company is entered in the Contact Name field. Clicking the table icon beside the field displays the full list of contacts at that company. If appropriate, select a different one.
-
Select the Include Detailed Substance Results to include the testing detail in the report. This is the default provided the parameter Suppress Detailed results on this report checkbox is not checked on the Administer Clinic System Parameters window, Drug Testing tab.
- If you do not wish for detailed substance results to be included in the report, select the Suppress Detailed Substance Results option. (You can make an entry in Clinical System Parameters to check this by default. Once this parameter is set, the user will not have to check or uncheck a box each time this report is printed. If the Clinic System Parameter is checked, this selection will be the default when this window is opened.)
- Select Suppress Validity Test Results (Creatinine and pH) to exclude validity tests from the Drug Testing Summary Report. The Exclude from the Employer Drug Testing Summary Report ( Creatinine and pH)check box MUST be selected on the Medical Activity Code setup window, Reporting tab for each validity test or these test results will appear even if the Suppress Validity Test Results (Creatinine and pH) option is selected here.
-
If your clinic uses electronic signatures, click the Sign button and enter the correct user code and password. (Note: If your clinic has not enabled this option on the CHARTING tab of Clinical System Parameters, this button will not appear.)
-
Click Print. (Generally, reports may be printed, faxed or e-mailed. The software is set by default to prevent positive drug test reports from being faxed or e-mailed. Clinic System Parameters includes an option to allow faxing or e-mailing Employer Drug Test Reports regardless of the results.)
-
The program will automatically put the Report Date into the MRO Request Date field.
Example:
Results Reported to Employer By defaults to the name of the MRO. Change if appropriate.
UpdateFinal Determination.
When you are finished, click the OK button to return to the [Enter Medical Activity] window.
Click OK again to return to the visit record.
ClickClose, thenOKto close the window.
Speciman tab
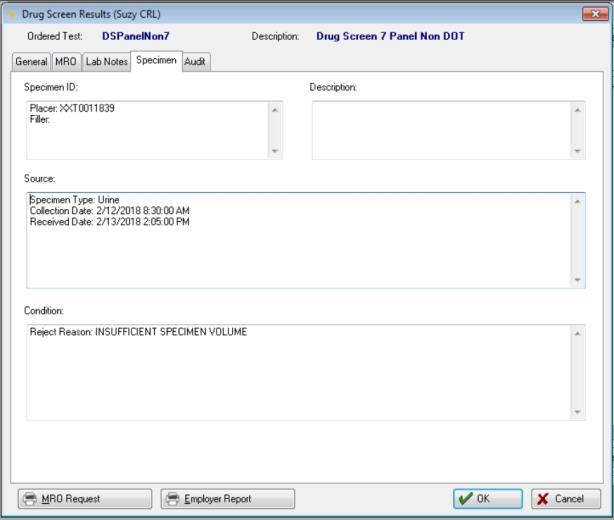
The Specimen tab provides information on the following:
- Specimen ID
- Description of the specimen
- Source of the specimen
- Condition of the specimen
This is read only designed to provide further details of the Drug Screening Results.