If your organization wants HIPAA Guard to track disclosures made automatically by certain systems, such as might be made to the National Cancer Registry, this can be done. Please contact Net Health at sales@hipaaguard.com.
Disclosures may also be tracked manually by following the instructions below:
-
From the Home Launch Pad, click
 .
. -
Find and select the patient, or add the patient to the database, then select him or her.
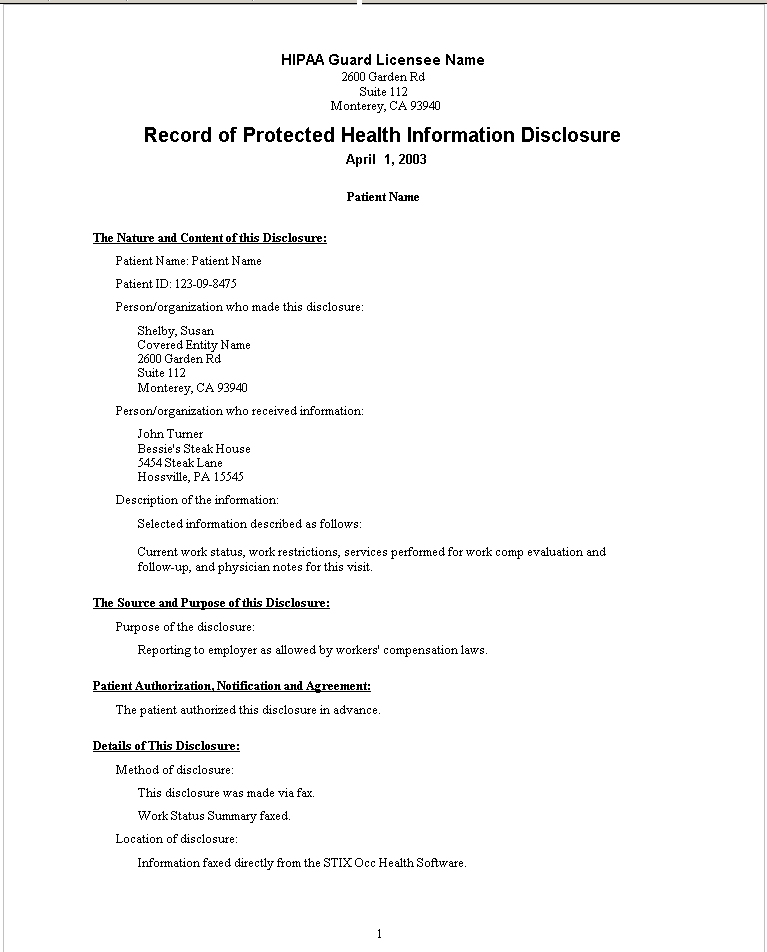
This window will display.
-
If you want to view any amendments on file for this patient, click the View Amendmentsbutton on the lower left side of the screen.
-
HIPAA Guard will enter today's date into the Disclosure Date field. If needed, type right over it to replace the date.
-
If this disclosure took place over time, (i.e. involved multiple disclosures of the same information), press the TAB key to enter the Thru field. Enter the ending date in this field.
-
If this disclosure is covered by one of the Disclosure Templates, click the table icon
 and select the template from the list [Select Standard Disclosure Template].
 -
If this disclosure has a related Authorization (and you are tracking these disclosures, even though not required under HIPAA), click the table icon, and select the Authorization from the list. This action will cause HIPAA Guard to enter most of the data that you will manually enter below.
-
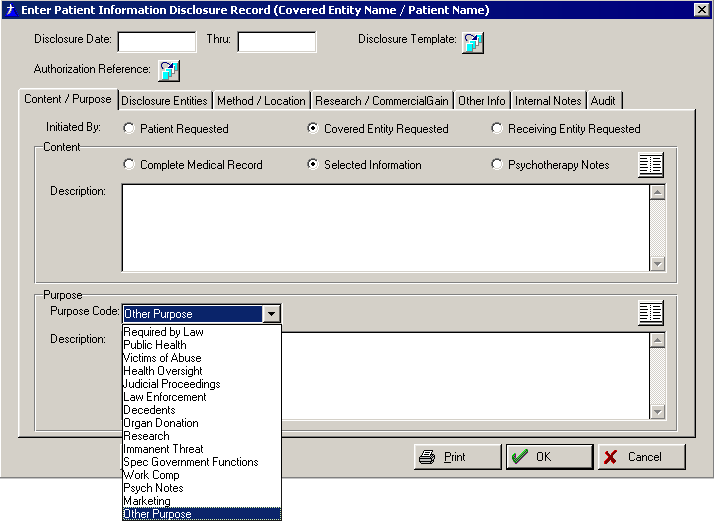
Click the appropriate radio button
 to indicate who initiated this disclosure. HIPAA Guard defaults to Covered Entity Requested.
 -
Click the appropriate radio button to indicate the content of the disclosure.
-
If appropriate, click the palette icon
 to quick pick items from the Standard Content list.
 -
If needed, enter additional text in the ContentDescription field.
-
Click the down arrow to the right of the Purpose Code field and select the appropriate purpose from the drop-down list.
-
If you selected Other Purpose, click the palette icon to quick pick one or more items from the Standard Purpose List.
-
If needed, enter additional text in the Purpose Description field.
-
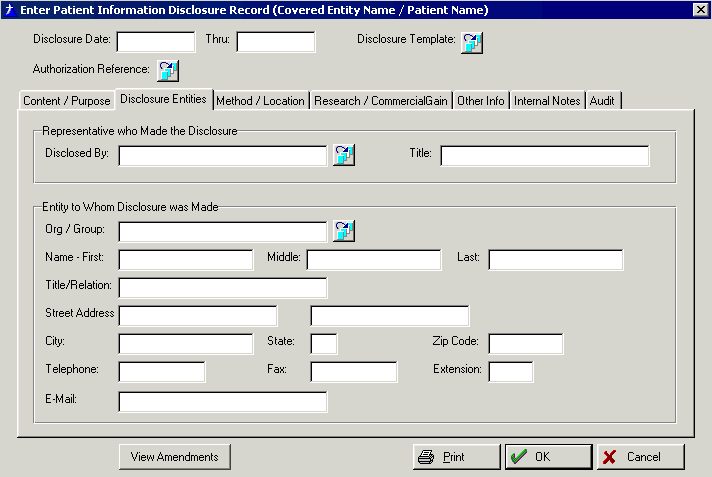
Click the DISCLOSURE ENTITIES tab and complete the applicable fields on the screen.
-
By default, HIPAA Guard will enter into the Disclosed By field, the name of the person in the Covered Entity who is identified as the [Disclosure] Accounting Officer on the SPECIAL REPRESENTATIVES tab of the Covered Entity Setup window. If this is incorrect, click the table icon to the right of the field, and select the proper Covered Entity representative.
-
Click the icon to the right of the Org / Group field.
-
To easily search the [Select Contact] window, click the down arrow to the right of the Select Type field, and select the type of contact you are searching.
-
Enter the Organization Name into the Search box, then press the TAB key on your keyboard to find the contact.
-
If the Contact is not already in the database, click the Add button and add the contact to the list. Be sure to indicate the type of contact by clicking the radio button in the Entity Type section
 on the [Setup External Entity Contact] window.
 -
Click OK to close the [Setup External Entity Contact] window, then click Select to add this contact to the disclosure record.
-
-
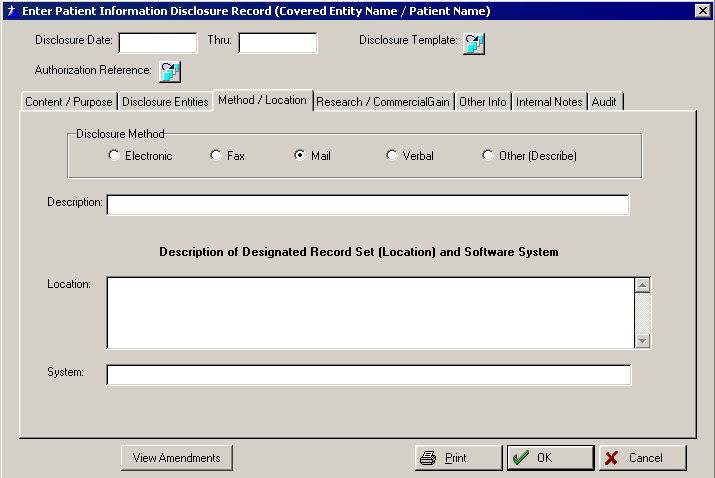
Click the METHOD / LOCATION tab and complete the applicable fields on the screen. (Location refers to the location of the medical records; if these records are held in a software system, you may document the name of the system).
-
Click the radio button to indicate the Disclosure Method. HIPAA Guard will default to Mail.
-
If you select Other, describe the method in the Description field.
-
If desired, in the Location field, enter a description of the location of the disclosed information, including the software System where the records reside, if applicable.
-
-
If needed, click the RESEARCH / FINANCIAL GAIN tab and complete the applicable fields on the screen.

-
If applicable, click the checkbox, This Disclosure was for Research Purposes. The Research Protocol window will become activated.
-
Enter a more detailed description of the research protocol, if needed, into the Research Protocol box.
-
If applicable, check the boxes to indicate if This Disclosure was for Marketing Purposes and/or whether your CoveredEntity Received Financial Remuneration.
-
-
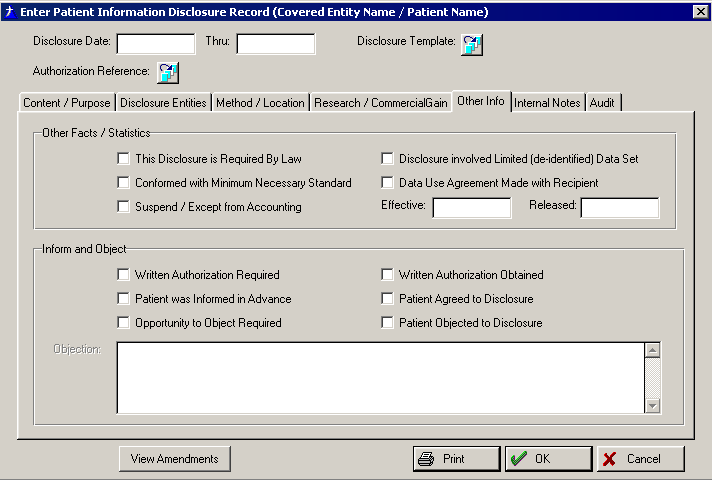
Click the OTHER INFO tab and complete the applicable fields on the screen.
-
In the Other Facts/Statistics section, check as many boxes as apply. The purpose of these boxes is simply to document that you complied with the requirements of the Privacy Provision.
-
If you check the box Suspend/Exceptfrom Accounting, this disclosure will be omitted from the official Accounting of Disclosures to the Patient.
-
If you check Data Use Agreement Made with Recipient, enter the Effective Date of the Agreement, as well as the Released (Completion) date of the Use Agreement.
-
-
In the Inform and Object section, check as many boxes as apply.
-
If you check the box to indicate the Patient Objected to the Disclosure,theObjectiontext box will become activated. Enter more detail regarding the objection and the disclosure.
-
-
-
If needed, click the INTERNAL NOTES tab and add any desired notes. These notes do not display or print anywhere other than on this window.
-
If desired, click the Print button to print a copy of the documented disclosure.
-
Click OKto close the [Enter Patient Information Disclosure] window.