Summary
Information about areas of the body other than the current complaint is collected on the ROS tab, and the text generated here goes into the Subjective section of the SOAP note. Depending on the workflow in your clinic, this might be done by a clinician or by the provider.
An option can be selected on the AUTOMATION tab of the EMR Parameters screen which will automatically pull certain information forward from a previous visit. For a Workers' Comp follow-up visit, the information entered on this tab for the initial visit can be brought forward. For a Private Practice visit, the information for the most recent prior visit within a specified time period can be brought forward.
Completing the ROS tab

-
Make sure that all the Template Elements that apply to this visit are enabled, that is, the box to the left of the button is checked and the button is not "grayed out". Usually the correct ones will already be enabled a result of the template setup. However, exceptions occur, and you can check beside a button to make it available if you want. (There is no need to uncheck an element if you are not going to document it.)
-
Where appropriate, check the "Denies All ..." box beside an element. This will enter appropriate text. In the example above, the Denies All Musculoskeletal box beside the M/Skel button was checked. You can see the text that was entered. The exact text generated can be change in Template setup. After you check the box, it will disappear.
-
Optionally, you can check the All Systems Normal button. This has the effect of checking all of the "Denies" boxes. Very efficient!
-
There are four ways you can proceed:
-
One is to click the button for a checked element, and enter information requested as described in the topic on Using Template Wizards.
-
The second is to click the Auto-Run Selected Elements button. This will automatically walk you through entry for all checked elements. Any elements for which you already checked the "Denies All ..." box will be skipped.
-
The third way is to click the Smart Form button. This will group as many elements as possible onto a single form instead of popping up a separate window for each element the way Auto-Run does. Any elements for which you checked the "Denies All..." box will be omitted. We recommend using Smart Form when you can.
-
If you click the ROS Set button, a list of all ROS Set Rapid Charts will be displayed. Each Rapid Chart executes a series of wizards. You may run multiple Rapid Charts, one at a time. Running a Rapid Chart does not affect your ability to enter additional information by clicking buttons.
-
-
Each button will display a [Charting Templates Text Elements] window.
-
Check the items you want.
-
Click Done.
-
Respond to Wizards as they are displayed.
-
-
If needed, you can make changes directly to the note using the editing features.
-
The Attest Review of ROS button located on the EMR Charting Workspace window under the ROS tab will give Providers the opportunity to attest to the Review of Systems (ROS). Selecting this button will display the following window, which contains entries created by the selected wizard:
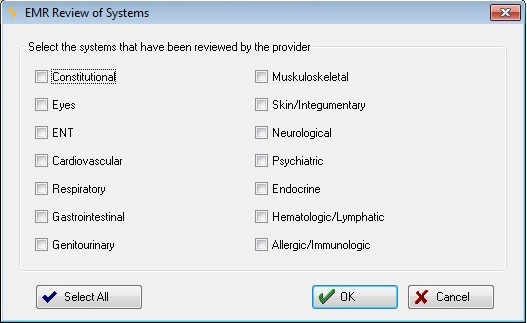
EMR_Review_of Systems
Providers may select each system that was reviewed or choose the Select All button which will check all of the systems listed. If a particular system is not active on the EMR it will be dithered and not available to be selected on this window. The application will determine if the user has defined an ROS attestation statement. If one exists, the system will use it. If one does not exist, Net Health Employee Health and Occupational Medicine will default to the language: "Completed a review". Then Net Health Employee Health and Occupational Medicine will complete the attestation statement with "a patient’s <list of systems checked off>"
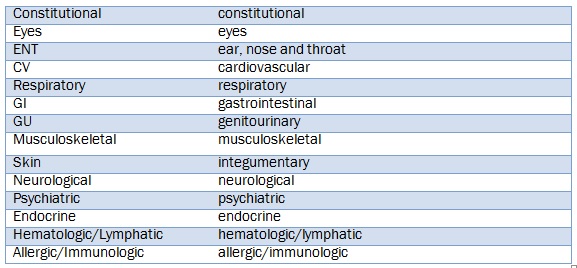
The following chart is a list of the descriptions that are used by Net Health Employee Health and Occupational Medicine: