Visit Reconciliation Report
If you haven't already done so, please read the Reports Overview. The Overview includes all the standard report options and how to use them. Those instructions and terms will not be repeated here. Also read End of Day Procedure for details on the full process for the end of each day.
Summary
The purpose of this report is to ensure that all visit-related data has been captured in the software. It is usually printed at the end of a day, or the start of the next day, and reconciled Encounter Forms. The report displays all the data that has been entered for each visit, including the medical activity codes and results.
Patient_Visit_Reconciliation_Report
How to Run this report:
-
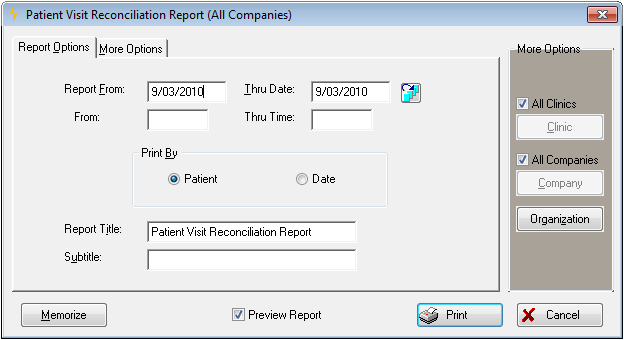
Enter the From and Thru dates for the desired reporting period, or click the table icon
 and select a date or range.
 -
Optionally, enter From and ThruTimes. This is intended for clinics that are open for extended hours where staff work in shifts. The time selection is based on the Start Time of the visit.
-
Select the option to have the report Print By employee or date, if more than one date was selected in #1 above.
-
Select any of the standard Company and Organization report options, if needed.
-
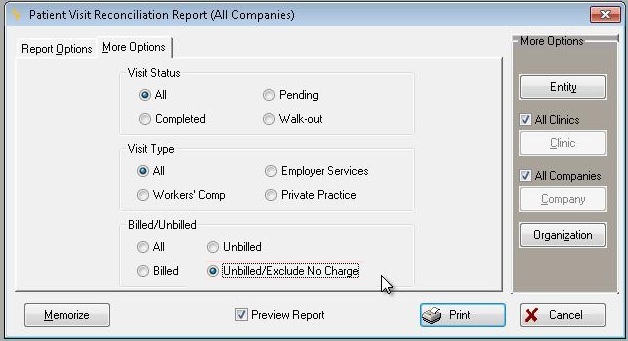
The More Options tab provides additional ways to control the information on the report.
Patient_Visit_ Reconciliation_Report
-
Click Print to run the report.
-
Review the report first to find all errors which the software has identified:
-
Patients who were not checked out. (All activities for the visit will show "?" for the result code.)
-
Billable activities and CPT codes which neither have fees or are marked as no charge. ("Missing" will be displayed for each problem activity in the Charge column.)
-
-
Workers' Comp visits for companies which neither have a carrier or are marked as self-insured. (All billable activities will show "Missing" in the charge column.)
-
payers without billing accounts. (All billable activities will show "Missing" in the charge column.)
-
-
Compare each Encounter Form to the information shown on the report. Make sure all activities have been entered.
-
Using your knowledge of clinic procedures, look for other errors. Here are some examples.
-
A "C" result code for an activity such as TB skin test which should never show that.
-
A visit that looks like it should have more charge items, given the diagnosis.
-
A visit with contradictory or overlapping charge items, such as both an E/M code and a laceration repair.
-
A visit that is missing an item that usually accompanies one of the activities that has been included, such as a laceration repair without a surgery tray.
-
Activities that you can see are missing based on observation, such as a visit without an arm cast when you saw the patient leaving with a cast.
-
-
Correct errors and re-run the report until all problems are handled.
ICD CODES
When printing the Visit Reconciliation Report:
- If there is only an ICD-9 coded on the Incident, the system will print the ICD-9 code.
- If there is only an ICD-10 coded on the Incident, the system will print the ICD-10 code.
- If there is both an ICD-9 and an ICD-10 coded on the Visit, the system will print the ICD-9 if the visit date is less than the clinic parameter for ICD-10 Effective Date, or if the Effective Date is empty.
- If there is both an ICD-9 and an ICD-10 coded on the Visit, the system will print the ICD-10 if the Visit Date is greater than the clinic parameter for ICD-10 Effective Date, and the Effective Date is not empty.
When printing the ICD-10 code the description of the diagnosis will come from the ICD10 master table. Descriptions are not stored for the ICD10 codes on the Incident.
The system will print the ICD-10 in the same area as the ICD-9 code and description print. However, due to the larger size of the ICD-10 code, the description may be truncated more.
|
|