How to Use Quick Shots
Each section below provides detailed instructions, including screen shots and explanations. At the end of the document, bare bones step-by-step versions of each how-to section are provided for printing out as a "cheat sheet"s to follow when actually working through the process.
If you have not already done so, read the H1N1 overview topic before proceeding.
Summary
Net Health has developed a system to help ease the burdens of flu shot tracking, including H1N1 tracking and reporting. The system is designed for Hospital Employee Health clients primarily. If you are providing EH services to your own organization or others, this will be useful to you. If you only provide services to outside organizations, it will have very limited usefulness. There are two components. The first is a method to reduce the effort required for capturing information on shots administered. While the existing Quick Load feature works very well for the requirements of a normal year, it requires direct access to the software, and given the extremely high volume of shots to be given this year in a very short period, it is still requires a great deal of work. Nothing is going to make this easy, but our new system will greatly reduce the effort required.
The system consists of two components. The first is a utility named Quick Shots which allows you to export employees to a single spreadsheet, or to individual spreadsheets for each department. Vaccination information can be entered in the spreadsheet by multiple individuals in other locations. Since those doing the entry do not need to be the software users, the workload can be spread across a much larger group of people, reducing the burden on your department. Once the information is entered in the spreadsheets, it can be reimported back into the software, creating the appropriate visit and result records.
The second step is generating reports and electronic files with the information that CDC is requiring be submitted via state health departments.
Quick Shots
Quick Shots will export all employees from a single organization to a spreadsheet. As an option, employees can be segregated into separate spreadsheets by dept/unit. These spreadsheets to be sent to the staff members in those departments who may administer the immunizations, allowing them to do the entry work for their own dept\unit. The export will include the employee names and their the software identifiers (e.g., SSN, etc.) When employees arrive to receive the shot, information about them is entered into the spreadsheet, not into the software. On a periodic basis, the spreadsheet(s) can be imported back into the software, using Quick Shots. The import will provide the option to log a visit for the date of the immunization.
There is no provision in the utility to import employees from more than one company at a time. For this reason, it will have limited usefulness to provider clinics, unless, perhaps, they go on-site and immunize a large employee population for a local employer, in which case they can use this. Also, it will not be possible to import into the software any employee who is not already known to the software, which is another reason this will have limited (if any) usefulness to provider clients.
|
|
Quick Shots uses the employee primary ID to match imported employees back to records . If SSN is how employees are identified (i.e., it is the primary identifier), and your organization has a policy that will not allow the SSN to be included in the spreadsheet, you will not be able to use this utility. If you have SSN and use a different primary identifier such as an internal Patient ID, you can use the other (primary) identifier instead. Of course, the software can only have one primary identifier at a time. |
Here are the steps required:
-
Using the Quick Shots utility, export the names of all patients (employees) in the database, including the ID used to track them , into a pre-formatted spreadsheet. Optionally, you can export by department/unit so that you can send the spreadsheet to people who may be administering the immunization outside the Employee Health department.)
-
When the immunization is administered, enter into the spreadsheet any information that is needed for each patient. Copy/paste information such as dosage, lot number, etc. from one patient to the next, as appropriate.
-
Using the Quick Shots utility, import the data into the software. The import will give you the option to automatically create a the software visit record for the same date as the date of the immunization.
-
Print the CDC Immunization Report to submit you your state department of health.
What Do You Want To Do?
How to Create the Spreadsheet
This section explains how to create a folder to hold your Quick Shots spreadsheets, and it uses your computer's Desktop as the recommended location.
For large organizations, however, it would be much preferred to store the spreadsheets on a shared but secured network drive, to eliminate the need to send the spreadsheets (which contain personal information) back and forth.
As you will learn when you view the help resources related to importing completed spreadsheets using Quick Shots, when you do the import, Quick Shots produces a new "Errors" spreadsheet that contains all the employee or patient records that did not load. These would include any patients who have not yet received their immunization: their records will be skipped.
If you use a centrally located network folder, each time you import a spreadsheet, the Errors spreadsheet, you will be actually be creating an updated spreadsheet. In addition to containing records with errors, the "Errors" spreadsheet will contain all the people who were skipped during the import because there was no shot administration date in their record.
This "Errors" spreadsheet can be used by the Clinicians the following week to administer shots to the people remaining on the spreadsheet. They just need to know to ignore the word Errors in the filename.
You could then wait until Dose 1 is over, then make all your corrections at one time, in the interim between Dose 1 and Dose 2 administration.
Before you start
-
A medical activity code for the H1N1 virus must have been created in your medical activities table.
-
Each Clinician who administers shots will need to be listed as a Clinician in your database.
Steps to create the spreadsheet
-
Create a folder for the spreadsheet on your Desktop, or in another appropriate location.
-
Right click on your desktop.
-
On the pop-up menu, click New.
-
Click Folder.
-
A folder icon will appear on the desktop with the label, "New Folder" highlighted. Type in a name which you can easily find such as "H1N1 Spreadsheets".
-
-
On the Home Nav Bar, click Utilities.
-
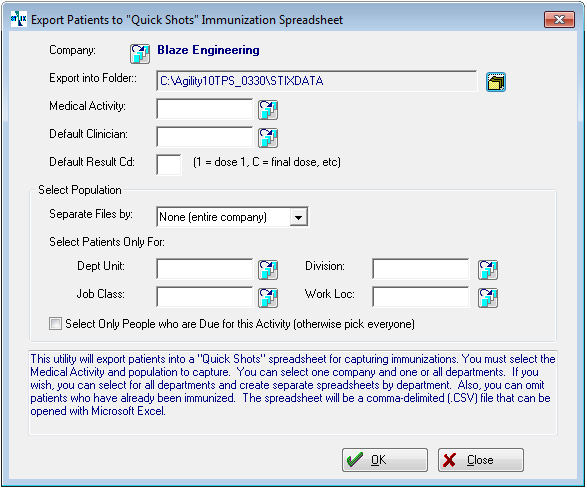
Click Export to Quick Shots File to display the [Export Patients to "Quick Shots" Immunization Spreadsheet] window.
-
Quick Shots exports only one company at a time. If the correct company is not currently selected, click the table icon
 beside the Company field, then search for and select the correct one.
 -
Click the folder icon beside Export to Folder to locate the H1N1 Spreadsheets folder on your Desktop. Quick Shots will put the exported spreadsheet into this folder.
-
On the [Browse for Folders] window, if needed, collapse other folders so that you can see all the folders on your Desktop.
-
Select the H1N1 Spreadsheets folder.
-
-
If you know your H1N1 vaccination medical activity code (not description), type it here. If not, click the table icon to search for and select it from the medical activity table.
-
Enter the Default Clinician, the person who will administer the shots for the group of people exported to this spreadsheet. If you are creating spreadsheets for each department, leaveDefault Clinicianblank.
-
If you know the Clinician Code for that person, type it in.
-
If you know the person, but not the code, click the table icon, then search for and select the correct clinician.
-
If you don't know who the clinician will be, leave it blank for now. The Clinician can fill it in when he or she gives the shots.

When the spreadsheet is returned, you will need to make sure that the Clinician Code matches what is before you upload the spreadsheet to the software. If the spreadsheet is incorrect, you can change the spreadsheet and copy/paste the correct Clinician Code to each spreadsheet cell, as needed.
-
-
In the Default Result Code, indicate the dose that will be tracked on this spreadsheet. Enter 1 or 2 for Dose 1 or Dose 2. You can leave this field blank and let the Clinician fill it in, if needed. Of course, when you first start the immunization process, it would be very helpful to fill in 1 for Dose 1, since no one would have yet received the shot. This will save data entry.
-
The Separate Files By allows you to put all employees in a single spreadsheet, sorted alphabetically by name. Select Department Unit to produce a separate spreadsheet for each (and every) department, Work Location to produce a separate spreadsheet for each location, etc. The program will export as many spreadsheets as needed, and include the name of each department, location, etc in the file name. If there are individuals who have not been assigned to a department, location, etc., an "unspecified" spreadsheet will be produced.
-
If you just want to create a spreadsheet for a single department, leave Separate Files By, discusssed in Step 9, set to "None", and enter the department in the Dept Unit field.
-
If you know the department code, just type it in.
-
If you don't know the department code, click the table icon beside the field, then search for and select the correct one.
-
If you make an incorrect entry, highlight the code, then press the delete key on your keyboard.
-
-
To create a file for a single Work Location, Job Class, or Division, follow the instructions in Step 10, substituting the appropriate field.
-
If you want to include only people who are due for the second dose, check Select Only People Who Are Due for This Activity (otherwise, pick everyone.)
-
Click the OK button to produce the spreadsheet(s).
-
When the software has finished producing the spreadsheet(s), a box will pop-up telling you how many patients were exported. Click OK to close.
-
To return to the Nav Bar, click the Cancel button.
How to Enter Data in the Spreadsheet when Administering Immunizations
On the left side of the spreadsheet
-
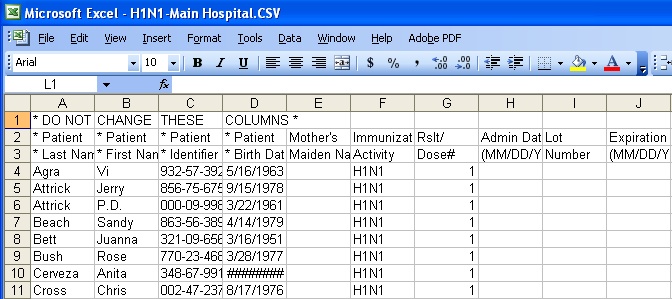
Columns A, B, C, D: Data in columns that have '*' in their heading must not be changed. These columns are included in the spreadsheet for reference only. If data is changed in one of these columns, you will get errors when you try to re-import the spreadsheet into the software.
Even if the patient's DOB is wrong on the spreadsheet, you cannot change it here and have it go into the software. It just doesn't work that way! Please be sure to tell others who will use the spreadsheets that this is the case. If they change the DOB (or any other cell in a column whose heading has an asterisk), you will not be able to import the data for that patient. The un-readable records will kick out into an error spreadsheet so that you can fix them, but this will be avoidable work and it could be time consuming if there are a lot of them.
If you know Excel, or have someone to help you, you can use Excel to lock cells that must not be changed before giving out the spreadsheet. How to do that varies with different versions of Excel, so we are not including instructions here, but you should do this if practical for your size organization.
-
Column D: The hatch marks ('#####') in the Birth Date for the 10th row just mean the column display is not wide enough (without adjustment) to show the entire contents of the column. Ignore them. The data is fine.
-
Column E:Mother's Maiden Name is included here because some states are asking for this information for their State Immunization Database. This is a field without an asterisk, so you can enter a name into it, and Quick Shots will import the name into the software. Of course, it is not required, just useful if you are in one of those states.
-
Column G: The Result Code field is where the clinician should enter '1' or '2', depending on the dose the employee receives. As noted previously, you can have Quick Shots fill this field automatically when it creates the spreadsheet, which you should definitely do for Dose 1.
You can also enter 'R' in this field to indicate the employee Refused the vaccination. If the medical activity for the H1N1 immunization has been set up with a result code 'W' for Waived, that code can be entered here, too.
Please note: only '1' or '2' or 'R' or 'W' should be entered in this field. ANYTHING else will cause an error, and therefore create more work for you!
-
Column H: The Admin Date is the date of the immunization. It must be formatted as MM/DD/YYYY. If someone enters a date in a different format, someone familiar with Excel can correctly format the entire column in a single step before you import to the software. If you don't know how to do that, ask someone who knows Excel to help you format the column.
-
Column I: Lot Number is just that: enter the lot number of the vaccine. Remind the clinician she can copy/paste the lot number for other patients, as needed.
-
Column J:Expiration Date is the date the vaccine expires. It must be formatted as MM/DD/YYYY. If someone enters a date in a different format, someone familiar with Excel can correctly format the entire column in a single step before you import to the software. If you don't know how to do that, ask someone who knows Excel to help you format the column.
On the right side of the spreadsheet
-
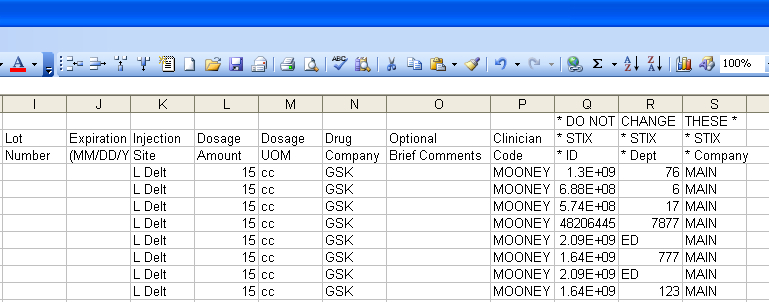
Columns Q, R, S: The data in columns that have an asterisk in the column heading must not be changed, same as on the left side of the spreadsheet. It is displayed here for reference purposes only.
-
Columns K-P: You can add or change data in any column on this side of the sheet that does not have an asterisk in the column heading. Some people may need the shot in the R Delt, for example. No problem, just change the cell.
-
Column O: The Brief Comment field is imported into the medical activity Summary field -- so keep the text short!
Some final words about working with the spreadsheet...
-
You cannot change data in the columns that have an asterisk. If data is changed in one of those columns, the record will not be loaded back into the software.
-
You must have an Administration Date entered. The data will not load for anyone missing the admin date.
-
You can definitely manually add people to the spreads sheet. You will first have to add them to the software (name and primary ID) prior to importing the spreadsheet, or the records will kick out as errors when you use Quick Shots to load the spreadsheet back into the software.
-
When you import the spreadsheet, all patient records that have errors will kick out into a special "error spreadsheet", placed in the folder you created in Step 1 above. You will be able to open this spreadsheet and fix the errors, then run Quick Shots again to import the corrected records.
-
People who have been added to the spreadsheet will most likely be those who are not already . The spreadsheet may have correct data, but the error is that the program doesn't recognize them. In that case, the correction needs to be made : Add their demographic record to the software, then make sure that whatever ID you use as the main identifier is also on the spreadsheet for that person.
How to Import Data from the Spreadsheet
-
Open Quick Shots by clicking Utilities on the Home Nav Bar.
-
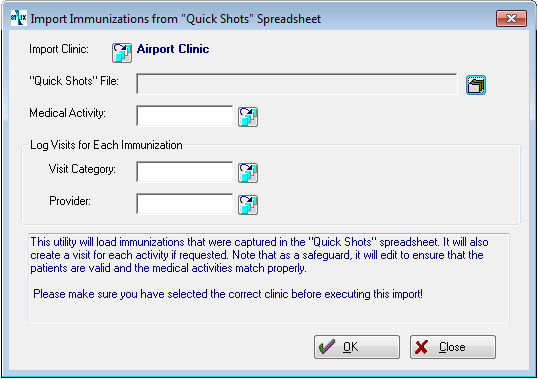
Click Import from Quick Shots File to display the [Import Immunizations from "Quick Shots" Spreadsheet] window.
-
If the correct clinic is not currently selected, click the table icon
beside the Clinic field, then search for and select the correct one. -
Click the the folder icon beside "Quick Shots" File to locate your spreadsheet, which we assume you have replaced in the original folder on your desktop, after receiving it back from the clinician who completed it.
-
On the [Choose a File] window, select the Desktop item.
-
Double click the H1N1 Spreadsheets folder to open it.
-
Double click the spreadsheet, or highlight it and then click the Open button to select the sheet.
-
-
In the Medical Activity field, enter the H1N1 medical activity code, or click the table icon to search for and select it from the medical activities table.
-
If you want the import process to also log a visit, enter the Visit Category code here, or click the table icon to select it from the list.
-
Optionally, enter a Provider. Do this ONLY if you want to bill the visit to an insurance company. Type the provider code, or click the table icon to select the provider from your Provider List.
-
Click the OK button to start the import process. (How long it takes depends on how many people are getting loaded).
-
When the import is complete, The program prints a report that lists everyone who got loaded, and that tells you the errors that occurred. The report will be displayed in the [Print Preview] window.
-
A progress bar will be displayed while Quick Shots prepares the report. It will display the completed report in the [Print Preview] window. Here is a section of the report:

-
In the imported spreadsheet, Ben Dover had a last name that did not match what was , a predictable error when people add names to the spreadsheet, although their error will likely be a typo. Quick Shots (a) did not load this record (b) found the ID in the database and matched the ID to display the employee / patient name on the report so you can find it and (c) put the "bad" record into the Errors spreadsheet.
-
Eileen Dover was skipped because there was no administration date in the spreadsheet, even though it is showing here. This will be very useful if you must import data weekly to meet reporting requirements: anyone who hasn't yet received their dose will be skipped. (More on this topic below).
Keep in mind that sometimes, Quick Shots may not have enough information from the spreadsheet to tell you who the patient is. It's smart, but not clairvoyant. It will at least tell you the person was skipped.
-
-
At the bottom of the report, the software summarizes how many people were successfully imported into the software, and how many errors and skipped records are on the Errors spreadsheet, in this case, a total of 5 records.

-
Click the print icon, then the Print button, to send the report to the printer. A progress bar will be displayed while the software prepares the report for printing.
-
When printing is finished, you can find the Error spreadsheet (named the same as the original spreadsheet, but with the word Error added) in your original spreadsheet folder. This Error spreadsheet contains only those records that were not properly imported for some reason. The printed report tells you the reason, as much as Quick Shots can determine.
Note that your original spreadsheet is gone. Quick Shots deleted it so that you will not get confused about which spreadsheets have and have not been loaded. There is no need to keep the original spreadsheet, since the data is now , and you don't need that private information hanging around anyway!
-
The next step in the process is to open the Errors spreadsheet in Excel and correct the errors, using the printed report as your guide. Remember that some of the errors may need to be fixed : If someone has been added to the spreadsheet, you should go into the software and add them to the database. Then, make sure the ID you use to track people in the program is correctly entered on the spreadsheet. Once the errors are fixed, just import the Error spreadsheet the same way you did the original spreadsheet.
Some final words on importing . . .
-
In very large organizations, you may want to keep your spreadsheets on a secured but centralized network drive, to minimize or eliminate altogether any "transportation" of the spreadsheet via email or other means.
-
Also keep in mind that if you must upload data to the software on a weekly basis to meet State reporting requirements, you can do that with no problem: just import the original spreadsheet. Anyone without an administration date (i.e. who has not received the shot) will "kick out" into the Errors spreadsheet. This means they will be listed on the spreadsheet just the same as in the original spreadsheet. So, the Errors spreadsheet will be the original list with everyone removed who was already imported to the software.
-
If you keep your spreadsheets centrally located, instruct your Clinicians who are using the spreadsheets to simply ignore the word "Errors" in the title. That way, you can just import each week and the following week, the Clinicians can open the "Errors" spreadsheet for their department or location and enter that week's activity. You can then repeat the process of importing and entering another week's activity until all names in the spreadsheet have been imported.
-
At the very end of the first dosing, you can fix any real errors and do the final import into the software.
How to Produce the Report to send the State Health Department
-
On the Home Nav Bar, click Utilities.
-
Click H1N1 Immunization Report to display the CDC Immunization report window.
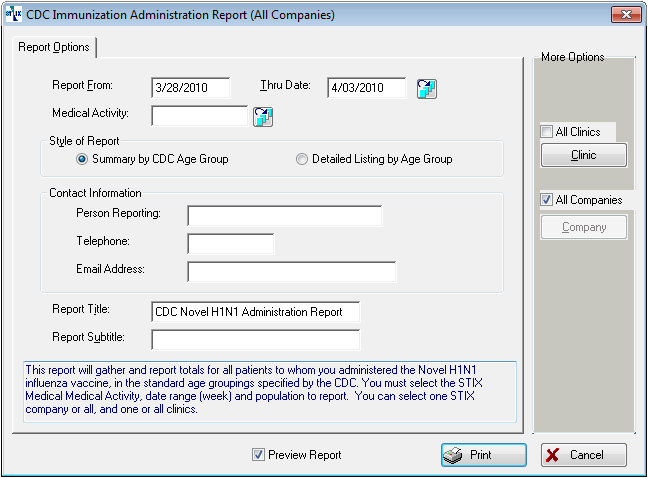
-
Enter the date range to include on the report. This can be done by either entering dates in Report From and Thru Date, or by clicking the table icon
and selecting a predefined period. -
In the Medical Activity field, either type in the medical activity code for your H1N1 vaccination or click the table icon, then search for and select the activity.
-
Indicate the Style of Report you want:
-
Check the Detailed Listing by Age Group radio button to produce a report with patient names, grouped by age range.
-
To produce the exact report specified by the CDC, select the Summary by CDC Age Group radio button. This report has no names on it, just the number of doses administered in the reporting period.
-
-
In the Contact Information fields, enter the name, telephone number, and e-mail address of the person to be printed on the report as the person submitting the report to the State Health Department.
-
Optionally, give the report a new Report Title by highlighting the default text and typing right over it.
-
Optionally, enter a Report Sub-title for the report. By default, Quick Shots will include your organization name on the report, so you don't need to enter it here.
-
Click Print. A progress bar will be displayed while the software processes the needed information.
-
In the [Select Printer] dialog box, do just that, then click OK. A dialog box will display a progress meter while the software prepares the report.
-
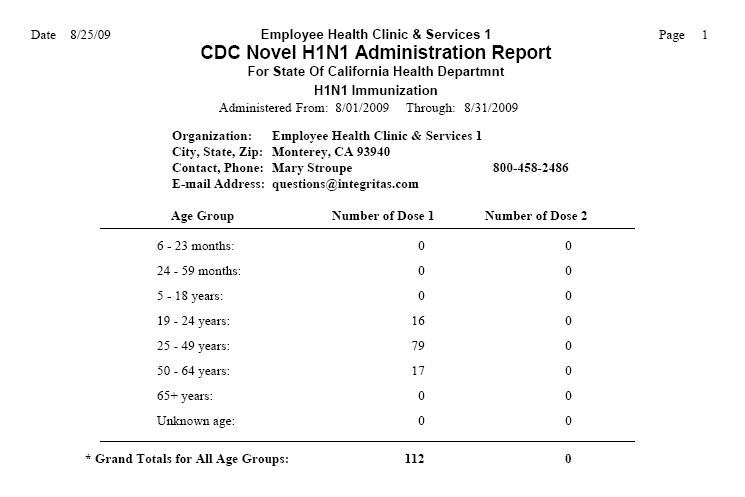
Here is a sample of the summary report:
-
Click the Print icon, then the Print button, to sent the report to the printer.
-
To return to the launch pad, click the Cancel button.
How to Export to the State Immunization Registry
Cheat Sheets
How to Create Quick Shots Spreadsheets
-
Create a folder for the spreadsheet on your desktop, or in another appropriate location.
-
Right click on your desktop.
-
On the pop-up menu, click New.
-
Click Folder.
-
A folder icon will appear on the desktop with the label, "New Folder" highlighted. Type in a name which you can easily find such as "H1N1 Spreadsheets".
-
-
Access Quick Shots by clicking Utilities on the Home Nav Bar.
-
Click Export Quick Shots File to display the [Export Patients to "Quick Shots" Immunization Spreadsheet] window.
-
If the correct company is not currently selected, click the table icon beside the Company field and select it.
-
Click the folder icon beside Export to Folder to locate the H1N1 Spreadsheets folder on your Desktop.
-
On the [Browse for Folders] window, if needed, collapse other folders so that you can see all the folders on your Desktop.
-
Select the H1N1 Spreadsheets folder.
-
-
Type the H1N1 medical activity code, or click the table icon
to search for and select it from the medical activity table. -
Optionally, enter the Default Clinician the Clinician Code by typing it in or clicking the table icon, to search for and select the correct clinician. If you are creating spreadsheets for each department, leaveDefault Clinicianblank.
-
In the Default Result Code, enter the number of the dose that will be tracked on this spreadsheet, either 1 or 2. Optionally, leave this field blank and let the Clinician fill it in.
-
The Separate Files By allows you to put all employees in a single spreadsheet, or to produce a separate spreadsheets based on a specified organizational group. Select None to produce a single spreadsheet with names sorted alphabetically. Select Department Unit to produce a separate spreadsheet for each department, Work Location to produce a separate spreadsheet for each location, etc.
-
Optionally, export a spreadsheet for a single dept/unit by entering the department in the Dept Unit field.
-
Optionally, export a spreadsheet for a single job class by entering the department in the Job Class field.
-
Optionally, export a spreadsheet for a single division by entering the department in the Division field.
-
Optionally, export a spreadsheet for a single work location by entering the department in the Work Loc field.
-
If you want to generate one spreadsheet for the people who are due for the second dose, check Select Only People Who Are Due for This Activity.
-
Click the OK button to produce the spreadsheet(s).
-
Click OK in the pop-up window that tells you how many patients were exported.
-
To exit, click the Cancel button.
How to Enter Data in Quick Shots Spreadsheets When Administering Immunizations
-
Columns A, B, C, D: DO NOTHING. If data is changed in one of these columns, you will get errors when you try to re-import the spreadsheet into the software.
-
Column E: Enter Mother's Maiden Nameonly if it is required in your state.
-
Column G: Enter the appropriate Result Code: 1-Dose 1; 2-Dose 2; R-Refused; W-Waived.
Please note: only '1' or '2' or 'R' or 'W' should be entered in this field. ANYTHING else will cause an error, and therefore create more work for you!
-
Column H: Enter Admin Date, the date of the immunization (formatted MM/DD/YYYY.)
-
Column I: Enter (copy/paste) the Lot Number of the vaccine.
-
Column J:EnterExpiration Date, the date the vaccine expires (formatted as MM/DD/YYYY.)
-
Columns Q, R, S: DO NOTHING. If data is changed in one of these columns, you will get errors when you try to re-import the spreadsheet into the software.
-
Columns K-P: Add or change data as needed.
-
Column O: Optionally, enter a Brief Comment to be imported into the medical activity Summary field .
How to Import a Quick Shots Spreadsheet
-
Access Quick Shots by clicking Utilities on the Home Nav Bar.
-
Click Import from Quick Shots File to display the [Import Immunizations from "Quick Shots" Spreadsheet] window.
-
If the company for the employees being imported is not currently selected, click the table icon beside the Company field and select the correct one.
-
Click the the folder icon beside "Quick Shots" File to locate your spreadsheet
-
On the [Choose a File] window, select the Desktop item.
-
Double click the H1N1 Spreadsheets folder to open it.
-
Double click the spreadsheet, or highlight it and then click the Open button to select the sheet.
-
-
In the Medical Activity field, enter the H1N1 medical activity code, or click the table icon to select it.
-
If you want the import process to also log a visit, enter the Visit Category code here, or click the table icon to select it.
-
Enter a Provider ONLY if you want to bill the visit to an insurance company.
-
Click the OK button to start the import process.
-
A progress bar will be displayed, then Quick Shots will display the completed report in the [Print Preview] window.
-
Click the Print icon, then the Print button, to send the report to the printer. A progress bar will be displayed while the software prepares the report for printing.
-
When printing is finished, you can find the Error spreadsheet (named the same as the original spreadsheet, but with the word Error added) in your original spreadsheet folder.
-
Open the Errors spreadsheet in Excel and correct the errors, using the printed report as your guide.
How to Produce the Report to Send the State Health Department
-
Access Quick Shots by clicking Utilities on the Home Nav Bar.
-
Click H1N1Immunization Report to display the [CDC Immunization report] window.
-
Enter the date range to include on the report. This can be done by either entering dates in Report From and Thru Date, or by clicking the table icon and selecting a predefined period.
-
In the Medical Activity field, either type in the medical activity code for your H1N1 vaccination or click the table icon, then search for and select the activity.
-
Indicate the Style of Report you want, Detailed Listing by Age Group, or Summary by CDC Age Group.
-
In the Contact Information fields, enter the name, telephone number, and e-mail address of the person to be displayed on the report as the person submitting the report to the State Health Department.
-
Optionally, give the report a new Report Title by highlighting the default text and typing right over it.
-
Optionally, enter a Report Sub-title for the report.
-
Click Print.
-
In the [Select Printer] dialog, select the printer for the error report, then click OK to start printing.
-
A progress bar will be displayed, then will Quick Shots display the completed report in the [Print Preview] window.
-
Click the Print icon, then the Print button, to send the report to the printer. A progress bar will be displayed while the software prepares the report for printing.
-
Click the Cancel button to exit.