Entering Macro/Standard Text
Summary
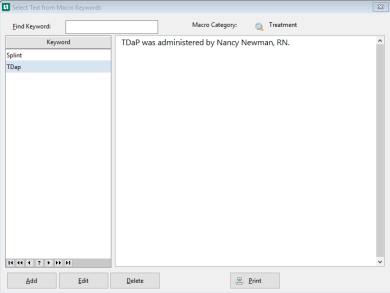
Charting Notes are plain text windows that give you a place to write, store and review your nursing notes. Charting notes can be added to visits, medical activities, and incidents. To speed up the entry of charting notes and reduce errors that result from unclear notes, the application includes a Text Macros function. A text macro is a key word or phrase that, when selected in the software, enters an associated segment of standard text. (For example, you might have a key phrase "TDaP" and when this is selected, it enters the following text: "TDaP was administered by Nancy Newman, RN.") There is no practical limit on the length of text in a single macro.
Macro text for charting notes is organized into 6 categories. This makes it easier to find the item you need. To enter text, click the button for the appropriate category, select the text you want, and the program will insert it into the chart note at the point where your cursor is located. You can change the category names if you wish. For instance, it might be that you have two users who have completely different macro text elements to enter, and who want them all in one place. To facilitate this you could change two of the categories to show their names for their personal sets of macro text.

If you use Provider Charting, this might not apply to you since the provider charting function generates the medical charting note for a visit. However, there might still be circumstances when you want to enter a note from another location. It might be that you don't use Provider Charting for physicals. Or, there might be nursing or administrative notes you want to capture independently of the primary charting note.
Macro Text for Protocol Instructions
If you use company specific visit category protocols, you can use macro text for entering special instructions. Using text macros can result in greater consistency in instructions among protocols and companies. People rarely write the same instruction the same way every time, and if more than one person is writing instructions, the same instruction is written numerous ways. Consequently, the clinical staff often has to ask for clarification, or worse yet, assume they know what is meant, or guess at what is meant. These actions can lead to mistakes and re-work. Macro text provides a method for assuring that instructions are consistent, correct, and understandable.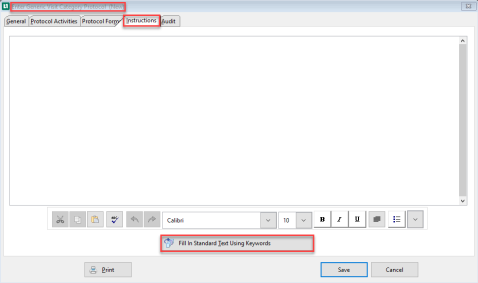
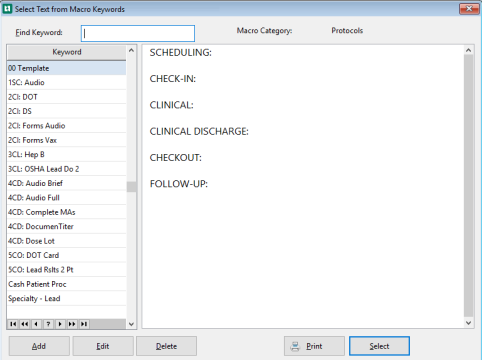
To help staff find what they are looking for quickly, it is a good idea to have a standard structure for protocol instructions. We recommend that you organize by work area: scheduling, check-in, etc. That allows each user to read only what is needed for the current task, saving time and reducing the opportunities for mistakes. Creating a macro text item with that structure saves time and encourages consistency.
While both charting notes and protocol instructions support rich text formatting, the macro text function will not save RTF. We do recommend the use of bold type and bullets to improve the readability of protocol instructions, but it will have to be added directly on the chart note after selecting the macro text.
Organize Your Key Words!
In the same way that it’s useful to organize your Special Instructions by the sequence they occur in the clinic, it’s useful to organize your keywords so that they are easy to find when setting up employer protocols. You can do this in several ways, but the easiest is to use numbers. For example, all keywords related to Scheduling might start with 1_Keyword. All instructions related to Check-In might start with 2_Keyword. This will enable the application to display related keywords together, which will save a lot of time and frustration.

Using Macro Text on Charting Notes
-
On the Enter Visit window
-
Select Charting Notes
-
Visit Charting for (patient name) window opens
-
Select Add
-
Charting Note (patient name / company) window opens
-
The window has 4 tabs for
-
Subjective - Categories 1-3
-
Objective - 4th Category
-
Assessment - 5th Category
-
Plan - 6th Category
-
-
Down the left of the window are the Categories available for each of the tabs. When changing the names of these remember how they are used in the charting note.
-
To enter these tabs select the appropriate category button to open the options available.
-
Highlight the Keyword
-
Click Select
-
If no additional information is needed it is just added to the Charting Note.
-
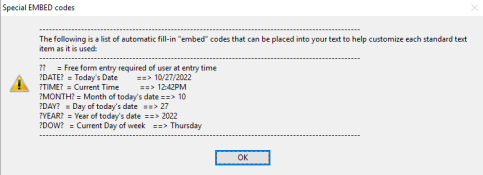
If additional information is needed (because the Display special EMBED codes button was selected) enter the information.

-
Here are the EMBED codes available
-
-
After completing the Charting Note
-
Select Save
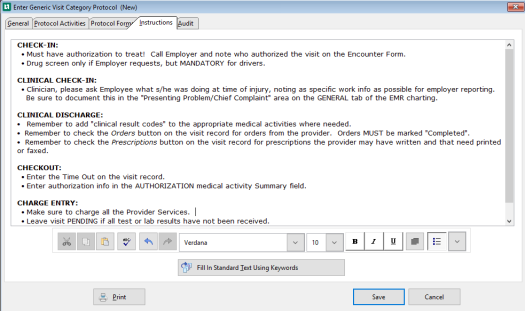
Using Macro Text to Create Protocol Instructions
To use Macro Text to create the Instructions on a Protocol
Select the Fill In Standard Text Using Keyword button from the bottom of the window.
After selecting the button the Select Text from Macro Keywords opens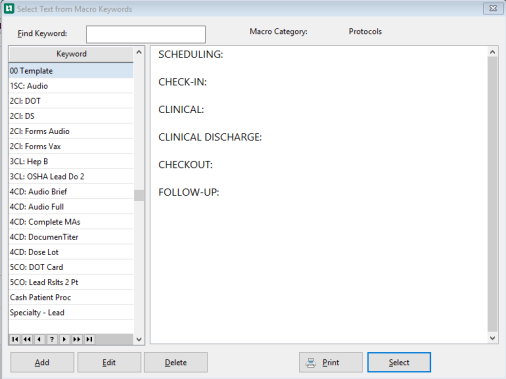
The headers will display on your Instructions tab.
Enter the information associated with each header.
These will need to be edited to bold an item, add bullet points, etc.
After completing the instructions
Select Save
Creating Macro Text
-
From the Home Nav bar select Setup / Admin
-
Select Protocols / Profiles
-
Select Macro Text
-
The Select Text from Macro Keywords opens
-
Select the Macro Category using the magnifying glass
-
From the bottom of the window select Add
-
-
The Macro text Definition window opens
-
Enter the Keyword in the Sub-Category Keyword
-
Enter the documentation for the keyword in the Fill in Standard Text field.
-
To use EMBED codes select the Display special EMBED codes.. button
-
-
Select Save