How to Quick Load Medical Activities
If you haven't already done so, please read the Quick Load Overview before reading this topic. The quick load module is only available to sites which have licensed the employee health functionality in the software.
Steps to Quick Load Medical Activities
-
On the Home Nav Bar, click the Company button.
-
Search for and select the company for which you are entering activity.
-
On the Home Nav Bar, click the Quick Load button.
-
Enter the code for the desired medical activity (e.g. HBV) OR click the table icon and select a medical activity.
-
Enter the code for the desired Visit Category and press the TAB key OR click the table icon and select a visit category.
-
Enter the code for the desired Provider or Clinician and press the TAB key OR click the table icon and select a Provider or Clinician.
-
If appropriate, enter Special Selections.
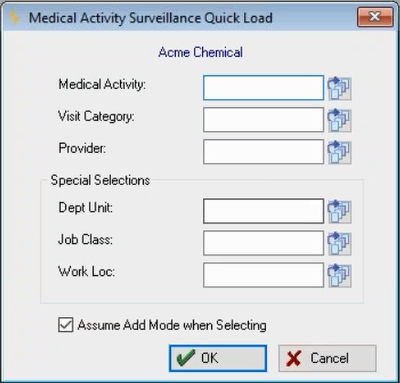
To enter data for a particular Department, Job Class or Location, do the following:
To select employees from a particular department
Click the table icon to select a department. the program will list only the employees who work in that department.
To select employees from a specific job class
Click the table icon to select a job class. the program will list only those employees who have that Job Class.
To select employees from a particular location:
Click the table icon to select a location code. The program will only list those employees who work in that Location.
The program will list only those employees who work in that Department/Job Class/Location. You can make entries in one, two or three of these fields, depending on how narrow a list of employees you want the software to display for your quick load.
If you want all the employees for the company to be listed, leave all of these fields blank.
If you did not select the company before entering Quick Load, click the Company button and do so now.

-
In the Search box at the top of the [Quick Load for (activity)] window, enter the last name of the first employee who received the medical activity and press the TAB key on your keyboard.
- Users may also click "Add", "Change", or "Delete" to access, edit, or delete a patient from the list.
-
Double click the employee's name. The [Enter Medical Activity] window will pop up.
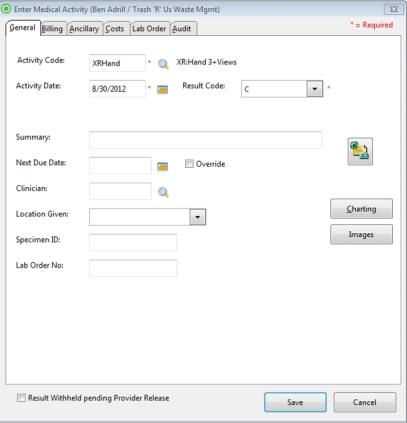
Note that whatever you enter in this window will be the same for subsequent employees, until you change it!
-
Press the TAB key once, and enter the appropriate result code (e.g. "1" for first dose, etc.), ORclick the down arrow to the right of theResult Codefield and select the appropriate code from the list.
-
If the Dosage/Lot window opens, complete the information required.
-
To add or change a default DOSE information (e.g. Dosage, Lot No, etc.):
-
Click the DOSE tab.
-
Make any required changes.
-
-
Complete the rest of medical activity record, if needed.
- To add a Document Image, click the Image button on the Enter Medical Activity window. This button is is included for EMR clients, but must be licensed for non-EMR clients. Selecting the Image button will immediately open the Add New Document Images and display the Medical Activity Images window in the background in case it is needed.
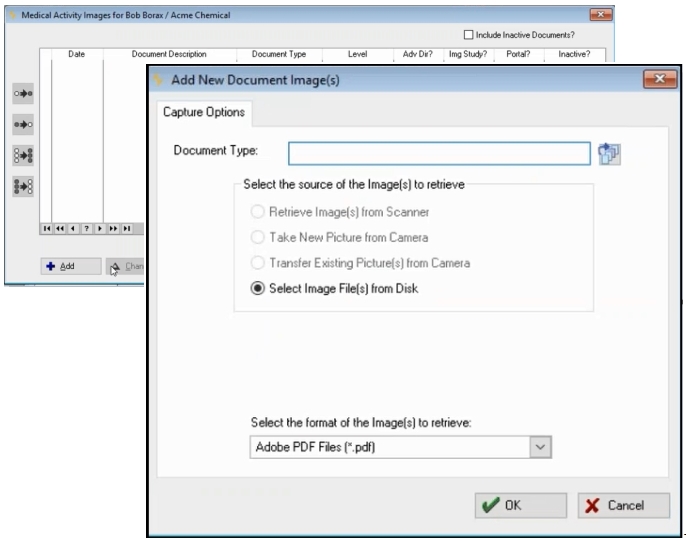
Select the Document Type with the table Icon to the right, select the Source and the Format, click OK.
The image source folder will display. To select an image, either highlight it an press "Open" or double click the image. The document image will be attached to the current patient's quick load medical activity. The process may be repeated for multiple document images as needed. -
Click OK to close the first employee's record.
-
Search for and double click the next employee who received the activity.
-
Read the screen to verify the information entered is correct for this employee, and change if it is not.
Note that whatever you enter in this window will be the same for subsequent employees, until you change it again.
-
Click OK to close the [Enter Medical Activity] window.
-
Repeat steps 16 through 20 until the results for all employees have been added.
-
To enter results for multiple companies, click the Company button and select the next company. Then, repeat steps 10-21 for that company.
-
Click Close to close the window.