Site Administration
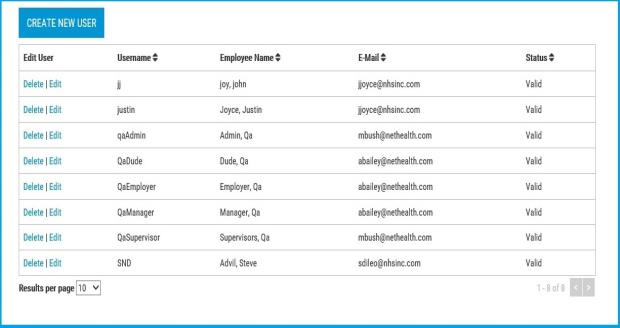
Users may display up to 100 accounts per page.
Create New User
Click the Create New User Button
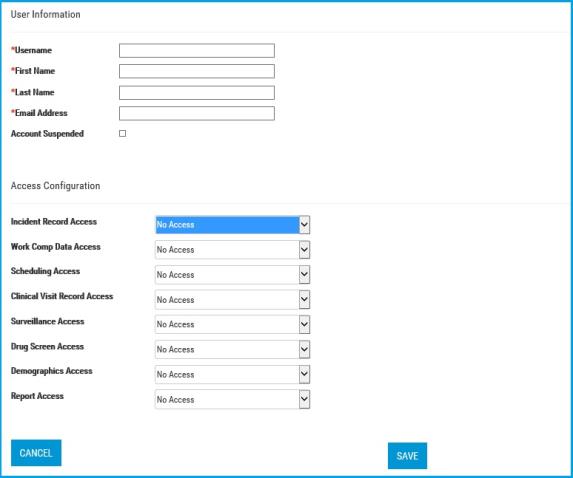
User Information
Administrators may enter the new user's information.
Username: This is the log in name . It can be 50 characters long.
First Name: This may be 50 characters long.
Last Name: This may be 50 characters long.
Email Address: This must be a valid address. This is the Email address the system will use to correspond with this account for invitations, password resets, etc.
Account Suspended: this user account is suspended when this checkbox is checked. The default is unchecked. When a user is locked out of an account, the Administrator may uncheck this box to restore the user's access to the portal.
Access Configuration
The Administrator will use this section to establish the new user's access privileges across the portal. only one access level may be selected for each category below.
Incident Record Access: May select No Access; Read Only; Change Only; Add/Change/Delete.
- No Access - The Incident tab will be hidden entirely.
- Read Only- Users can view the listing of summary incident records and the details of individual incidents.
Add/Change/Delete - Users will have Read Only permissions, plus the ability to add a new incident.
Work Comp Data Access: May select No Access; Read Only. (If the user has no access to the Incident tab, then they have no access to the Work Comp Data Access.)
No Access - The OSHA log; Charges; Lost Time; Referrals: Restrictions tabs will be entirely hidden.
Read Only - User can view the OSHA log; Charges; Lost Time; Referrals: Restrictions tabs. However, incident record access supersedes this security flag, so users would need to have at least Read Only access to Incidents to view this information.
Scheduling Access (Request a Visit): May select No Access; Read Only; Change Only; Add/Change/Delete.
- No Access- Users will not see the Upcoming Appointments section including Request a Visit.
Read Only- Users will see a summary of upcoming appointments and be able to view the details of those appointments.
Change Only- Users will have Read Only permissions, plus be able to edit pending appointments.
Add/Change/Delete- Users will have Change Only permissions, plus be able to delete pending requests and request new appointments.
Clinical Visit Record Access: May select No Access; Read Only.
No Access - Users will not be able to see the Visit History section and will also not be able to see visits in Employee Record.
Read Only - Users will be able to view past visit records and any information or reports contained within them.
Surveillance Access: May select No Access; Read Only.
- No Access - The Results tab will be removed from the employee record for all employees this user is viewing.
- Read Only - Users will have access to view the Results tab within the employee record. The Drug Test Access configuration for this user may reduce what is displayed in the Results tab.
Drug Screen Access: May select No Access; Read Only.
- No Access - The portal Drug Screen section will not display in the Results tab of the employee record.
- Read Only - Users will be able to view Drug Screen information within the Results tab.
Demographics Access: May select No Access; Read Only.
- No Access - Users will not be able to view what is contained within the Employee Information tab. While other access to the portal may be available, users with this access level are not able to view employee information.
- Read Only - Users will be able to view all content contained within the Employee Information tab. Users will be granted full access to the summary listing of employees and all of the information contained in an employee record.
Report Access: May select No Access; Read Only.
- No Access - Users with No Access will have the entire portal Reporting tab removed.
- Read Only - Users have the ability to access all reports contained in the Reporting tab.
Press Cancel to undo your changes and start over. Press Save to create the new user account.
At this point the system will return a message of "User has been added/changed successfully". For information on how to complete the Enrollment Process, click here.
Edit an existing User Account
Click Edit next to the account you wish to update. The following window will display:
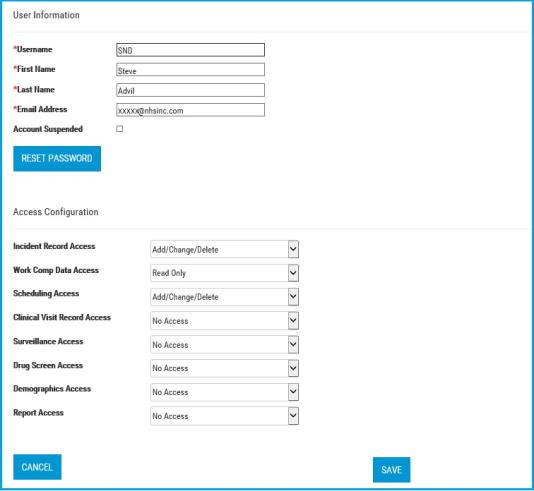
User Information
When editing an existing user, the screen is pre-populated with the existing account information Administrators may alter the existing users information as needed.
Account Suspended: this user account is suspended when this checkbox is checked. The default is unchecked. When a user is locked out of an account, the Administrator may uncheck this box to restore the user's access to the portal.
Password Reset
If an Administrator wishes to reset this user's Password, they may click the Password Reset button. Before this process continues the system will display a warning about how this action will generate an Email to the user.

Click Yes and the system will Email the user his or her Usename and a temporary Password. The next time the user logs in, they will be presented with the following:
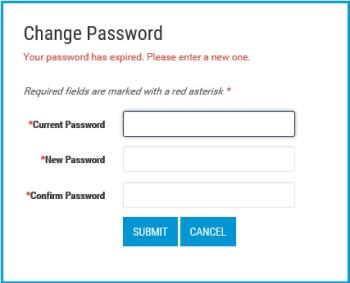
In order to login, the user will need to create a new password. For password rules please go to the Change Password.
Access Configuration
Access selections are the same as listed above.
Press Cancel to undo your changes and start over. Press Save to create the new user account.
Delete an existing User Account
Click Delete next to the account you wish to remove. You will be presented with the following window:
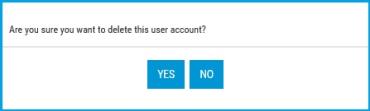
Click Yes to remove the account.