Fax & Email Setup
Summary
Before setting up to fax or email from within the software, we recommend you review Technical Specifications to learn more about the available options.
Microsoft Fax has been incorporated into Net Health Employee Health and Occupational Medicine for the Auto-Faxing function. This makes automated faxing free of charge to clients who operate on the Windows Server 2003 operating system. Microsoft Fax can be installed relatively easily and for no extra software expense.
Prior to using the fax or e-mail functions in the software, the following tasks must be completed:
-
To use email, each user must have an email account already established in your organization's email system or with your organization's Internet Service Provider (ISP), ORa single email account (such as OHNurse@myhospital.org) that multiple people use must be operative.
-
You must have the following folders set up somewhere on your network, in order to store temporary files:
-
-
A folder to hold Fax Temporary Files
-
A folder to hold Email Temporary Files
-
A folder to hold PDF Report Files
-
The System Parameters tell the software where documents (such as faxes in a fax queue) are stored, email account information, server information, etc. In this topic, when a parameter record is referred to, it means one record that includes all the settings for a location and/or user.
In the simplest case, such as when the clinic has a single email address, (e.g. OHNurse@myhospital.org), a single Corporate Default parameter for all users will suffice.
The Program allows you to set up as many parameters records as you need. For example, if you have more than one clinic locations, and the users from each location will be using a separate email service or email account for each location, such as StateStClinic@myhospital.org, then one parameter record can be set up for each department (Clinic).
Similarly, if each user will be using his/her own individual email account, such as mjones@myhospital.org, one parameter record should be set up for each user.
If you have multiple locations and multiple users within each one, you may need to set up additional parameters for each clinic and/or user combination. However, if each user will always and only have his or her own individual email account, you do not need to set up parameter records for specific locations (Net Health Employee Health and Occupational Medicine Clinics), unless each clinic has its own separate email facility or ISP. In this case, one person would have a different email address for each location, assuming the person works at both locations. For example, mjones@hospitalA.org and mjones@hospitalB.org.
At least one parameter record must be defined to enable the faxing and/or emailing functionality within the software if you plan to use them!
The first parameter record set up will automatically become the "Corporate Default" record. This means it is the information that the program will use in the absence of any other information about a particular clinic or user. If you have a small office with only one user, this Corporate Default is all you need.
|
|
Only someone with System Administrator The person who establishes entity codes, such as divisions and departments for employers, and system administration parameters. rights can set up this information! |
How to Access email and fax System Parameters
-
From the Home Nav Bar, click the ADMINISTRATION Tab
-
Click the System Parameters button.
-
On the lower left side of the [Enter System Parameters] window, click the Fax/E-Mail button. The [Fax and E-Mail Parameters] screen opens. If this is the first time adding parameters, the screen will be blank. Otherwise, you will see a list of parameter records that have been set up previously.
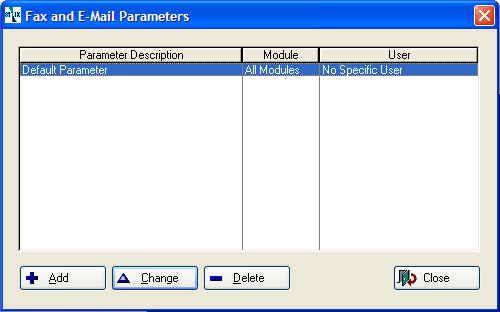
How to add a parameter record for a department (Clinic) and/or User:
![]() If no parameters have been defined previously, when you click Add, you will be creating the Corporate Default parameter. By design, the Corporate Default is always the first parameter record that is set up.
If no parameters have been defined previously, when you click Add, you will be creating the Corporate Default parameter. By design, the Corporate Default is always the first parameter record that is set up.
-
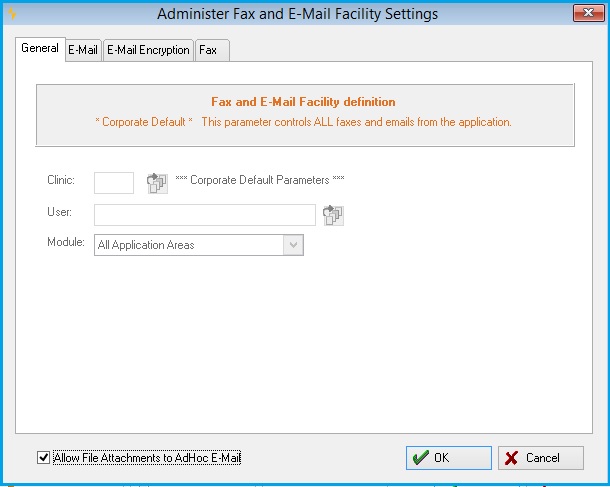
Fromthe[Fax and E-Mail Parameters] screen, click theAddbutton. The following screen appears:
-
Complete the GENERAL tab:
-
Clinic field:
-
-
When defining the Corporate Default parameter leave this field blank.
-
Email/Faxing for a single location or for multiple clinics that share the same email facilities: leave this field blank. This will create a Corporate Default parameter and will be used at all clinic locations. At least one parameter is required with this option. The default parameter will be used for any clinic or user not defined individually.
-
Email/Faxing for a single department location that has a different email facility from other department locations: Click the table icon
 and select the appropriate clinic from the clinic table. This will create a Clinic parameter that will be just for that Employee Health department location.
-
![]() If you define parameters for this department location, then additional parameter records will need to be entered for any other department locations to use the email or fax function.
If you define parameters for this department location, then additional parameter records will need to be entered for any other department locations to use the email or fax function.
-
User field:
![]() If Client Authorization is required by your email service to log onto e-mail, then individual users must be defined!
If Client Authorization is required by your email service to log onto e-mail, then individual users must be defined!
-
When defining the Corporate Default parameter leave this field blank.
-
Email/Faxing for multiple users that share the same email account: leave this field blank. This will create the parameter for all users based on the level defined in the clinic field (i.e. Corporate Default or individual clinic location).
-
Email/Faxing for individual users with different email accounts: Click the table icon
and select the appropriate user from the user table. This will create a parameter record just for that user.
![]() If you define parameters for one user, then additional parameter records will need to be entered for any other users to use the email capabilities.
If you define parameters for one user, then additional parameter records will need to be entered for any other users to use the email capabilities.
-
Module field:
-
When defining the Corporate Default parameter leave this at the default All Modules.
-
Email/Faxing for multiple users that share the same email account: leave this field All Modules.
-
Email/Faxing for individual users with different email accounts: If the user for whom you are setting up the parameter record is restricted to one module of the program click the table icon
and select the appropriate module from the drop-down list.
Emails sent through the SendEMail button on the Net Health Employee Health and Occupational Medicine Home NAV BAR are considered ad-hoc emails. Check the box to allow users to send attachments on any ad-hoc emails sent. Leave this field blank only if the user should be restricted from sending attachments on ad-hoc emails.
-
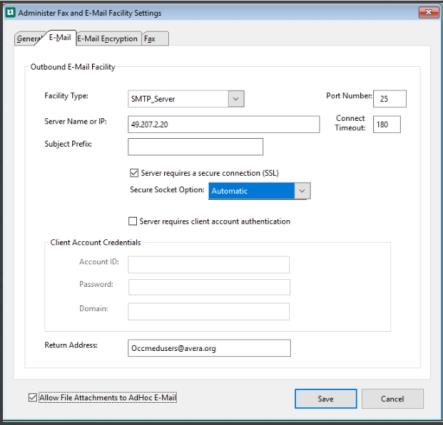
Complete the E-MAIL tab:
-
Facility Type: Click the drop down list and select the type.
-
If you are going to use the E-Mailing feature, select SMTP Server. Otherwise, leave this as None, and skip the rest of this tab.
-
Port Number: 25 is the industry standard port number reserved for SMTP. Do not change this unless you know something we don't!
-
Server Name or IP Address: Enter the SMTP server name (for example, smtp.msn.com). This must be a valid SMTP server available on your network.
-
Connect Timeout: the program will wait 60 seconds for a server connection, which should be adequate for most needs. You can change this number if desired.
-
Secure Connection: Check the box if your server uses a secure connection (SSL). Leave blank if this does not apply.
Note that the HIPAA Security Standard requires SSL or other encryption tools for security purposes, so you will most likely need to use SSL.
-
Secure Socket Options: Click the dropdown to select one of the following options:
-
None
-
Automatic
-
On Connect
-
Elevate Immediately
-
Elevate when Available
-
-
Client Authorization: Check this box if your email server requires the user to enter a logon account and password when sending emails. (Most often this is not the case. Check with your email administrator.) Leave blank if this does not apply.
-
Account ID: This field is disabled unless theClient Authenticationbox is checked. If required, enter the user name required to logon to the email server. Un-check theClient Authenticationbox if this does not apply.
-
Password: This field is disabled unless theClient Authenticationbox is checked. If required, enter thePassword(for the Account ID defined above)that is required to logon to the email server. Un-check theClient Authenticationbox if this does not apply.
-
Server Domain: This field is disabled unless theClient Authenticationbox is checked.
-
Return Address: If you want to have a centralized person accountable for receiving responses or delivery failure notifications, enter the default email return address. This can be either your personal email account or your clinic or corporate email account (e.g. "customerservice@mycompany.com"). If you do not want a centralized person in this role, leave it blank. The sending user's email address will be used.
-
Dialup Connection: (Not often used) If your organization is using a dial up connection to the Internet through the Microsoft dialup connection, check this box, and then click the drop down to select the appropriate configuration for your email servers. This drop down will show any Dialup Network Connections configured through your PC settings.
-
PhoneBook Entry: If theDialup Connectionbox is checked, click the drop down button and select the appropriate configuration to connect to your email server. The list displays any Dialup Network Connections configured through the PC Settings. Leave this field blank if this does not apply.
-
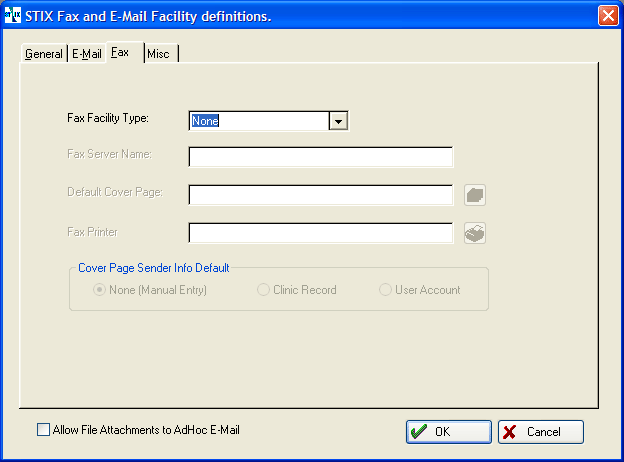
Complete the FAX tab:
-
Facility Type:
Click the drop down arrow to select the faxing type to be used within the software:
-
If this user will not be faxing, select None.
-
If MS Fax Server is available, select that.
-
If the user will be faxing through a fax "printer", such as provided by Winfax, select Fax Printer.
Once selected, the fields needed for the selected type will display on the window.
-
Fax Server Name: If using MS Fax Server, type in the name of the fax server. This must be the name of the Windows Server that is serving as the fax server (the actual computer name, not an IP address).
-
Fax Printer: This field displays only ifFax Printerwas selected in #1 above. Point to a generic or other fax device, such as MSFax or RightFax device.
-
Days to Retain: Enter the number of days to keep a sent fax on the server before it is deleted.
-
Cover Page Sender Default:If using MS Fax Server, clickNoneto require a manual entry at fax sending time,Clinicif youwant the cover page to default to the clinic information, orUser Accountif you want the cover page information to come from the individual User Account record.
-
Repeat from Step 1 above to add any other parameter records for another location and/or other users.
-
When you are finished entering all parameter records, clickCloseto return to the [Enter System Parameters] window.
-
Click Close to return to the Home Launch Pad.
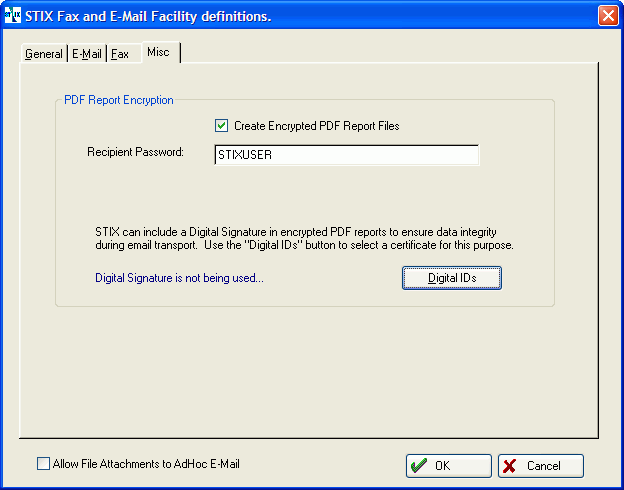
5. Complete the MISC tab
The Misc tab handles the special universal setting for PDF encryption:
-
Encrypted PDF Report Files: Check this box to have any PDF files sent through the email to be encrypted with a password. This is requirement based on the HIPAA Security Standard. Net Health Employee Health and Occupational Medicine uses the Adobe Acrobat built-in technology for encryption. It is possible to add a password specific to a single company on the 1ST REPORT tab of Company Setup.
-
Recipient Password: This is the password that will be used by a person who receives an email from you with a PDF document attached. If you are sending a PDF report to an occupational health company, and that company has its own password for Adobe PDF encryption (set up in the company table), the company level password will be used instead.
-
Digital IDs: The program allows you to sign an encrypted PDF file with a digital certificate. The certificate identifies who the file came from and confirms it has not been modified. This is one for the techies. If you don't understand it, don't try it.