How to Set Up Hardware for Scanning
Preparing to Scan in Net Health Employee Health and Occupational Medicine
Once you have completed the setup as defined in this topic, you are technically ready to start scanning and capturing images in Net Health Employee Health and Occupational Medicine and Net Health Employee Health and Occupational Medicine. However, before you start doing so, we strongly recommend that you read the companion document, "Preparing to Scan in Net Health Employee Health and Occupational Medicine". This is a planning spreadsheet with instructions that will assist you with making a smooth transition to scanning and image capture.
The spreadsheet includes a seed list of document types and instructions, so that you can understand what is meant by a document type, and so that you can plan what will be scanned, by whom, where it will be view-able in the software, etc.
You will define your document types in the spreadsheet and prepare to set them up in Net Health Employee Health and Occupational Medicine. The setup instructions are explained below, but the directions below assume that you already know the document types you want to use in the software. The spreadsheet will help you define these prior to setting them up in the software.
If you haven't already received the spreadsheet, or if you have misplaced it, it is available from Net Health Technical Support. Please refer to this spreadsheet for details about a suggested approach to planning for implementing scanning or photo capture in your organization.
To run the Scanning and Image Capture function your PC must meet the certain minimum requirements.
-
Operating system must be Windows
-
The dot Net Framework 2.0 must be installed. Please ask your network administrator to complete this task, as Net Health cannot assist with this task. The dot Net Framework is a free program, downloadable from Microsoft's website.
-
Scanner(s) and/or camera(s) must be Windows Image Acquisition (WIA) compatible.
Hardware Setup
Scanner Setup
Follow the manufacturer's instructions for installing your scanning device. We recommend you visit the manufacturer's website and obtain the latest version of the drivers that are available.
Please note; you only need to install the basic driver package for your scanner. Any other software that may be included with your scanner is not needed in order for the software to communicate with your scanner. If you plan to use the scanner only to scan into this program, we recommend you not install any other software that may have come with the scanner.
Once the device has been installed run a test scan via the "Scanner and Camera Wizard" that is included with Windows. Refer to the Scanner and Camera Wizard Testing Procedures section below for instructions. Running this wizard will help avoid any issues when scanning from Net Health Employee Health and Occupational Medicine. Once a scanning and/or imaging device is functioning from the Scanner and Camera Wizard, it is ready to be controlled by the Scanning and Image Capture function.
Camera Setup
Typically cameras do not have or require device drivers: Windows contains default drivers that will work with the camera, if it is WIA compatible..
Most cameras on the market today support what is known as PTP, or Picture Transfer Protocol. They also include a USB Mass Storage function to allow your camera to be viewed as another hard drive when the camera is connected to the computer, so you can transfer images from the camera to the computer using WindowsExplorer.
PTP will allow your camera to be controlled via Windows Image Acquisition (WIA), whereas the USB Mass Storage function will only mount your camera’s memory card as a new drive letter under My Computer. The PTP function in your digital camera may also mount the memory card similar to the USB Mass Storage feature; providing dual functionality.
It is possible to use the program to control your camera directly, but this requires your camera settings to be adjusted to PTP instead of USB Mass Storage. Please refer to your camera's owners manual for instructions on how to do this. Net Health does not and cannot know how to do this for every camera on the market, so please do this yourself instead of calling for support!
Most cameras ship with the USB Mass Storage enabled by default, so if you want to have Net Health Employee Health and Occupational Medicine control the camera (i.e. click a button in Net Health Employee Health and Occupational Medicine to make the camera take the picture), you will have to change the setting.
If your camera does not support PTP, or you cannot figure out how to change the setting, you may still use the software to obtain images from your camera. You will first take the picture as you would ordinarily using the camera, then transfer the image to the software using the "File Import Option" which is discussed later in this document. We have done this and it is not awful, it just involves one more step.
Scanner and Camera Wizard Testing Procedures
WindowsImage Acquisition (WIA) is a driver model and application programming interface (API) for modern Microsoft Windows operating systems. It enables application software (Net Health Employee Health and Occupational Medicine) to communicate with imaging hardware such as scanners, digital cameras and digital video-equipment. It was first introduced in 2000, and continues to be the standard imaging device and API model through successive Windows versions. It is implemented as an on-demand service in Windows and later Windows operating systems. The Scanner and Camera Wizard was designed to make it easy for users to scan images or transfer images from a camera to their computer. If your scanner and camera works with this wizard, they will also work seamlessly within the software.
Click the Start button in Windows and navigate to the ACCESSORIES sub-menu, usually at the top of the All Programs list. This location is typically where you will find the Scanner and Camera Wizard. Click the wizard to start it. If your scanner is properly installed, you will be provided with one of two following windows.
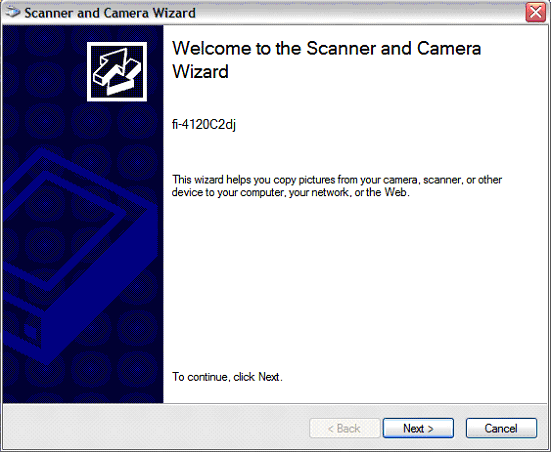
If you only have one imaging device installed, you will see the [Scanner and Camera Wizard] dialog as seen in the first window below. Click Next and follow the instructions to test out your device.

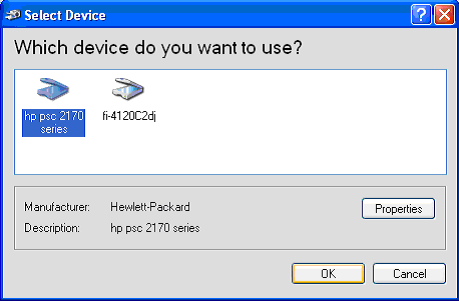
If you have installed the drivers for more than one imaging device, you will see the [Select Device] dialog box, as shown below. Select the device you want to test, click OK and then follow the wizard's instructions to perform the test.

|
|
If you do not see one of these two windows, or if you see the window, but your scanner name is not displayed, please try to re-install your scanner. Unfortunately, Net Health cannot assist you with the scanner installation since each scanner is different, and different versions of Windows may be different as well. You may find help in the user manual that came with your scanner. |
Scanning and Imaging Installation for a Terminal Services RDP Environment
The Scanning and Imaging client module for Terminal Services RDP Clients is provided in the form of a Terminal Services RDP Client Add-In. The msi file, if you choose to allow it, will handle everything that is needed to implement this add-in on a single Terminal Server Client.
Steps for Server Installation:
-
Run the Setup Net Health Employee Health and Occupational Medicine Interop.msi, choosing all defaults except when prompted for the installation directory. NOTE: The installation directory MUST be the same directory where the Net Health Employee Health and Occupational Medicine program files are installed.
Steps for Client Installation:
-
Run the Setup Net Health Employee Health and Occupational Medicine Terminal Services Client.msi, choosing defaults. NOTE: The installation directory MUST be the same as the mstsc.exe file, which is the Terminal Services RDP Client Program. Typically this path is: "C:Windows\System32\".
-
During the commit phase of the installation, an additional program will run in order to create the necessary registry key, which instructs the RDP Client to load the add-in. It will prompt you to confirm that you wish the installer to complete this task. If you select "No", you will have to manually create the registry key in order for the driver to load.
Steps for Manual Installation (If you selected "NO" in the step above):
-
Create the following Registry Key: {HKEY_CURRENT_USER\Software\Microsoft\Terminal Server Client\Default\Addins\Net Health Employee Health and Occupational Medicine.TerminalServices] "Name"="C:\\WINDOWS\\System32\\Net Health Employee Health and Occupational Medicine.TerminalServices.dll"
-
Files copies to the directory include:
StixVCSetupStub.exe
stixvd.dll
stixbridge.dll
Net Health Employee Health and Occupational Medicine.terminalservices.dll
Net Health Employee Health and Occupational Medicine.imaging.dll
interop.wia.dll
wiaaut.dll
Scanning and Imaging Installation for a Citrix ICA Environment
The Scanning and Imaging client module for Citrix ICA Clients is provided in the form of a Citrix Virtual Driver. The msi, if you choose to allow it, will handle everything that is needed to implement this driver on a single ICA Client.
Steps for Server Installation:
-
Run the Setup Net Health Employee Health and Occupational Medicine Interop.msi, choosing all defaults except when prompted for the installation directory. NOTE: The installation directory MUST by the same directory where the Net Health Employee Health and Occupational Medicine program files are installed.
Steps for Client Installation:
-
Run the Setup Net Health Employee Health and Occupational Medicine Citrix Client.msi, choosing defaults. NOTE: The installation directory MUST by the same as the wfcrun32.exe file, which is the CIA Client Program. Typically this path is: "C:\Program Files\Citrix\ICA Client\".
-
During the commit phase of the installation, an additional program will run in order to modify the module.ini file located in the Citrix ICA Client directory. It will prompt you to confirm that you wish the installer to complete this task. If you select "No", you will have to manually edit the module.ini file in order for the driver to load.
Steps for Manual Installation (If you selected "NO" in the step above):
Changes to the Module.ini file include:
-
In the [ICA 3.0] section, the "VirtualDriver=" entry gets the value ",stixvd " added at the very end.
-
In the [VirtualDriver] Section, an additional entry of "stixvd =" is added.
-
In the very end of the .ini file, an entire new section is added for the stixvd driver: [stixvd]
Drivername = stixvd.dll
DriverNameWin16 = stixvd.dll
DriverNameWin32 = stixvd.dll
The files copied to the directory include:
StixVCSetupStub.exe
stixvd.dll
stixbridge.dll
Net Health Employee Health and Occupational Medicine.terminalservices.dll
Net Health Employee Health and Occupational Medicine.imaging.dll
interop.wia.dll
wiaaut.dll
Once you have completed the hardware setup as described here, you must set up for scanning in Net Health Employee Health and Occupational Medicine.