Scheduling by Date Report
If you haven't already done so, please read the Reports Overview. The Overview includes all the standard report options and how to use them. Those instructions and terms will not be repeated here.
Summary
This report provides an easy way to print out a daily schedule of appointments, and to report the status of appointments (Completed, Canceled, No Show, etc.). The report can also provide summary data regarding the number of appointments scheduled by practitioner, by visit category, or by practitioner type.
How to Run this report:
Patient_Scheduling_By_Date_Report
You have three options for running this report:
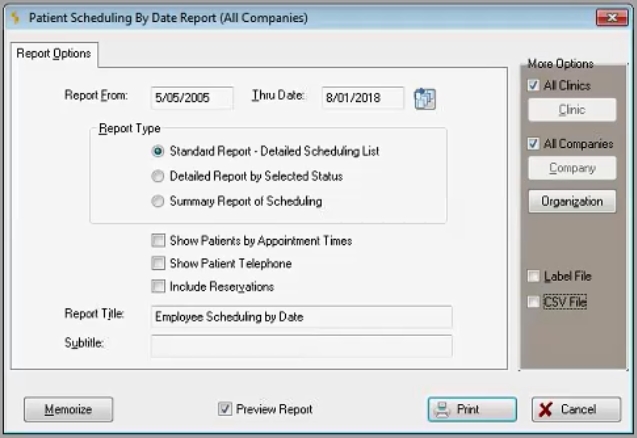
OPTION 1: Standard Report of Detailed Scheduling
-
Enter the From and Thru dates for the desired reporting period, or click the table icon
 and select a standard date or range from the list.
 -
Select Standard Report, and check the box to Sort Employees by Appointment Times, if desired. Otherwise, the report will be sorted alphabetically by last name.
-
Select any of the standard report options, if needed (Company, Sub-Group, etc.).
-
Click Print to run the report.
More Options
-
All Clinics checkbox: If checked, the program will report across all clinics.
-
Clinic button: This button is only available when theAll Clinicscheckbox is unchecked. It allows you to select a single clinic for the a report. The clinic selected shows in the title bar of the report dialog.
-
All Companies checkbox: If checked, the program will report across all companies.
-
Company button: This button is only available when the All Companies checkbox is unchecked. It allows you to select a single company (hospital, campus, location) for the a report. The company selected shows in the title bar of the report dialog.
-
Organization button: This presents a window which repeats the choices above, plus two other options.
-
-
The Select Company Option drop-down box includes, in addition to Current Company and All Companies, the choice of Select List of Companies. When this is chosen, a SELECT COMPANY tab will be added to the report dialog. There will be two panes. The one on the left will list all companies in the system. The one on the right will list companies you have selected for this report. Find companies by using the Search field or the VCR buttons. Select by double-clicking the company, or by highlighting the company and clicking the right arrow between the panes. Unselect by double-clicking the company in the right pane, or by highlighting and clicking the left arrow between the panes.
-
Four filter fields, only available when selecting for all companies, allow you to limit the report based on State, Region, District, and Complex.
-
-
-
Label File checkbox: If checked, the program will create labels.
-
CSV File checkbox: If checked, the program will create a CSV file. Upon selecting the CSV check box, the Net Health Employee Health and Occupational Medicine Exported Data File window will display:
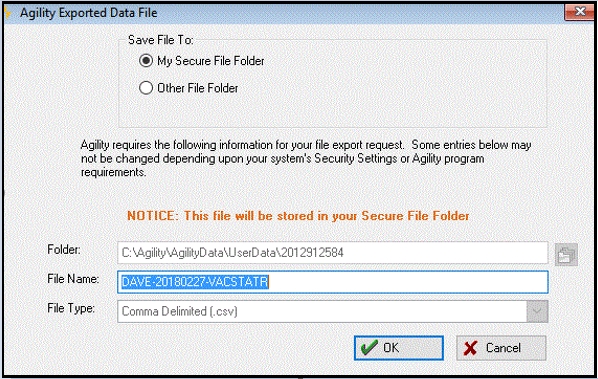
Select where to save the file.
Enter the Folder. File Name, and File Type and then click OK.
The file will be created with the following fields:
- Patient Last Name
- Patient Middle Name
- Patient First Name
- Date
- Time of Appointment
- Patient's telephone number
- Company (if private practice the company will appear as "private practice")
- ID Number
- Purpose
- Clinic
- Provider
- Clinician
- Billing Physician
- Referred By
- Appointment Status
- Scheduling Minutes Required
- Cancel Reason
- Incident number
- Protocol
- Series
When the Report Type is "Summary Report of Scheduling" and "Detailed Report by Selected Status", the CSV File option will be unavailable.
OPTION 2: Detailed Report by Selected (Appointment) Status
-
Enter the From and Thru dates for the desired reporting period, or click the table icon
and select a standard date or range from the list. -
Select Detailed Report by Selected Status.
-
Click the SPECIAL STATUS OPTIONS tab to select specific criteria on which to report. (This tab will appear when Detailed Report by Selected Status is selected in Step 1.)
-
On the SPECIAL STATUS OPTIONS tab, click the Select Status down arrow to see and select the desired status options.
-
Select the Sequence by which you want the appointments displayed (Date, Visit Category, Job Class, Department).
-
Check the box to sort and total by company, if desired.
-
Select any of the standard report options, if needed (Company, Sub-Group, etc.).
-
Click Print to run the report.
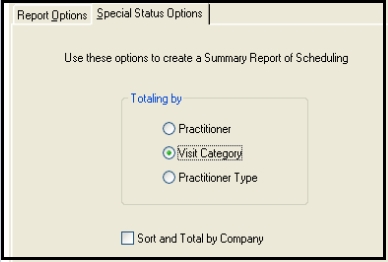
OPTION 3: Summary Report of Scheduling
-
Enter the From and Thru dates for the desired reporting period, or click the table icon
and select a standard date or range from the list. -
Click Summary Report of Scheduling.
-
Click the SPECIAL STATUS OPTIONS tab to select the variable by which to total the report: (Specific) Practitioner, Visit Category, or Practitioner Type.
-
Check the box to sort and total by company, if desired.
-
Select any of the standard report options, if needed (Company, Sub-Group, etc.).
-
Click Print to run the report.